Info
If you don't know the name of your interface, you can find it using the following command:
First, open your interface configuration file in a text editor of your choice, using the following command:
$ sudo vi /etc/network/interfaces
Edit the interfaces file to make it appear as follows:
# This file describes the network interfaces available on your system
# and how to activate them. For more information, see interfaces(5).

source /etc/network/interfaces.d/*

# The loopback network interface
auto lo
iface lo inet loopback

# The primary network interface
auto ens192
iface ens192 inet static
address 192.0.2.1
netmask 255.255.255.255
gateway 203.0.113.254
dns-nameservers 208.67.222.222 208.67.220.220
In this file, replace the following pieces of information as instructed:
-
address: Replace 192.0.2.1 with the Additional IP from the first step of this guide.
-
gateway: Replace 203.0.113.254 with your Dedicated Server's gateway.
Info
You need the first three octets of your Dedicated Server's IP address with a final octet of "254". For example, if your Dedicated Server's IP was 1.2.3.4, you would use 1.2.3.254 as your gateway.
-
dns-nameservers: The DNS name servers listed are from OpenDNS; feel free to use other name servers if you choose.
Now you will need to bring your NIC online. To do so, enter the following command:
$ sudo ip link set ens192 up
Finally, restart your networking service using the following command:
$ sudo systemctl restart networking
Ubuntu (22.04 and later) and Debian (12 and later) both use Netplan for network configuration.
To configure the network interface, open the network configuration file /etc/netplan/ in a text editor of your choice. The exact file name may vary depending on your image — in this example, it's called 50-cloud-init.yaml.
$ sudo vi /etc/netplan/50-cloud-init.yaml
Edit the file to make it appear as follows:
# This file describes the network interfaces available on your system
# For more information, see netplan(5).

network:
  version: 2
  renderer: networkd
  ethernets:
    ens160:
      dhcp4: no
      dhcp6: no
      addresses: [192.0.2.1/32]
      gateway4: 203.0.113.254
      nameservers:
        addresses: [208.67.222.222,208.67.220.220]
      routes:
      - to: 203.0.113.254/32
        via: 0.0.0.0
        scope: link
In this file, replace the following pieces of information as instructed:
-
ethernets: Replace ens160 with the name of your interface. If you don't know the name of your interface, you can find it using the following command:
-
addresses: Replace 192.0.2.1/32 with the Additional IP (in CIDR notation) from the first step of this guide.
-
gateway4: Replace 203.0.113.254 with your Dedicated Server's gateway.
Info
You need the first three octets of your Dedicated Server's IP address with a final octet of "254". For instance, if your Dedicated Server IP was 1.2.3.4, you would use 1.2.3.254 as your gateway.
-
nameservers: The DNS name server addresses listed are from OpenDNS; feel free to use other name servers if you choose.
Warning
NOTE: The additional IP is configured with a host-only (/32) netmask, and the gateway sits outside that subnet — this is expected for OVHcloud Additional IPs. The routes: section above tells Netplan to treat the gateway as directly reachable. Omitting it — relying on gateway4 alone — can leave the interface unable to reach the gateway.
Now apply the Netplan settings with the following command:
First, navigate to the network-scripts directory using the following command:
$ cd /etc/sysconfig/network-scripts
Use the ls command to view the directory contents.
Locate your interface file (e.g., ifcfg-ensXXX) and then open it in a text editor of your choice using the following command:
Warning
NOTE: In our example the interface file is ifcfg-ens192.
Edit the interfaces file to make it appear as follows:
TYPE=Ethernet
PROXY_METHOD=none
BROWSER_ONLY=no
BOOTPROTO=none
DEFROUTE=yes
IPV4_FAILURE_FATAL=no
IPV6INIT=yes
IPV6_AUTOCONF=yes
IPV6_DEFROUTE=yes
IPV6_FAILURE_FATAL=no
IPV6_ADDR_GEN_MODE=stable-privacy
NAME=ens192
UUID=*DO NOT edit this field!*
DEVICE=ens192
ONBOOT=yes
IPADDR=192.0.2.1
NETMASK=255.255.255.255
DNS1=208.67.222.222
DNS2=208.67.220.220
In this file, check or replace the following pieces of information as instructed:
-
ONBOOT= Verify that is says yes.
-
BOOTPROTO= Verify that is says none.
-
IPADDR= Replace 192.0.2.1 with the Additional IP from the first step of this guide.
-
GATEWAY= Replace 203.0.113.254 with your Dedicated Server's gateway.
Info
You need the first three octets of your Dedicated Server's IP address with a final octet of "254". For instance, if your Dedicated Server IP was 1.2.3.4, you would use 1.2.3.254 as your gateway.
-
DNS1= and DNS2= The DNS name servers listed are from OpenDNS; Feel free to use whichever name servers you prefer.
Next, since the Additional IP uses a host-only (/32) netmask and the gateway sits outside that subnet, create a companion route file, route-ens192, in the /etc/sysconfig/network-scripts/ directory to make the gateway reachable:
$ sudo vi /etc/sysconfig/network-scripts/route-ens192
203.0.113.254 dev ens192
default via 203.0.113.254 dev ens192
Replace 203.0.113.254 with your Dedicated Server's gateway.
Info
You need the first three octets of your Dedicated Server's IP address with a final octet of "254". For instance, if your Dedicated Server IP was 1.2.3.4, you would use 1.2.3.254 as your gateway.
Next, enable the NIC by restarting the network service:
$ sudo systemctl restart NetworkManager
In this step, we will be configuring our interface settings. To do this, navigate to the Server Manager. From the left-hand column, click the Local Server option.
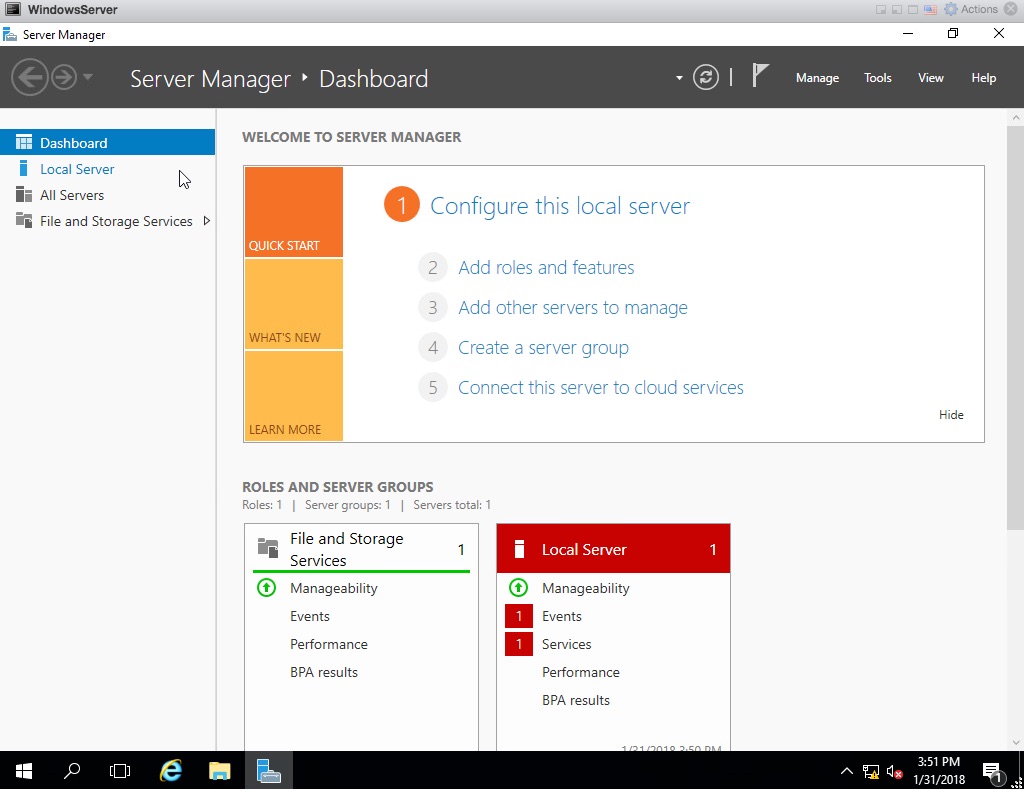
By default, the Ethernet0 field will read: IPv4 address assigned by DHCP, IPv6 enabled. This is exactly what we want to change, so click on this text.
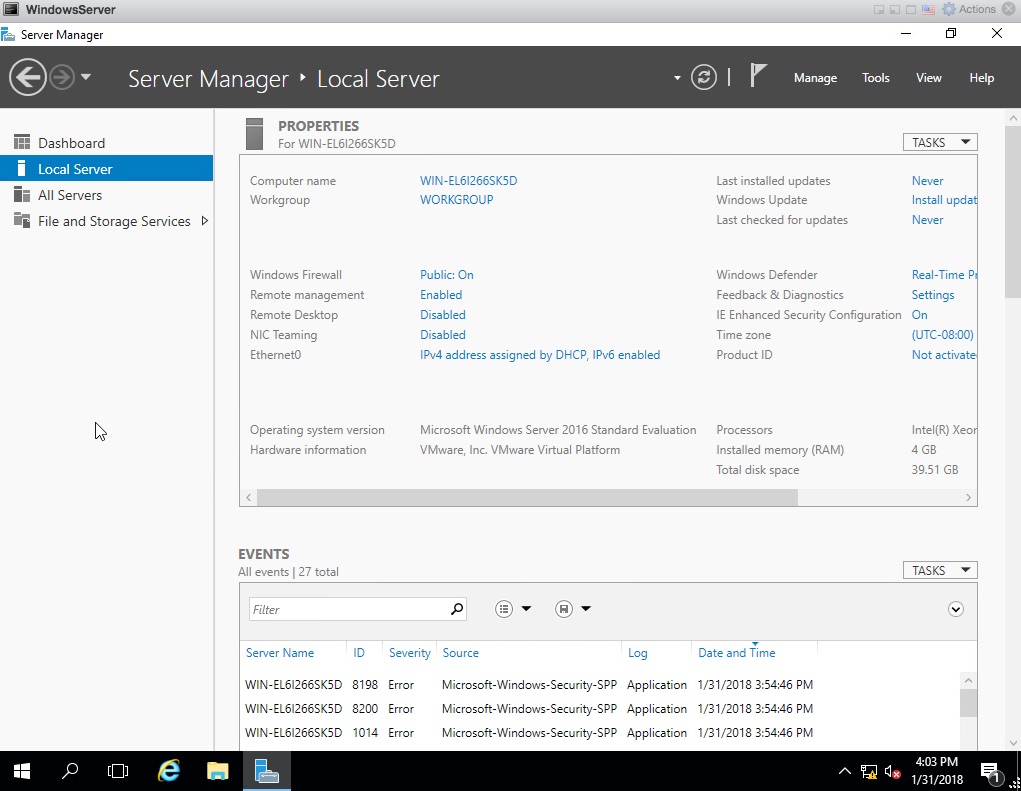
Next, right-click on Ethernet0 and select the Properties option from the drop-down menu. From the ensuing menu, double-click the Internet Protocol Version 4 (TCP/IPv4) option.
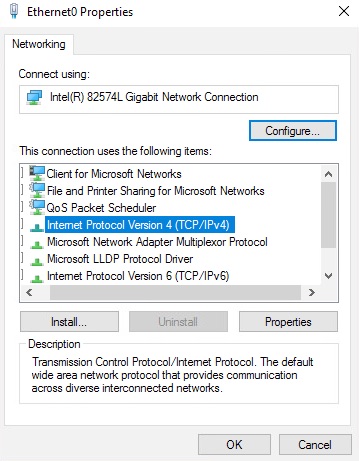
This will allow you to configure your interface to use the IP address, gateway, and DNS name servers of your choice. Configure it as follows:
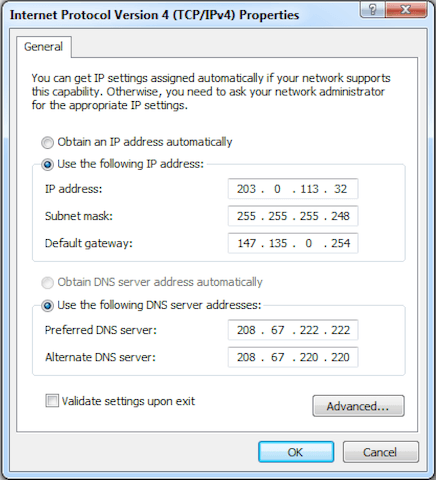
Enter the following information in the dialog box, as shown in the picture:
- IP address: Replace
203.0.113.32 with the Additional IP from the first step of this guide.
- Subnet mask: Replace
255.255.255.248 with the correct netmask depending on the size of the block of IPs you have purchased. For example, if you are using a /28 block, put "240" in the last octet.
- Default gateway: Replace
147.135.0.254 with the first three octets of your Dedicated Server's IP address with a final octet of "254".
- DNS server addresses: The DNS nameservers listed are from OpenDNS; feel free to use other name servers here, if you choose.
Click OK after making these changes.