
Finalize a maintenance intervention on your dedicated server
Our maintenance interventions are limited to the hardware aspect of your server. Following a maintenance intervention, actions may be required on your server's software.
Requirements
- A dedicated server in your OVHcloud account
Instructions
Find out how to identify the names of your network interfaces in this subpart of this guide.
Continue reading this guide by clicking on the link for your installation:
-
- Ubuntu/Debian 12+
- CentOS/Alma Linux
- SmartOS
- FreeBSD
- Gentoo
-
- Proxmox/Debian (excluding Debian 12+)
- XenServer
- ESXi
- Windows (Hyper-V)
If you experience an operating system boot problem that appears to be related to its EFI boot partition, go directly to this section.
Operating System
Click each tab for your operating system.
If you are experiencing network connectivity issues (for example, no ping after a motherboard replacement), perform the following steps:
1. Reboot the server in rescue mode.
2. Mount the partition /:
root@rescue:~# mount /dev/my_system_disk /mntIf the 70-persistent-net.rules file does not exist (refer to the section of this guide on the names of your network interfaces), check the following files in the /etc/systemd/network/ tree:
50-default.network50-public-interface.link
root@rescue:~# cat /mnt/etc/systemd/network/50-default.network
# This file sets the IP configuration of the primary (public) network device.
# You can also see this as "OSI Layer 3" config.
# It was created by the OVH installer, please be careful with modifications.
# Documentation: man systemd.network or https://www.freedesktop.org/software/systemd/man/systemd.network.html

[Match]
MACAddress=xx:xx:xx:xx:xx:xx

[Network]
Description=network interface on public network, with default route
DHCP=no
Address=1.2.3.4/24
Gateway=1.2.3.254
IPv6AcceptRA=no
NTP=ntp.ovh.us
DNS=127.0.0.1
DNS=213.186.33.99
DNS=2001:41d0:3:163::1
Gateway=2001:41d0:0203:4bff:ff:ff:ff:ff

[Address]
Address=2001:41d0:0203:1234::/64

[Route]
Destination=2001:41d0:0203:4bff:ff:ff:ff:ff:ff
Scope=link
root@rescue:~#
root@rescue:~# cat /mnt/etc/systemd/network/50-public-interface.link
# This file configures the relation between network device and device name.
# You can also see this as "OSI Layer 2" config.
# It was created by the OVH installer, please be careful with modifications.
# Documentation: man systemd.link or https://www.freedesktop.org/software/systemd/man/systemd.link.html

[Match]
MACAddress=xx:xx:xx:xx:xx:xx

[Link]
Description=network interface on public network, with default route
MACAddressPolicy=persistent
NamePolicy=kernel database onboard slot path mac
#Name=eth2    # name under which this interface is known under OVH rescue system
#Name=eno3    # name under which this interface is probably known by systemd
root@rescue:~#
3. Save and edit the files to enter the new value for your MAC address:
root@rescue:~# cp /mnt/etc/systemd/network/50-default.network /mnt/etc/systemd/network/50-default.network.link.bak-`date +%s`
root@rescue:~# cp /mnt/etc/systemd/network/50-public-interface.link /mnt/etc/systemd/network/50-public-interface.link.bak-`date +%s`
root@rescue:~# nano /mnt/etc/systemd/network/50-default.network
root@rescue:~# cat /mnt/etc/systemd/network/50-default.network | grep MACAddress
MACAddress=xx:xx:xx:xx:xx:xx
root@rescue:~#
root@rescue:~# nano /mnt/etc/systemd/network/50-public-interface.link
root@rescue:~#
root@rescue:~# cat /mnt/etc/systemd/network/50-public-interface.link | grep MACAddress
MACAddress=xx:xx:xx:xx:xx:xx
root@rescue:~#
4. Unmount the partition / before rebooting the server.
Special cases
In some cases, it is necessary to propagate the new MAC address to the following files:
/mnt/etc/netplan/01-netcfg.yaml/mnt/etc/netplan/50-cloud-init.yaml/mnt/etc/systemd/network/10-eno1.link/mnt/etc/systemd/network/10-eno1.network
If you are experiencing network connectivity issues (for example, no ping after a motherboard replacement), perform the following steps:
1. Reboot the server in rescue mode.
2. Mount the partition /:
root@rescue:~# mount /dev/my_system_disk /mnt3. Check the configuration file /mnt/etc/sysconfig/network-scripts/ifcfg-eth0. 4. Back up the files and edit them to correct the MAC address:
root@rescue:~# cp /mnt/etc/sysconfig/network-scripts/ifcfg-eth0 /mnt/etc/sysconfig/network-scripts/ifcfg-eth0.`date +%s`5. Enter the new MAC address in the line HWADDR=xx:xx:xx:xx:xx:xx. 6. Please remember to unmount the partition / before rebooting the server.
If you are experiencing network connectivity issues (for example, no ping after a motherboard replacement), perform the following steps:
1. Reboot the server in rescue mode.
modprobe zfs
root@rescue:~# zpool import -f zones (zpool import to list the pools)
root@rescue:~# zfs set mountpoint=/mnt zones/usbkey
root@rescue:~# zfs mount zones/usbkey
root@rescue:~# cp /mnt/config {,.bak-$(date +"%Y-%m-%d-%H_%M")}
2. Enter the new MAC address in the admin_nic line:
root@rescue:~# vim /mnt/config3. Do not forget to unmount the partitions before rebooting the server in netboot mode:
root@rescue:~# zfs umount -a
root@rescue:~# zfs set mountpoint=`/usbkey` zones/usbkey
If you are experiencing network connectivity issues (for example, no ping after a motherboard replacement), perform the following steps:
1. Reboot the server in rescue-bsd mode.
2. Run the ifconfig command from the rescue-bsd prompt.
This way, you can identify the name of your network interface:
root@rescue-bsd:~ # ifconfig
igb0: flags=8843<UP,BROADCAST,RUNNING,SIMPLEX,MULTICAST> metric 0 mtu 1500
options=403bb<RXCSUM,TXCSUM,VLAN_MTU,VLAN_HWTAGGING,JUMBO_MTU,VLAN_HWCSUM,TSO4,TSO6,VLAN_HWTSO>
ether xx:xx:xx:xx:xx:xx
3. Run the gpart show command to locate and associate the partitions/names:
root@rescue-bsd:~ # gpart show
=> 63 3907029105 ada0 MBR (1.8T)
 63 3907029105 1 freebsd [active] (1.8T)

=> 0 3907029105 ada0s1 BSD (1.8T)
 0 40960000 1 freebsd-ufs (20G)
 40960000 3865020416 2 freebsd-ufs (1.8T)
 3905980416 1048689 4 freebsd-swap (512M)

=> 63 3907029105 diskid/DISK-PN1134P6K14W5W MBR (1.8T)
 63 3907029105 1 freebsd [active] (1.8T)

=> 0 3907029105 diskid/DISK-PN1134P6K14W5Ws1 BSD (1.8T)
 0 40960000 1 freebsd-ufs (20G)
 40960000 3865020416 2 freebsd-ufs (1.8T)
 3905980416 1048689 4 freebsd-swap (512M)
4. Mount the partition you are interested in; you can modify the interface via the file /etc/rc.conf:
root@rescue-bsd:~ # zpool import
   pool: zroot
     id: 16525429322000118320
  state: ONLINE
 status: The pool was last accessed by another system.
 action: The pool can be imported using its name or numeric identifier and
    the '-f' flag.
   see: http://illumos.org/msg/ZFS-8000-EY
 config:

    zroot       ONLINE
      ada0p4    ONLINE
root@rescue-bsd:~ #
root@rescue-bsd:~ #
root@rescue-bsd:~ # zpool import -f zroot
cannot mount '/home': failed to create mountpoint
cannot mount '/zroot': failed to create mountpoint
root@rescue-bsd:~ #

root@rescue-bsd:~ # zfs list -t all
NAME                 USED  AVAIL  REFER  MOUNTPOINT
zroot               1.01G   673G    88K  /zroot
zroot/ROOT          1.00G   673G    88K  none
zroot/ROOT/default  1.00G  18.5G  1.00G  /
zroot/home            88K   673G    88K  /home
root@rescue-bsd:~ # mkdir /tmp/rootClient
root@rescue-bsd:~ # zfs set mountpoint=/tmp/roo
mountpoint=/tmp/ not found

root@rescue-bsd:~ # zfs set mountpoint=/tmp/rootClient zroot/ROOT/default
root@rescue-bsd:~ # zfs list -t all
NAME                 USED  AVAIL  REFER  MOUNTPOINT
zroot               1.01G   673G    88K  /zroot
zroot/ROOT          1.00G   673G    88K  none
zroot/ROOT/default  1.00G  18.5G  1.00G  /tmp/rootClient
zroot/home            88K   673G    88K  /home
root@rescue-bsd:~ #

root@rescue-bsd:~ # zfs mount zroot/ROOT/default
root@rescue-bsd:~ # ls /tmp/rootClient/
.cshrc          .rnd            bin             boot.config     entropy         home            libexec         mnt             opt             rescue          sbin            tmp             var
.profile        COPYRIGHT       boot            dev             etc             lib             media           net             proc            root            sys             usr             zroot
root@rescue-bsd:~ #
5. Back up the files and edit them to correct the MAC address.
In this case, we need to modify the 3 instances of em0 by ibg0 from the associated configuration file:
root@rescue-bsd:~ # mount /dev/ada0s1 /mnt/
root@rescue-bsd:~ #
root@rescue-bsd:~ # cat /mnt/etc/rc.conf
sshd_enable="YES"
# Set dumpdev to "AUTO" to enable crash dumps, "NO" to disable
dumpdev="AUTO"
local_unbound_enable=yes
ifconfig_em0="inet xx.xxx.xxx.xxx netmask 255.255.255.0 broadcast xx.xxx.xxx.255"
defaultrouter="xx.xxx.xxx.254"

# IPv6 configuration
ipv6_enable="YES"
ipv6_network_interfaces="em0"
ifconfig_em0_ipv6="inet6 2001:xxxx:xxxx:xxx::1 prefixlen 128 accept_rtadv no_radr"
ipv6_static_routes="ovhgw"
ipv6_route_ovhgw="2001:41d0:0001:c1ff:ff:ff:ff:ff -prefixlen 128 -interface em0"
ipv6_defaultrouter="2001:41d0:0001:c1ff:ff:ff:ff:ff"
mysql_enable="YES"
root@rescue-bsd:~ #
root@rescue-bsd:~ # cp /mnt/etc/rc.conf /mnt/etc/rc.conf.`date +%s`
root@rescue-bsd:~ #
root@rescue-bsd:~ # vim /mnt/etc/rc.conf
root@rescue-bsd:~ #
root@rescue-bsd:~ # cat /mnt/etc/rc.conf
sshd_enable="YES"
# Set dumpdev to "AUTO" to enable crash dumps, "NO" to disable
dumpdev="AUTO"
local_unbound_enable=yes
ifconfig_ibg0="inet xx.xxx.xxx.xxx netmask 255.255.255.0 broadcast xx.xxx.xxx.255"
defaultrouter="xx.xxx.xxx.254"

# IPv6 configuration
ipv6_enable="YES"
ipv6_network_interfaces="em0"
ifconfig_ibg0_ipv6="inet6 2001:xxxx:xxxx:xxxx::1 prefixlen 128 accept_rtadv no_radr"
ipv6_static_routes="ovhgw"
ipv6_route_ovhgw="2001:41d0:0001:c1ff:ff:ff:ff:ff -prefixlen 128 -interface ibg0"
ipv6_defaultrouter="2001:41d0:0001:c1ff:ff:ff:ff:ff"
mysql_enable="YES"
root@rescue-bsd:~ #
6. Unmount ZFS partitions:
root@rescue-bsd:~ # zfs unmount /tmp/rootClient/
root@rescue-bsd:~ # zfs get mountpoint zroot/ROOT/default
NAME                PROPERTY    VALUE            SOURCE
zroot/ROOT/default  mountpoint  /tmp/rootClient  local
root@rescue-bsd:~ # zfs setuntpoint zroot/ROOT/default
root@rescue-bsd:~ # zfs set mountpoint=/ zroot/ROOT/default
root@rescue-bsd:~ # zfs get mountpoint zroot/ROOT/default
NAME                PROPERTY    VALUE       SOURCE
zroot/ROOT/default  mountpoint  /           local
root@rescue-bsd:~ # zfs list -t all
NAME                 USED  AVAIL  REFER  MOUNTPOINT
zroot               1.01G   673G    88K  /zroot
zroot/ROOT          1.00G   673G    88K  none
zroot/ROOT/default  1.00G  18.5G  1.00G  /
zroot/home            88K   673G    88K  /home
root@rescue-bsd:~ # zpool export zroot
root@rescue-bsd:~ # zfs list -t all
no datasets available
root@rescue-bsd:~ #
After a motherboard has been replaced, you cannot modify the new MAC addresses through the OS via rescue mode.
1. Reboot the server in rescue mode and locate the partition /:
root@rescue:~# blkid
/dev/sda1: UUID="15D6-5706" TYPE="vfat" PARTLABEL="grub" PARTUUID="bf514348-6259-41a4-a73f-ba0c38d45de5"
/dev/sda2: UUID=`15D6-8A6F` TYPE=`vfat` PARTLABEL=`boot` PARTUUID=`7c0cbc80-c09a-4226-b7f2-91689a04250c`
/dev/sda3: UUID=`Q1r3UN-wfmY-QSPI-jIvA-9ybX-IWwk-YNNnUg` TYPE=`LVM2_member` PARTLABEL=`lvm` PARTUUID=`79581bf9-3eb3-4947 9-c51-856fb5d72ffa`
/dev/mapper/vg0-swap: UUID="337409d9-cdc5-4db8-a957-336631d3e7cb" TYPE="swap"
/dev/mapper/vg0-root: UUID="2b672f12-77be-40c2-a099-487565ffa933" TYPE="xfs"
root@rescue:~#
In our example, the system uses LVM:
root@rescue:~# lvdisplay
  --- Logical volume ---
  LV Path                /dev/vg0/swap
  LV Name                swap
  VG Name                vg0
  LV UUID                X9ttby-08vi-iJVW-aJGP-qnep-PDI9-ohJF6J
  LV Write Access        read/write
  LV Creation host, time rescue.ovh.us, 2019-06-03 16:21:38 -0400
  LV Status              available
  # open                 0
  LV Size                128.00 GiB
  Current LE             32768
  Segments               1
  Allocation             inherit
  Read ahead sectors     auto
  - currently set to     256
  Block device           252:0

  --- Logical volume ---
  LV Path                /dev/vg0/root
  LV Name                root
  VG Name                vg0
  LV UUID                822GLw-DELk-Q1ze-3NJD-1B3W-LT9H-CG8RTO
  LV Write Access        read/write
  LV Creation host, time rescue.ovh.us, 2019-06-03 16:21:44 -0400
  LV Status              available
  # open                 0
  LV Size                17.34 TiB
  Current LE             4545078
  Segments               1
  Allocation             inherit
  Read ahead sectors     auto
  - currently set to     256
  Block device           252:1
2. Mount the / identified partition:
root@rescue:~# mount /dev/vg0/root /mnt
root@rescue:~# ls /mnt
backups  bin  boot  dev  etc  home  images  images-ear  images-ueba  lib  lib32
        media  mnt  opt  overlayimages  proc  root  run  sbin  srv  sys  tmp  uploads  usr  var
In Gentoo, MAC addresses are present in the following 4 files:
root@rescue:~# cat /mnt/etc/systemd/network/
10-external.link   11-internal.link   50-static.network  51-vrack.network
root@rescue:~#
3. Back up files before editing them:
root@rescue:~# cp /mnt/etc/systemd/network/50-static.network /mnt/etc/systemd/network/50-static.network.`date +%s`
root@rescue:~# cp /mnt/etc/systemd/network/51-vrack.network /mnt/etc/systemd/network/51-vrack.network.`date +%s`
root@rescue:~# cp /mnt/etc/systemd/network/10-external.link /mnt/etc/systemd/network/10-external.link.`date +%s`
root@rescue:~# cp /mnt/etc/systemd/network/11-internal.link /mnt/etc/systemd/network/11-internal.link.`date +%s`
4. Update the files with the new MAC addresses:
root@rescue:~# nano /mnt/etc/systemd/network/50-static.network
root@rescue:~# nano /mnt/etc/systemd/network/51-vrack.network
root@rescue:~# nano /mnt/etc/systemd/network/10-external.link
root@rescue:~# nano /mnt/etc/systemd/network/11-internal.lin
5. Unmount the partitions, then reboot:
root@rescue:~# umount /mnt
root@rescue:~# reboot
Special cases
For some versions, only the file /mnt/etc/udev/rules.d/10-f2c-network.rules needs to be modified:
root@rescue:~# cat /mnt/etc/gentoo-release
Gentoo Base System release 2.2
root@rescue:~#
root@rescue:~# ls /mnt/etc/udev/rules.d/
10-f2c-network.rules
root@rescue:~#
root@rescue:~# cat /mnt/etc/udev/rules.d/10-f2c-network.rules
SUBSYSTEM=="net", ACTION=="add", DRIVERS=="?*", ATTR{address}=="xx:xx:xx:xx:xx:xx", ATTR{type}=="1", KERNEL=="*", NAME="netpublic0"
SUBSYSTEM=="net", ACTION=="add", DRIVERS=="?*", ATTR{address}=="xx:xx:xx:xx:xx:xx", ATTR{type}=="1", KERNEL=="*", NAME="netprivate0"
root@rescue:~#
Virtualization
Click the tab for your virtualization option.
If you are experiencing network connectivity issues (for example, no ping after a motherboard replacement), this may be related to an error during system startup caused by the old MAC address value still present:
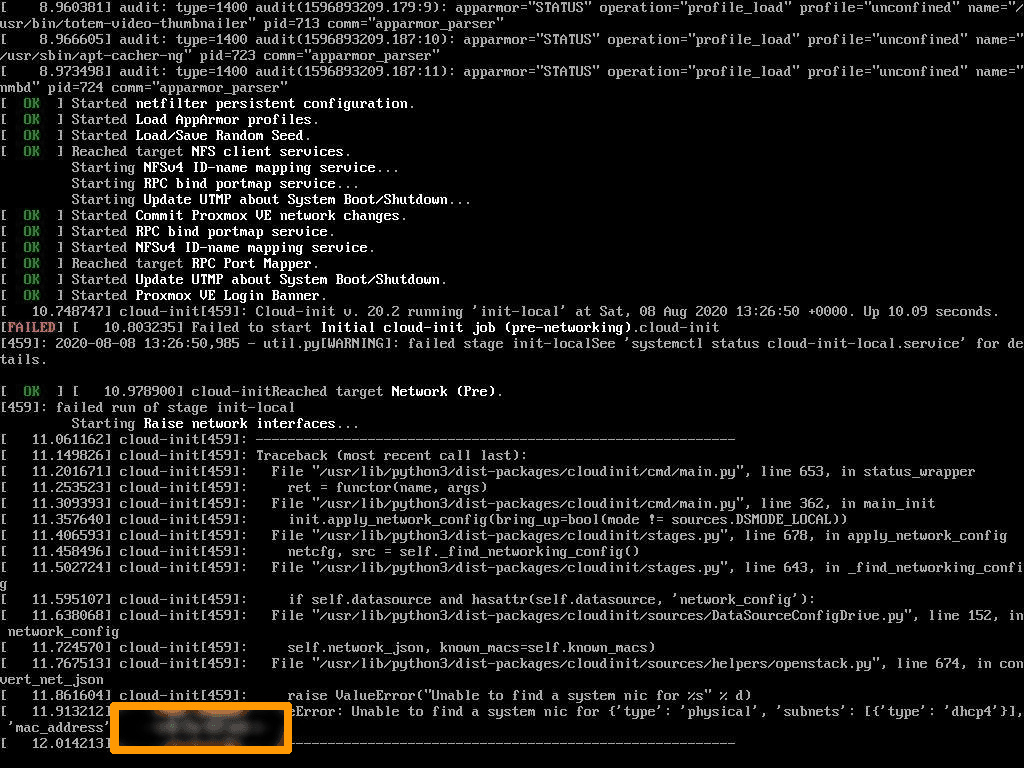
Do the following:
1. Reboot the server in rescue mode.
root@rescue:~# cat /mnt/etc/network/interfaces
# This file describes the network interfaces available on your system
# and how to activate them. For more information, see interfaces(5).

# The loopback network interface
auto lo
iface lo inet loopback

iface enp3s0f0 inet manual

auto vmbr0
iface vmbr0 inet dhcp
  bridge-ports enp3s0f0
  bridge-stp off
  bridge-fd 0

auto vmbr1
iface vmbr1 inet static
  address  192.168.22.254
  netmask  255.255.255.0
  bridge_ports none
  bridge_stp off
  bridge_fd 0
  post-up echo 1 > /proc/sys/net/ipv4/ip_forward
root@rescue:~#
root@rescue:~# cat /mnt/var/log/messages | grep renamed
Aug  8 14:27:20 s22 kernel: [    1.527563] igb 0000:04:00.0 eno1: renamed from eth0
Aug  8 14:27:20 s22 kernel: [    1.550622] igb 0000:04:00.1 eno2: renamed from eth1
Aug  8 14:27:34 s22 kernel: [   88.148303] eth0: renamed from vethGRELEP
Aug  8 14:27:36 s22 kernel: [   90.444727] eth0: renamed from vethVMV0MH
Aug  8 14:27:40 s22 kernel: [   94.116739] eth0: renamed from vethQWYCXT
Aug  8 14:27:43 s22 kernel: [   97.469199] eth0: renamed from vethAIWWWX
Aug  8 14:27:48 s22 kernel: [  102.101324] eth0: renamed from vethB2DGCS
Aug  8 14:27:48 s22 kernel: [  102.139437] eth1: renamed from vethRSNNKL
root@rescue:~#
2. Create the 70-persistent-net.rules file again and add:
- The network interface name found in the
/mnt/etc/network/interfacesfile. - The new MAC address (viewable in the tab
Network interfacesin the OVHcloud Control Panel or in the return of the commandip link).
root@rescue:~# cat /mnt/etc/udev/rules.d/70-persistent-net.rules
SUBSYSTEM=="net", ACTION=="add", DRIVERS=="?*", ATTR{address}=="xx:xx:xx:xx:xx:xx", NAME="enp3s0f0"
root@rescue:~#
If you are experiencing network connectivity issues (for example, no ping after a motherboard replacement), the MAC address is static configured and must be reset.
Do the following:
1. Restart the server in rescue mode and use the chroot command:
root@rescue:~# mount /dev/sda1 /mnt
root@rescue:~# mount -t proc /proc/ /mnt/proc/
root@rescue:~# mount -o bind /sys/ /mnt/sys/
root@rescue:~# mount -o bind /dev/ /mnt/dev/
root@rescue:~# mount -o bind /dev/pts/ /mnt/dev/pts/
root@rescue:~# chroot /mnt
2. Change the current configuration to match the new settings:
[root@rescue /]# xe-reset-networking --device=eth0 --mode=static --ip=xx.xx.xx.xx --netmask=255.255.255.0 --gateway=xx.xx.xx.xxx3. You will be asked to answer the question with yes, then press Enter:
----------------------------------------------------------------------
!! WARNING !!

This command will reboot the host and reset its network configuration.
Any running VMs will be forcefully shutdown.

Before completing this command:
- Where possible, cleanly shutdown all VMs running on this host.
- Disable HA if this host is part of a resource pool with HA enabled.
----------------------------------------------------------------------

Your network will be re-configured as follows:

Management interface:   eth0
IP configuration mode:  static
IP address:             xx.xx.xx.xx
Netmask:                255.255.255.0
Gateway:                xx.xx.xx.xx
Pool master's address:  xx.xx.xx.xx

If you want to change any of the above settings, type 'no' and re-run
the command with appropriate arguments (use --help for a list of options).

Type 'yes' to continue.
Type 'no' to cancel.
yes
Stopping xapi...
Reconfiguring eth0...
Updating inventory file...
Running in chroot, ignoring request.
4. Type "exit" to leave chroot mode, then unmount all partitions:
root@rescue:~# umount /mnt/sys
root@rescue:~# umount /mnt/proc
root@rescue:~# umount /mnt/dev/pts
root@rescue:~# umount /mnt/dev
root@rescue:~# umount /mnt
Special cases
You need to check and adapt the following files:
/mnt/etc/sysconfig/network-scripts/interface-rename-data/static-rules.conf/mnt/etc/sysconfig/network-scripts/interface-rename-data/dynamic-rules.json
After a motherboard has been replaced, you cannot modify the new MAC addresses through the esxi.conf file via the tools integrated in rescue mode. This will require manual intervention.
Version 7.0 or newer
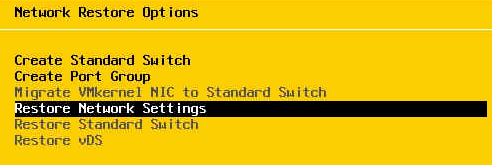
The following procedure applies only to versions 7.0 and later. From this release on, the state.tgz file is encrypted. You will need to reboot the network from the Direct Console menu via your KVM or IPMI.
Please refer to the screenshot below:
Version 6.7 or older
The procedure described below applies only to versions 6.7 and earlier.
1. Restart the server in rescue mode to mount the partition /:
root@rescue:~# mount /dev/sdaX /mnt/2. Save the state.tgz file
root@rescue:~# ls /mnt/state.tgz
root@rescue:~# cp /mnt/state.tgz /mnt/state.tgz.`date +%s`
3. Create a working environment:
root@rescue:~# mkdir /home/ovh/esxi
root@rescue:~# WORKINGDIR=/home/ovh/esxi
root@rescue:~# cd $WORKINGDIR
4. Extract the contents of state.tgz to $WORKINGDIR, and then extract the contents of local.tgz.
5. Edit the resulting esx.conf file:
root@rescue:/home/ovh/esxi# tar xf /mnt/state.tgz -C $WORKINGDIR
root@rescue:/home/ovh/esxi# tar xf /home/ovh/esxi/local.tgz -C $WORKINGDIR
root@rescue:/home/ovh/esxi# vim etc/vmware/esx.conf
6. Locate and modify the MAC address for vmkernelnic:
/net/vmkernelnic/child[0000]/mac = "XX:XX:XX:XX:XX:XX"7. Identify on which interface the primary IP address is used:
/net/vswitch/child[0000]/uplinks/child[0000]/pnic = "vmnicX"8. Update the MAC address of the main interface:
NOTE: Do not change the virtual MAC address.
/net/pnic/child[0001]/mac = "XX:XX:XX:XX:XX:XX"         <== Primary Interface Mac address
/net/pnic/child[0001]/virtualMac = "00:50:56:XX:XX:XX"  <== Virtual Mac
/net/pnic/child[0001]/name = "vmnic1"NOTE: If there is a vRack interface, remember to also change its MAC address.
9. Perform a backup, then unmount the partition /:
root@rescue:/home/ovh/esxi# tar -czf $WORKINGDIR/local.tgz etc/
root@rescue:/home/ovh/esxi# tar -czf /mnt/state.tgz local.tgz
root@rescue:/home/ovh/esxi# umount /mnt
Special cases
Check the order of your vmnicX declarations. Here is a functional example:
root@rescue:/home/ovh/esxi# cat etc/vmware/esx.conf | grep "/vmkdevmgr/pci"
/vmkdevmgr/pci/m00008901/alias = "vmhba0"
/vmkdevmgr/pci/m00008501/alias = "vmnic0"
/vmkdevmgr/pci/m00008502/alias = "vmnic1"
After the motherboard is replaced, the server cannot be reached until you manually change the MAC addresses through Device Manager.
There are two methods:
Via IPMI/KVM
1. Log in as an administrator from the IPMI/KVM interface.
2. Open the Run utility (Windows logo key + R), and through the run prompt, run the devmgmt.msc command:
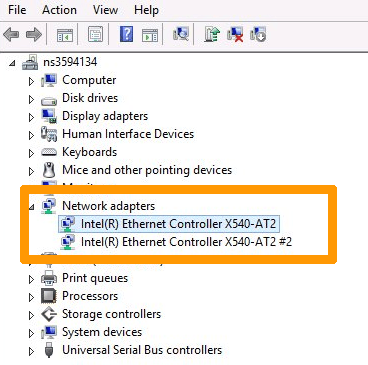
3. Open Network adapters and select the adapter corresponding to eth0.
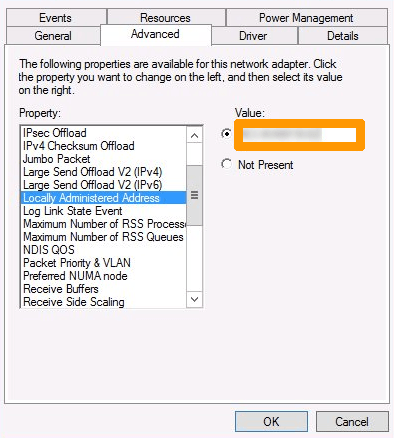
4. Right-click on Properties > Advanced.
5. Locate Locally Administered Address.
6. Enter the new value for the MAC address (numbers only, no spaces).
Via WinPE
1. Restart the server in WinPE mode.
2. Issue the regedit command at the run command prompt.
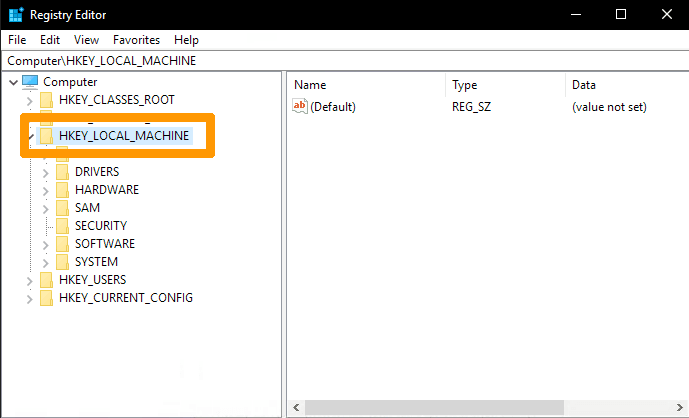
3. Load the local registry through the one available in WinPE, then click HKEY_LOCAL_MACHINE:
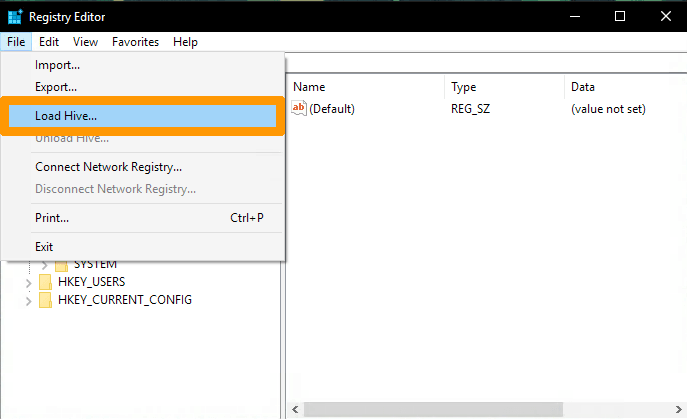
4. Then click Load Hive....
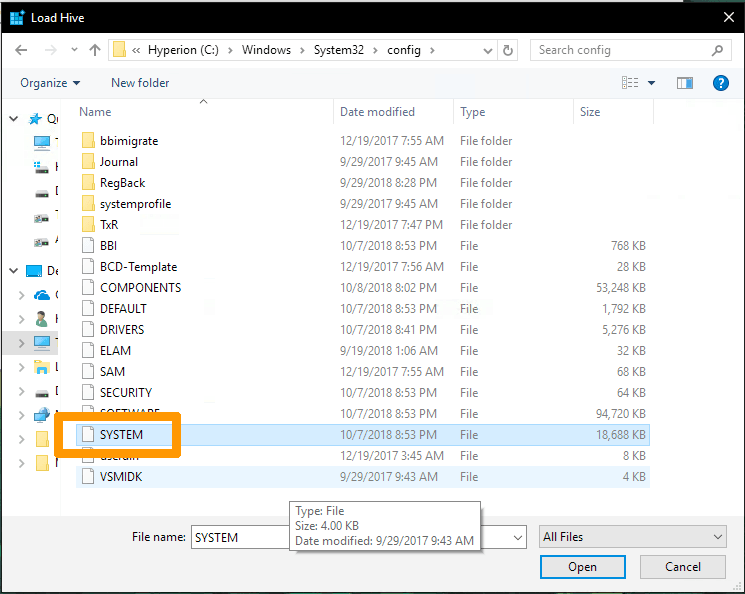
By default, you will be in the WinPE tree. Don't forget to browse to C:\.
5. Locate the SYSTEM registry.
6. You will be asked to enter a name. For example, you can choose OVH_TEST.
7. Locate the following registry value:
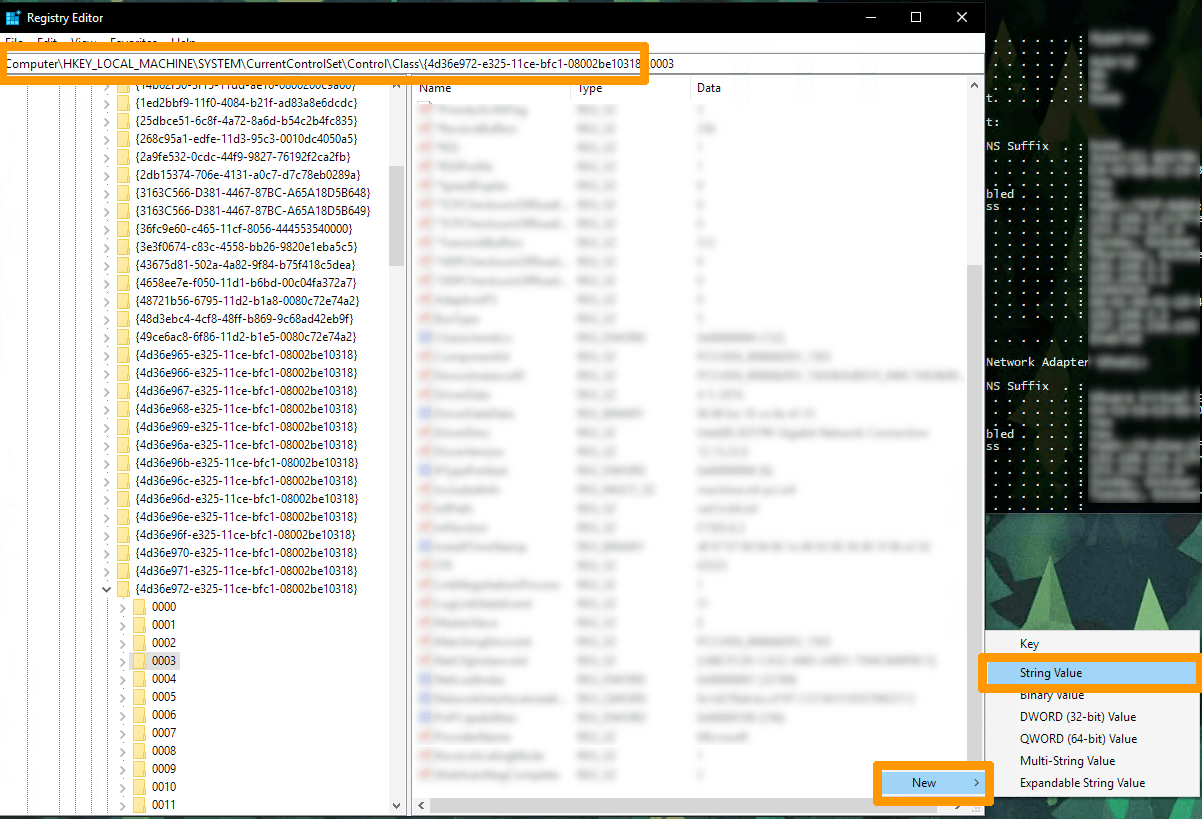
"HKEY_LOCAL_MACHINE\SYSTEM\CurrentControlSet\Control\Class\{4D36E972-E325-11CE-BFC1-08002BE10318}"NOTE: As long as we are on WinPE, the value CurrentControlSet should be equal to CurrentSet001.
You should see several subkeys named like this: 0000, 0001, etc.
8. Click each subkey to check the DriverDesc value that should match your network interface. You can check the name of your interface from a terminal using the following command:
ipconfig /all9. Look in the NetworkAddress registry entries on the right pane and change the value to your new MAC address. If this entry does not exist, right-click in an empty box to create a String with the name NetworkAddress.
10. You will need to unload the registry to apply the recent changes. Click OVH_TEST (created earlier) then click File (in the top left-hand corner) and select Unload hive....
Locate the name of your network interfaces
After the motherboard is replaced, the server cannot be reached because the network interface controller has been renamed by the operating system.
1. Restart the server in rescue mode, mount the partition / and then use the chroot command:
root@rescue:~# mount /dev/my_disk /mnt
root@rescue:~# for i in /dev /dev/pts /proc /sys; do mount -B $i /mnt$i; done
root@rescue:~# chroot /mnt
2. Check if the interfaces have been modified. Check the var/log/messages logs or var/log/kern.log if the interface has been renamed:
Oct  9 22:25:49 node1 kernel: [    5.479916] ixgbe 0000:03:00.1 eno4: renamed from eth1
Oct  9 22:25:49 node1 kernel: [    5.504285] ixgbe 0000:03:00.0 eno3: renamed from eth0
3. Check your configuration file /mnt/etc/udev/rules.d/70-persistent.-net.rules and replace the new values (MAC addresses) if necessary:
root@rescue:~# cat /mnt/etc/udev/rules.d/70-persistent-net.rules
SUBSYSTEM=="net", ACTION=="add", DRIVERS=="?*", ATTR{address}=="xx:xx:xx:xx:xx:xx", ATTR{dev_id}=="0x0", ATTR{type}=="1", KERNEL=="eth*", NAME="public"
SUBSYSTEM=="net", ACTION=="add", DRIVERS=="?*", ATTR{address}=="xx:xx:xx:xx:xx:xx", ATTR{dev_id}=="0x0", ATTR{type}=="1", KERNEL=="eth*", NAME="private"
4. Go to the directory /boot/grub/ and create a backup of the file grub.cfg.
5. Edit the /etc/default/grub file and edit the line beginning with GRUB_CMDLINE_LINUX to get this:
GRUB_CMDLINE_LINUX="net.ifnames=0 biosdevname=0"6. Run the command:
root@rescue:~# grub-mkconfig -o /boot/grub/grub.cfg7. Exit the chroot environment using the exit command and unmount all partitions:
root@rescue:~# umount /mnt/sys
root@rescue:~# umount /mnt/proc
root@rescue:~# umount /mnt/dev/pts
root@rescue:~# umount /mnt/dev
root@rescue:~# umount /mnt
Problems with your EFI partition
The following steps are indicated if you experience a boot problem related to the partitions present on your disks.
There are two methods, via rescue mode or via BIOS.
Click the tab for the method you want to use.
- Use case: The installed system (in this case Proxmox) is no longer bootable after the disk has been replaced (no EFI input is visible through the BIOS).
1. Reboot the server in rescue mode.
2. Locate the disk with the original EFI partition:
Disk /dev/nvme1n1: 894.3 GiB, 960197124096 bytes, 1875385008 sectors
Units: sectors of 1 * 512 = 512 bytes
Sector size (logical/physical): 512 bytes / 512 bytes
I/O size (minimum/optimal): 512 bytes / 512 bytes
Disk /dev/nvme0n1: 894.3 GiB, 960197124096 bytes, 1875385008 sectors
Units: sectors of 1 * 512 = 512 bytes
Sector size (logical/physical): 512 bytes / 512 bytes
I/O size (minimum/optimal): 512 bytes / 512 bytes
Disklabel type: gpt
Disk identifier: A28EAF07-248B-4CEB-86D4-92F75A36F1B0

Device              Start        End    Sectors   Size Type
/dev/nvme0n1p1         34    1048609    1048576   512M EFI System
/dev/nvme0n1p2    1050624 1875368589 1874317966 893.8G Solaris /usr & Apple ZFS
/dev/nvme0n1p9 1875368590 1875384974      16385     8M Solaris reserved 1
3. Mount the partition concerned.
root@rescue:~# ls /mnt/EFI/proxmox/grubx64.efi
/mnt/EFI/proxmox/grubx64.efi
root@rescue:~#
root@rescue:~# umount /mnt
4. Use the following command to make this partition functional again:
root@rescue:~# efibootmgr -v --create --disk /dev/nvme0n1 --part 1 --label "proxmox2" --loader '\EFI\proxmox\grubx64.efi'
BootCurrent: 0005
Timeout: 1 seconds
BootOrder: 0000,0005,0007,0006,0008,0001
Boot0001* proxmox    Vendor(99e275e7-75a0-4b37-a2e6-c5385e6c00cb,)
Boot0005* UEFI: PXE IP4 P0 Intel(R) Ethernet Controller X550    ACPI(a0341d0,0)PCI(1b,4)PCI(0,0)MAC(MAC(d05099d5e395,1)..BO
Boot0006  UEFI: PXE IP4 P1 Intel(R) Ethernet Controller X550    ACPI(a0341d0,0)PCI(1b,4)PCI(0,1)MAC(MAC(d05099d5e394,1)..BO
Boot0007  UEFI: Built-in EFI Shell    Vendor(5023b95c-db26-429b-a648-bd47664c8012,)..BO
Boot0008* UEFI: PXE IP4 P0 American Megatrends Inc.    ACPI(a0341d0,0)PCI(14,0)USB(7,0)USB(2,1)MAC(MAC(2ab925859a66,0)..BO
Boot0000* proxmox2 HD(1,22,100000,0df658ff-5461-470a-9d92-5d95208d5c0f)File(\EFI\proxmox\grubx64.efi)- Use case: the installed system (in this case CentOS 6) is no longer bootable after replacing the disk (no EFI input is visible through the BIOS).
1. Reboot the server to enter the BIOS menu.
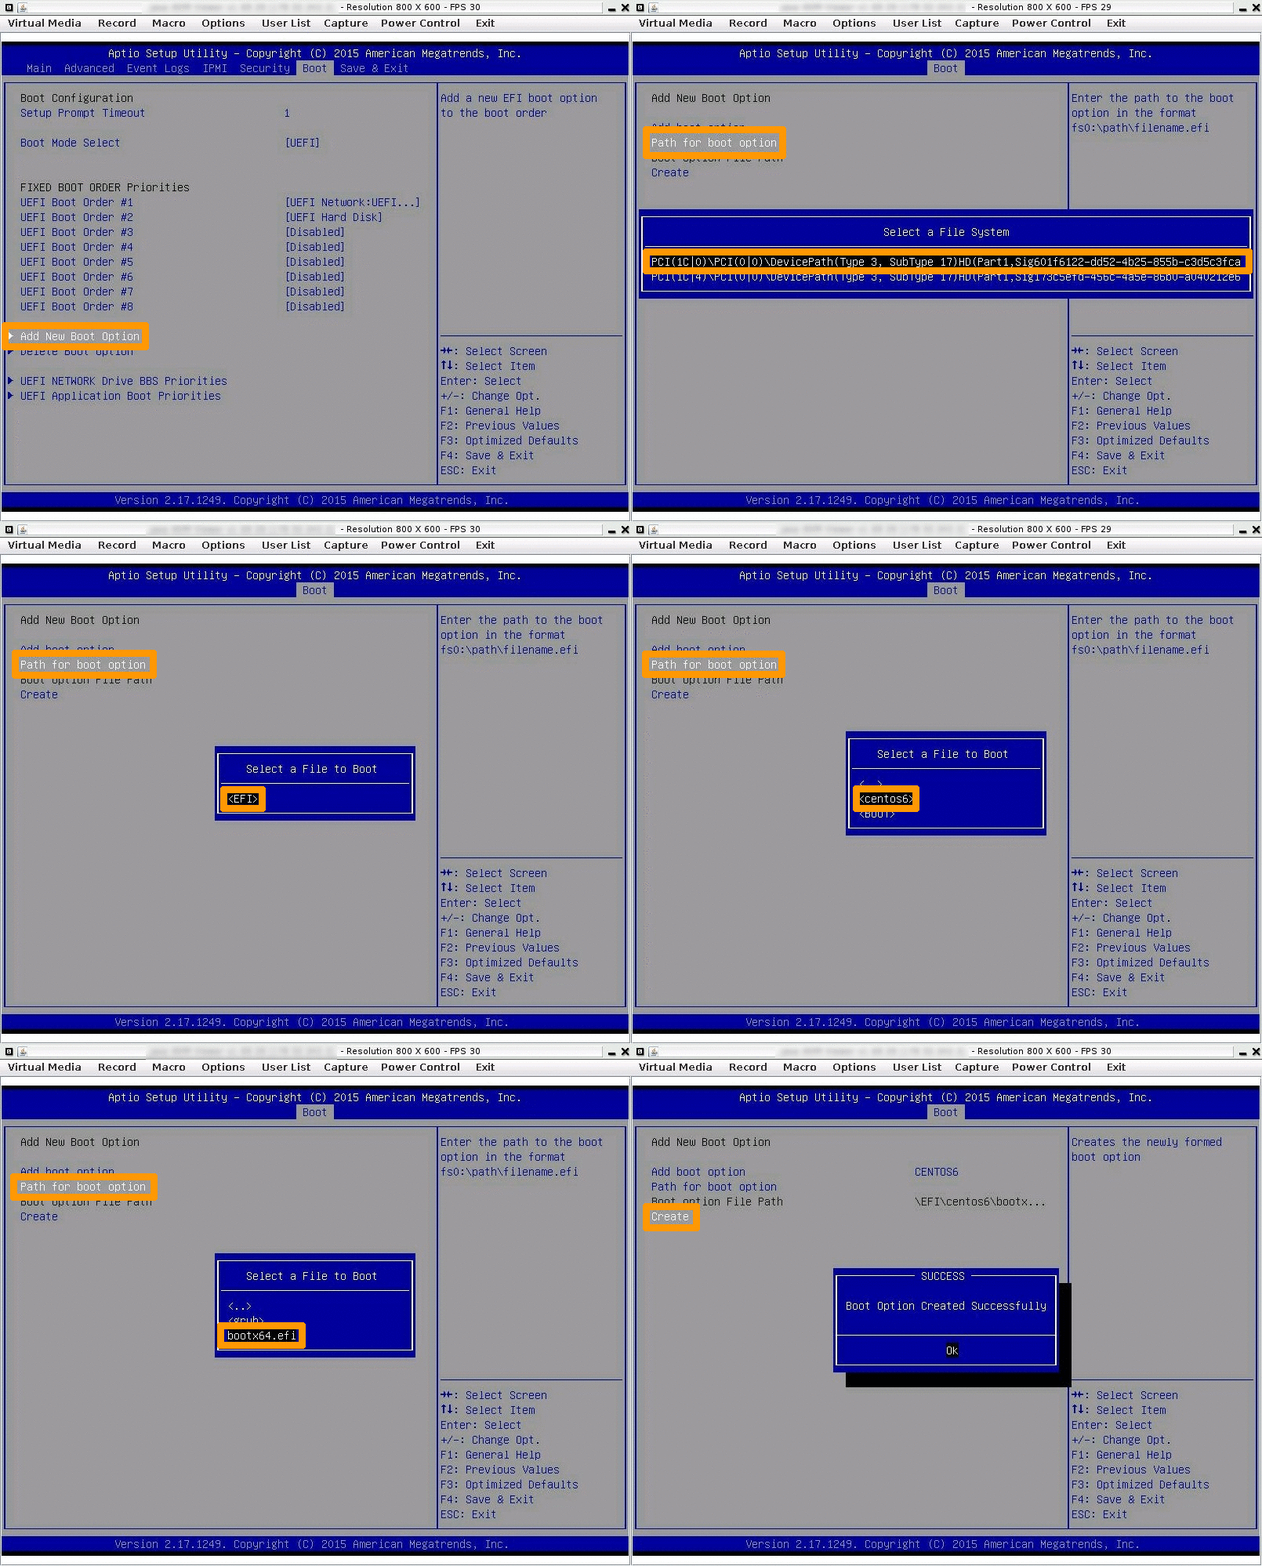
The first step involves regenerating the files you need to restore your partition to full operation:
-
Go to the BIOS
bootmenu:- Select
Add New Boot Option. - Choose the path to your
Path for boot partition optionand select the file system that contains your boot partition. - Select the
EFI\centos6\bootx64.efifile and chooseCreate.
- Select
The image below is a summary of the actions mentioned above:
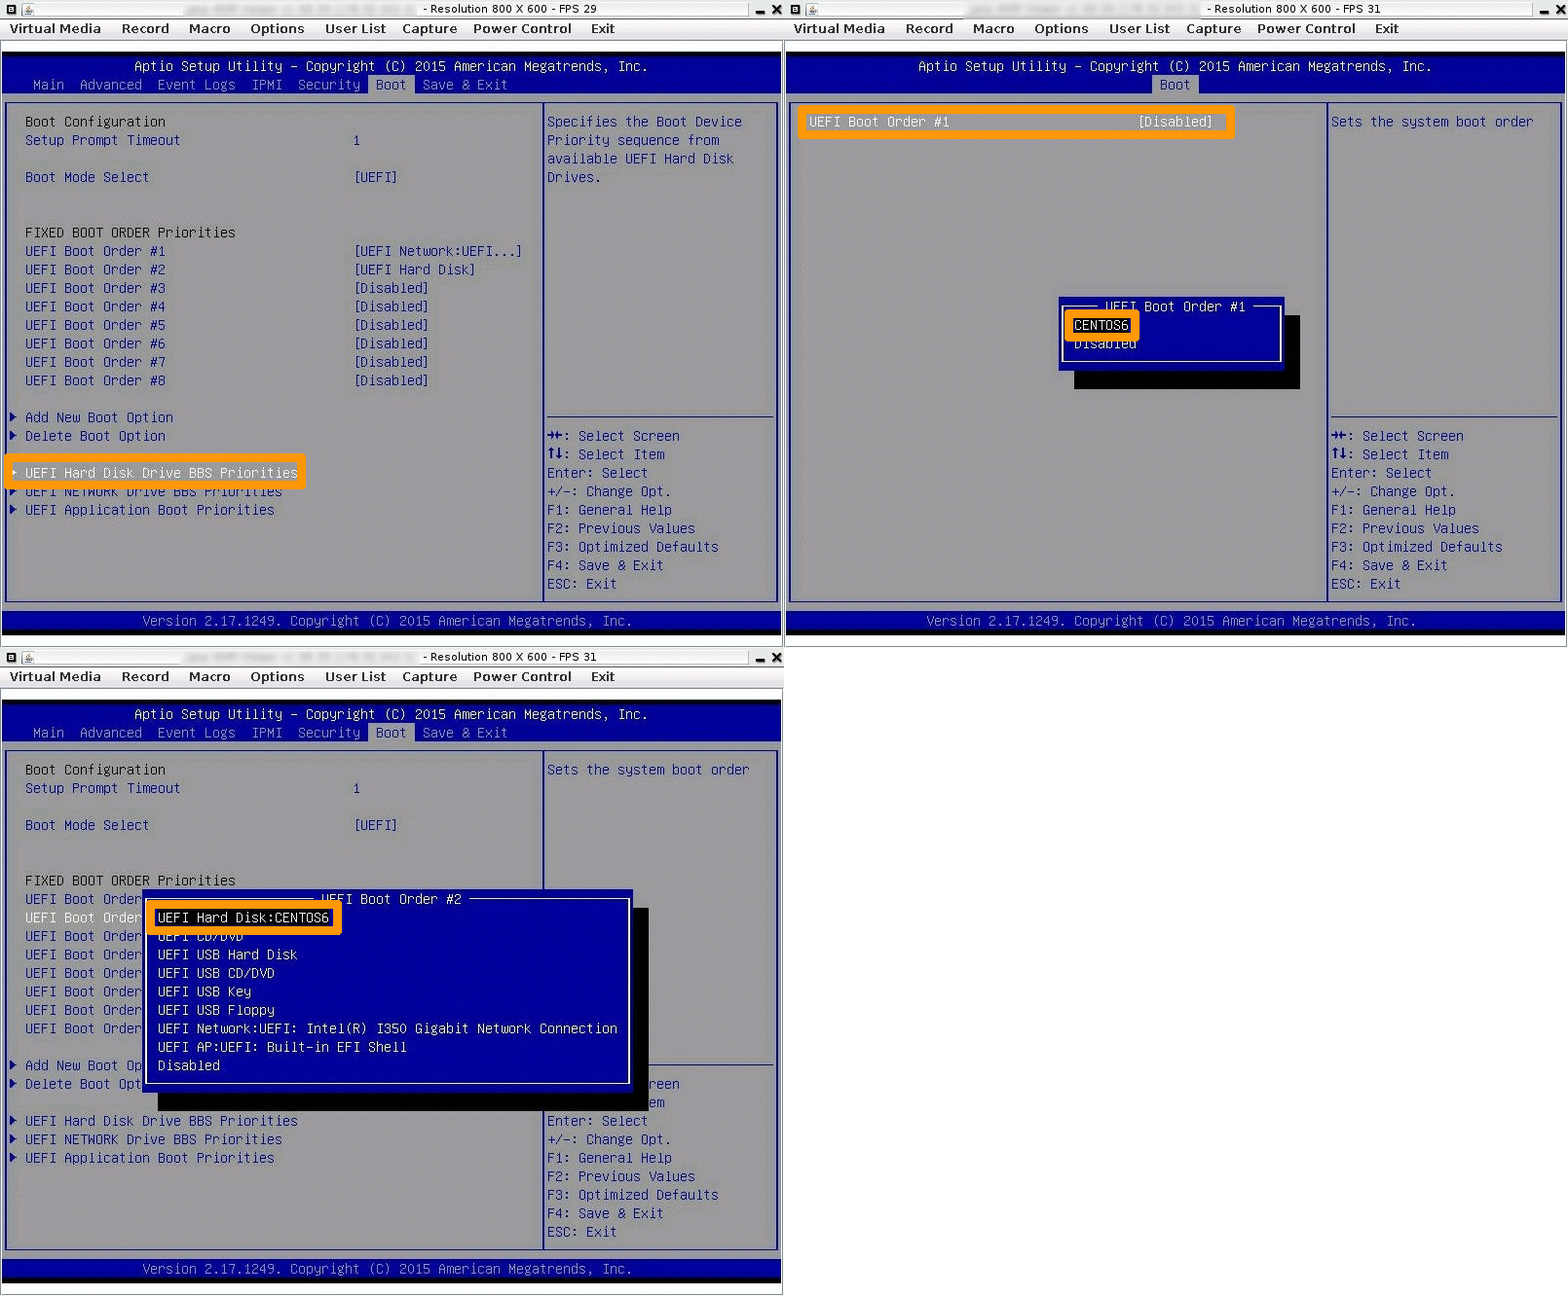
The second sequence is to make the selected partition active in the previous sequence.
-
In the BIOS
bootmenu:- Choose
UEFI Hard Disk BBS Priorities. - Choose
UEFI Boot Order #1then selectCENTOS6to position it as the first start choice in the current list.
- Choose
The image below is a summary of the actions mentioned above:
Go further
Browse all the Dedicated Servers guides.
Browse the rest of the OVHcloud US documentation for guides on our other products and services.
Learn more about Dedicated Servers on the OVHcloud US website.