
How to Customize Redeployment of Your Nutanix Cluster
Find out how to repackage a Cluster with custom network settings in the OVHcloud Control Panel and API.
Requirements
- a Nutanix Cluster in your OVHcloud account.
- access to the OVHcloud Control Panel.
- access to the OVHcloud API page.
Introduction to using the private network for a Nutanix Cluster at OVHcloud
Before redeploying a Nutanix Cluster, you must define a private network with its subnet mask, as follows: XX.XX.XX.XX/XX.
You then need to choose IP addresses within this scope.
The list of required IP addresses varies depending on the number of servers ordered (the solution offered by OVHcloud ranges from 3 to 32 nodes) and the configuration mode of Prism Central (Alone or Scale).
Here are the details:
- Between 6 and 36 IP addresses for physical servers (requires two addresses per server, one for the AHV hypervisor and another for the CVM virtual machine).
- An IP address for Prism Element.
- An IP address for the IP address of Prism Central.
- three optional IP addresses for Prism Central scale-mode deployment with three virtual machines.
- An IP address for the Internet gateway.
NOTE: Some IP plan addresses are reserved for the Load Balancer. They are still on the network XX.XX.XX.128/27, i.e. the addresses between XX.XX.XX.129, and XX.XX.XX.158 of the network. They should not be used during redeployment.
Here are two possible examples of Nutanix cluster configuration at OVHcloud:
Example 1: Reconfiguring a cluster with 3 nodes on an IP plan in 192.168.10.0/24.
- Server 1: VM address CVM
192.168.10.1, hypervisor IP address AHV192.168.10.21. - Server 2: VM address CVM
192.168.10.2, hypervisor IP address AHV192.168.10.22. - Server 3: VM address CVM
192.168.10.3, hypervisor IP address AHV192.168.10.23. - Prism Element virtual address:
192.168.10.111. - Prism Central IP address:
192.168.10.222. - Scope reserved for the load balancer:
192.168.10.128 to 192.168.10.159. - Gateway:
192.168.10.254.
Example 2: Reconfiguring a cluster with four nodes in Scale mode for Prism Central on an IP plan in 172.16.0.0/16.
- Server 1: VM CVM
address 172.16.0.1, hypervisor IP address AHV172.16.0.21. - Server 2: VM address CVM
172.16.0.2, hypervisor IP address AHV172.16.0.22. - Server 3: VM CVM
address 172.16.0.3, hypervisor IP address AHV172.16.0.23. - Server 4: VM CVM
address 172.16.0.4, hypervisor IP address AHV172.16.0.24. - Prism Element virtual address:
172.16.0.111. - Prism Central IP address:
172.16.0.222. - VM Prism Central:
172.16.0.223 to 172.16.0.225. - The load balancer:
172.16.0.128 to 172.16.0.159. - Gateway:
172.16.0.254.
Instructions
We will redeploy a cluster with three nodes, as in Example 1 (above), either from the OVHcloud Control Panel or from the OVHcloud API.
NOTE: The Cluster redeployment operation cannot be undone. All data in the Cluster will be deleted, and a new admin account password will be generated and sent by email to the OVHcloud customer account holder.
Redeploy the cluster from the OVHcloud Control Panel
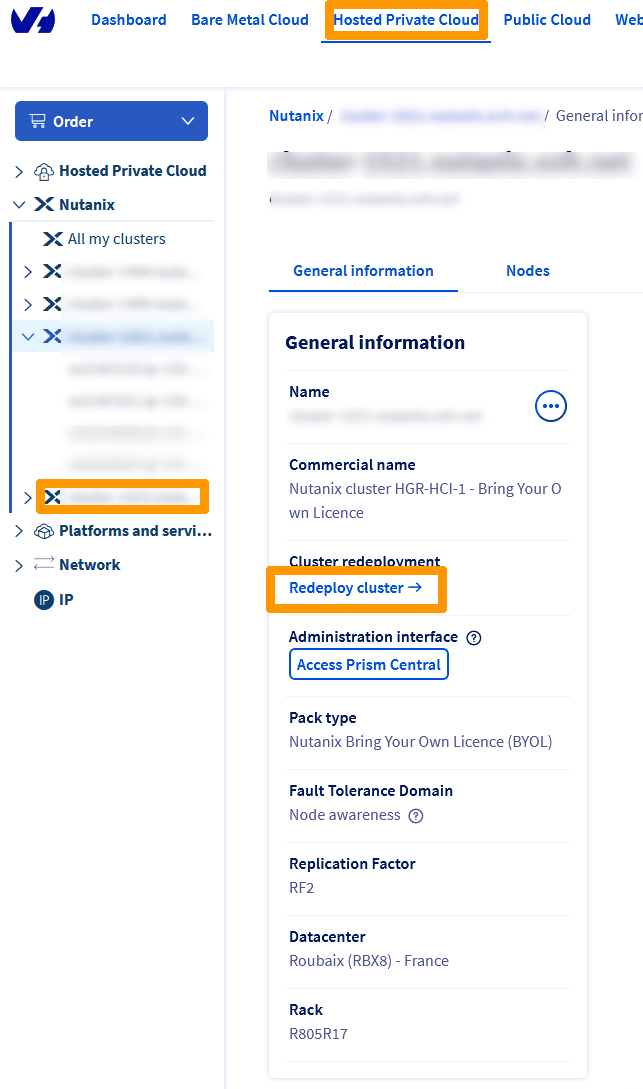
In the OVHcloud Control Panel, click on the Hosted Private Cloud tab, select your cluster below the Nutanix category on the left-hand side, then click on Redeploy cluster.
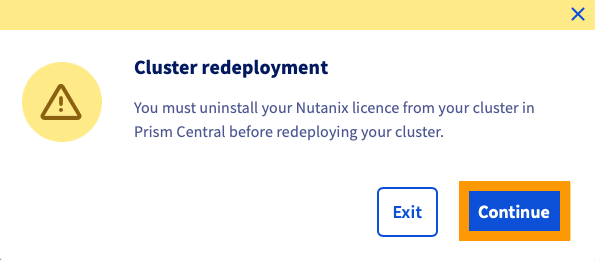
When the pop-up appears, click Next.
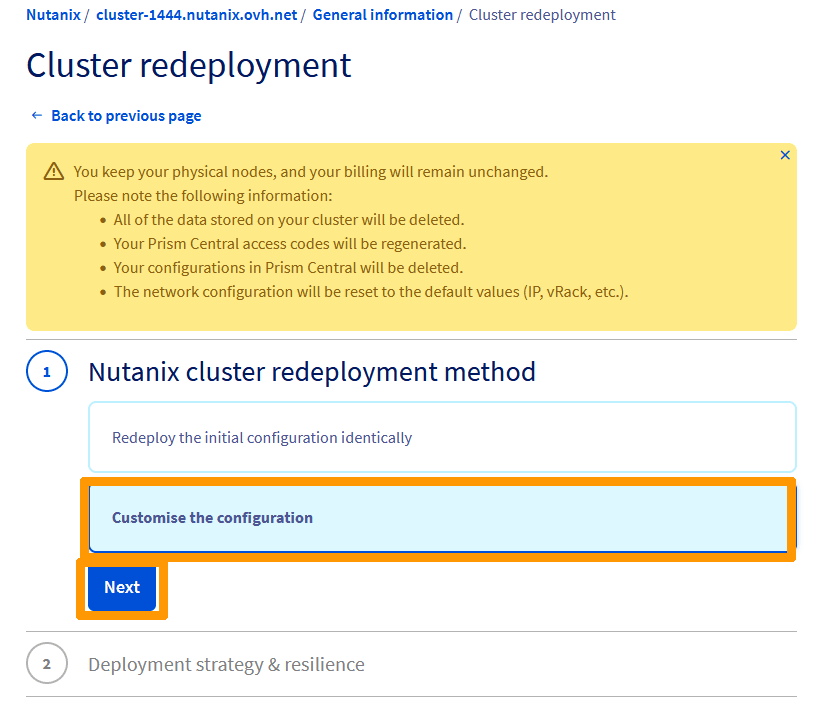
Click Customize the Configuration and click Next.
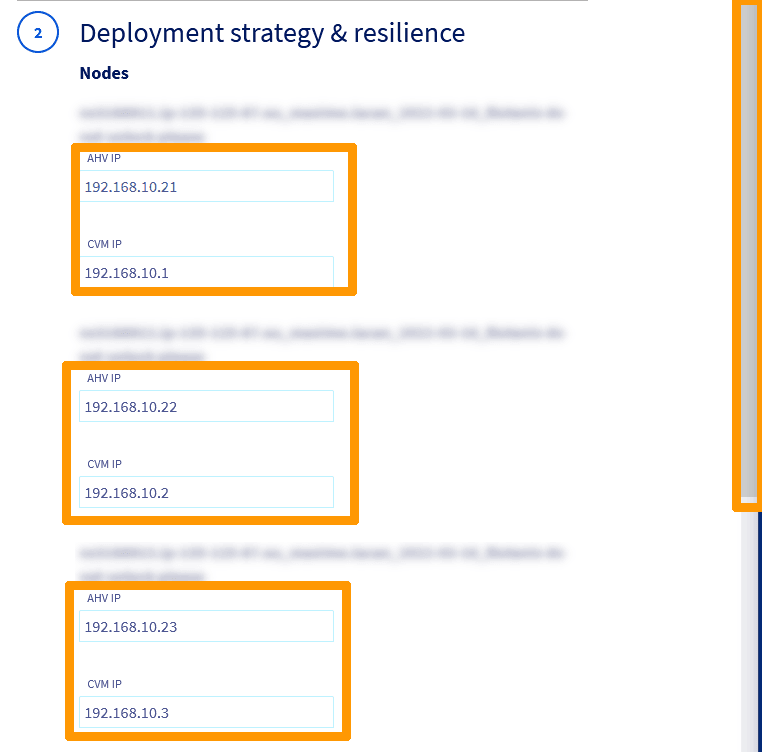
Enter the information for each of your nodes, which are:
- the private IP address of your AHV hypervisor.
- the private IP address of the CVM virtual machine.
Then scroll through the window.
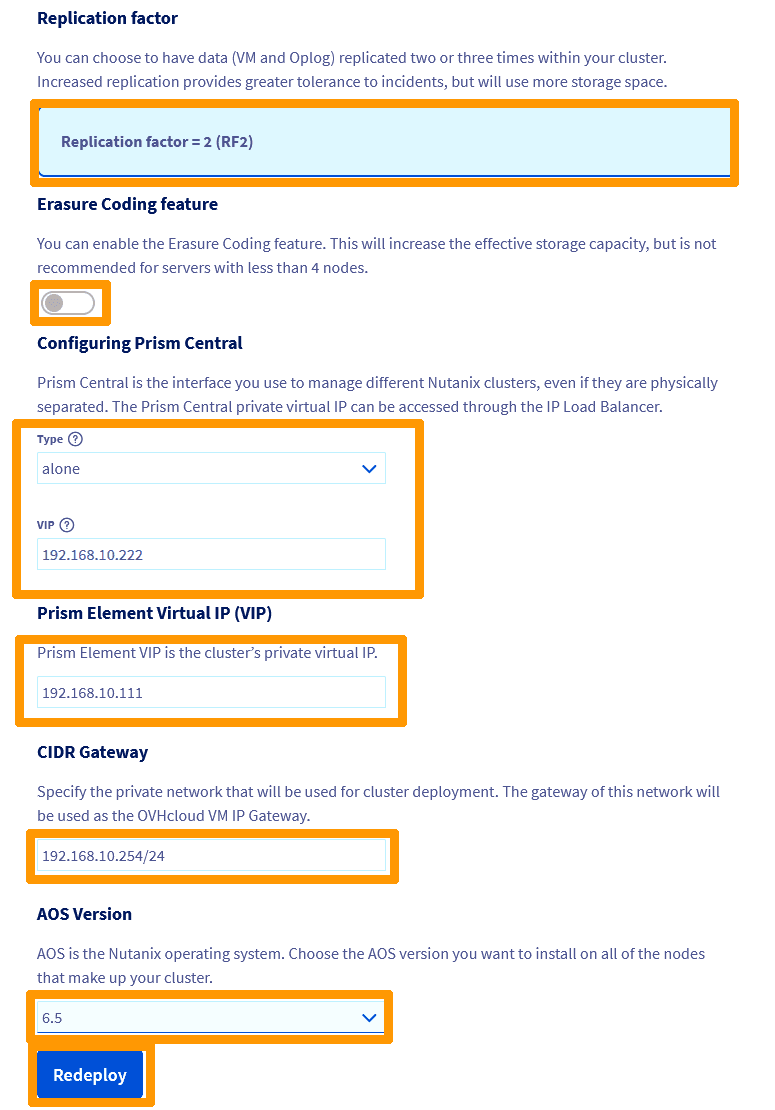
Leave these default settings :
- Replication Factor: RF2.
- Erasure Coding feature: Erasure Coding disabled.
- Prism Type: Alone.
Modify these values:
- Prism Central VIP: Prism Central private IP address.
- Prism Element Virtual IP(VIP): Prism Element private IP address.
- CIDR Gateway: Private IP address of the gateway followed by the subnet mask, in the following form XX.XX.XX.XX/XX.
- AOS Version: Version of AOS chosen during redeployment.
Then click Redeploy.
Enter REDEPLOY and click Confirm.
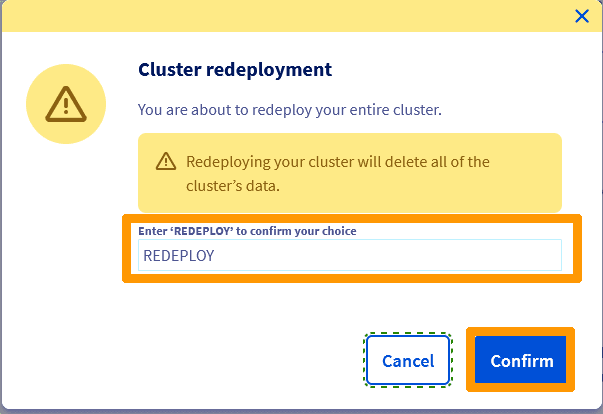
NOTE: The Cluster redeployment takes a minimum of two hours. Wait until the OVHcloud account holder receives an email before using the Cluster again. The Load Balancer is reconfigured during redeployment and points the FQDN address of the Cluster to the private address of Prism Central.

Redeploy the cluster through the OVHcloud API
Log in to the OVHcloud API. For more details on how the OVHcloud API works, please refer to our guide, First Steps with the OVHcloud API.
Use the following API call:
Enter this data:
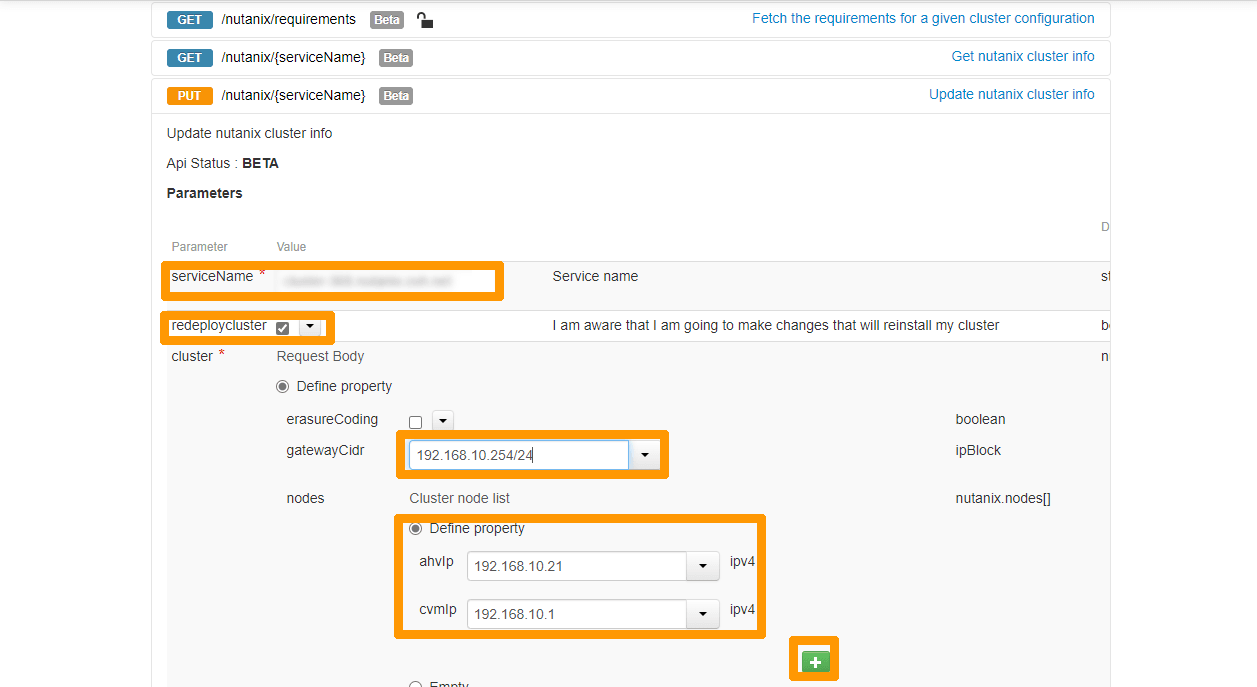
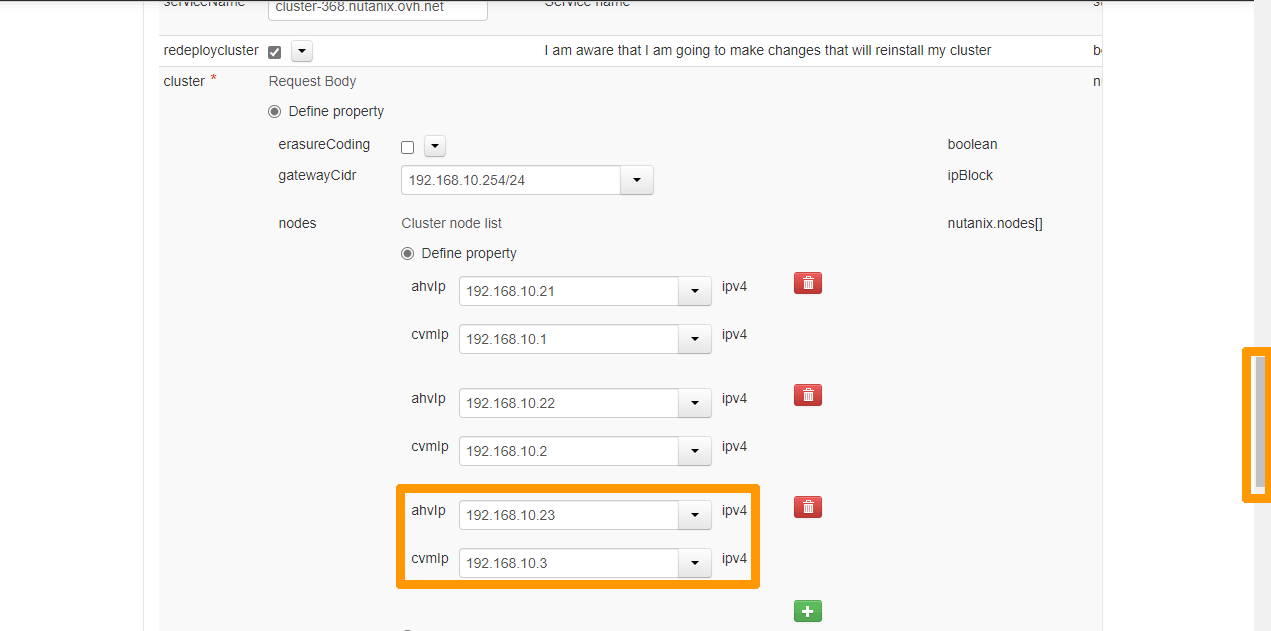
- ServiceName:
FQDN name of your Nutanix Cluster. - redeploycluster:
Check the box. - gatewayCidr:
The gateway IP address followed by the subnet mask.
Enter the following information below nodes:
- ahvip:
IP address of the hypervisor of the first node. - clip:
IP address of the first node's CVM.
Then click the + button.
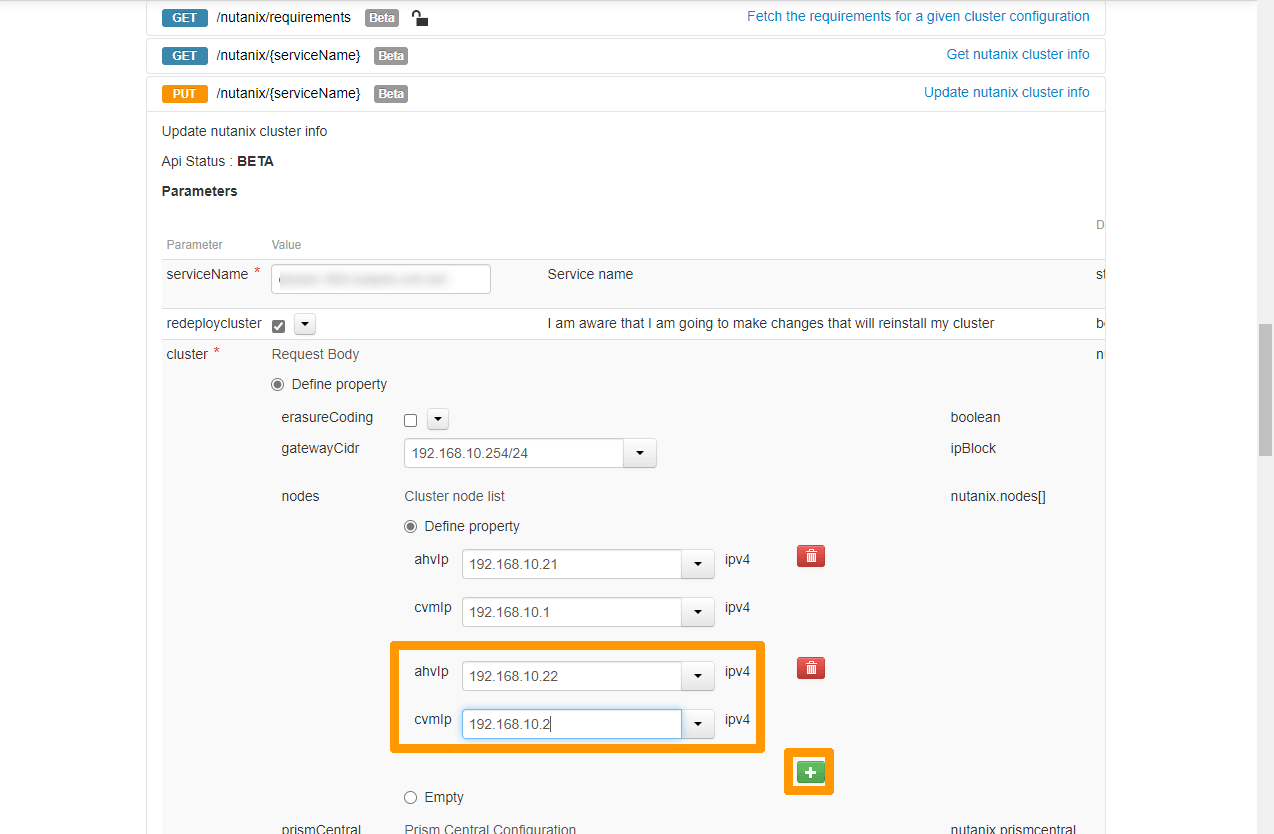
Add the information for the second node:
- ahvip:
IP address of the hypervisor of the second node. - cvmip:
IP address of the second node's CVM.
Click the + button again.
Then add the information for the last node:
- ahvip:
IP address of the hypervisor of the last node. - cvmip:
IP address of the last node's CVM.
Then scroll through the browser window with the scroll bar.
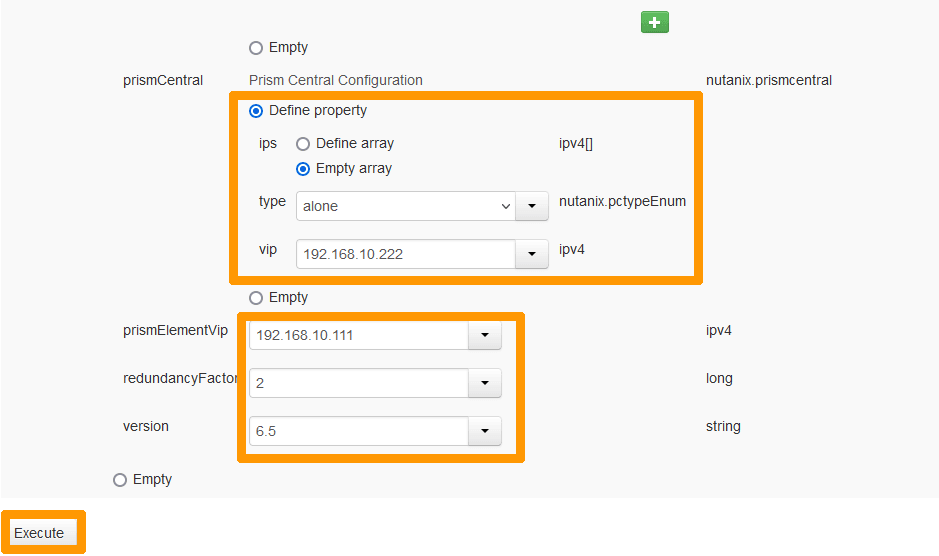
In the Prism Central Configuration section:
- Check
Define propertyandEmpty array. - Choose
alonefrom the type drop-down menu. - Enter
the IP address of Prism Centralin the vip drop-down menu.
Then enter:
The IP address of Prism Elementin the prismElementVip drop-down menu.- The
number of the redundancy factorin the redundancyFactor drop-down menu. - The
version number of the clusterin the version dropdown menu.
Click Execute to start the cluster redeployment.
NOTE: The Cluster redeployment takes a minimum of two hours. Wait until the OVHcloud account holder receives an email before using the Cluster again. The Load Balancer is reconfigured during redeployment and points the FQDN address of the Cluster to the private address of Prism Central.
Go further
Browse all the Nutanix guides.
Browse the rest of the OVHcloud US documentation for guides on our other products and services.
Learn more about Nutanix on OVHcloud on the OVHcloud US website.