Configuring IPv6 on dedicated servers
Learn how to configure IPv6 addresses on your server using various examples.
Internet Protocol version 6 (IPv6) is the latest version of the Internet Protocol (IP). It is designed to address the long-anticipated address exhaustion of its predecessor, IPv4, by using 128-bit addresses instead of 32-bit addresses. Most OVHcloud dedicated servers are delivered with a /64 IPv6 block, with the exception of High Grade and Scale servers, which are delivered with a /56 IPv6 block. This represents over 18 quintillion IP addresses that you can use at your convenience.
Info
This article is about primary IP configuration. For servers that support vRack connectivity, you can also configure Additional IP addresses in a vRack rather than on the public interface of your server. You can find the matching instructions in these guides:
Warning
NOTE: OVHcloud provides services for which you are responsible for their configuration and management. You are therefore responsible for their proper functioning.
This tutorial is designed to help you as much as possible with common tasks. If you are having difficulty performing these actions, please contact a specialized service provider. OVHcloud cannot provide you with technical support in this regard.
Requirements
- A dedicated server in your OVHcloud account
- All your IPv6 information (prefix, gateway, etc.)
- Basic knowledge of SSH and networking
Warning
NOTE: Kimsufi servers are only provided with a single IPV6 block (/128). IPv6 will be configured automatically when installing the OS.
Instructions
The following sections contain configurations for the distributions we currently offer and the most commonly used distributions/operating systems. The first step is always to log in to your server via SSH or a GUI login session (RDP for a Windows server).
On dedicated servers, the first IPv6 is declared as 2607:5300:xxxx:xxxx::. For example, if we've assigned your server the IPv6 range: 2607:5300:abcd:efgh::/64, your server's first IPv6 is: 2607:5300:abcd:efgh::.
By default, the first IPv6 is configured on most of the recent Linux distributions we offer for installation, so the gateway is already included in the configuration file. In most cases, you won't need to add it again manually.
Please take note of the following terminology that will be used in code examples and instructions of the guide sections below:
In our examples, we'll use the nano text editor. Feel free to use the text editor of your choice.
Default Gateway
The first step is to identify the IPv6 block and gateway assigned to your server. There are two ways of doing this:
Via the OVHcloud Control Panel
Log in to the OVHcloud Control Panel, go to the Bare Metal Cloud section and select your server from Dedicated servers.
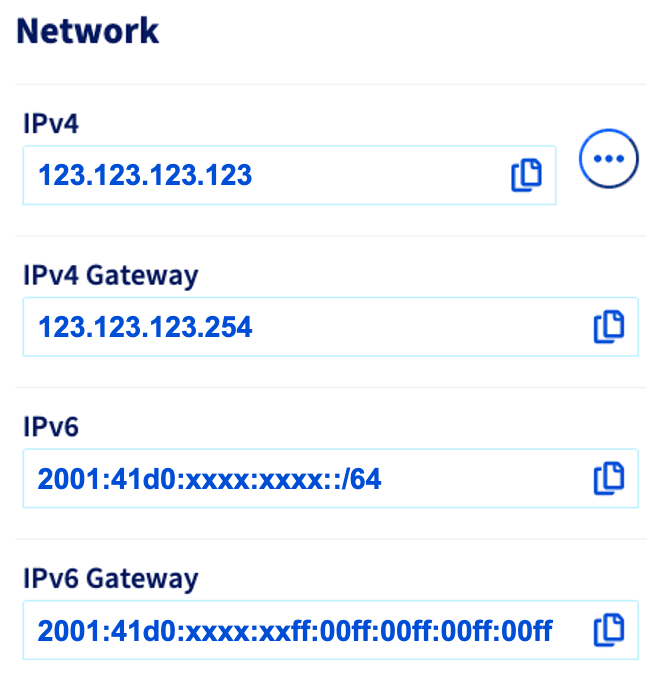
The IPv6 block and gateway assigned to your server will appear in the Network panel of the General Information tab. Once you have copied them, continue with applying the IPv6 configuration.
Via the OVHcloud API
Another way to retrieve the networking information for your server is to use the OVHcloud API.
Execute the following API call, indicating the internal server name (example: ns3956771.ip-169-254-10.eu):
Please note that the leading "0's" can be removed in an IPv6 gateway. For example, The IPv6 gateway 2607:5300:60:62ff:00ff:00ff:00ff:00ff can also been written as 2607:5300:60:62ff:ff:ff:ff:ff.
Warning
NOTE: Before modifying a configuration file, always create a backup of the original.
Info
With some operating systems, the addition of static IPv6 routes in the original configuration file is necessary and is done by default. If that is the case, simply add your configuration for IPv6 as instructed in the guide, do not modify any lines in the original file.
Tip
Select the tab corresponding to the operating system you are using.
Debian and Debian-based operating systems (excluding Debian 12)
The configuration example below is based on Debian 11 (Bullseye).
Warning
Before following the steps below, we strongly suggest that you disable IPv6 autoconf and router advertising to prevent known issues. You can do so by adding the following lines to your sysctl.conf file, which is located in /etc/sysctl.conf:
net.ipv6.conf.all.autoconf=0
net.ipv6.conf.all.accept_ra=0
Once this has been done, you can apply those rules by executing the following command: sudo sysctl -p.
Step 1: Connect to your server via SSH
Step 2: Create a backup
Your server's network configuration file is located in /etc/network/interfaces.d. In our example, it is called 50-cloud-init. Before proceeding, create a backup of your file using the following command:
sudo cp /etc/network/interfaces.d/50-cloud-init /etc/network/interfaces.d/50-cloud-init.bak
Step 3: Amend the network configuration file
Do not modify the existing lines in the configuration file. Add the lines for your IPv6 configuration, replacing YOUR_IPv6 and IPv6_PREFIX with your own values. In this example, the network interface is called eth0. The interface on your server may differ.
auto eth0
iface eth0 inet dhcp
    accept_ra 0

iface eth0 inet6 static
    address YOUR_IPv6
    netmask IPv6_PREFIX

# control-alias eth0
iface eth0 inet6 static
    address 2607:5300:xxxx:xxxx::/xx
    dns-nameservers 2001:41d0:3:163::1
    gateway 2607:5300:xxxx:xxff:ff:ff:ff:ff
Debian 10
iface eth0 inet6 static
    address YOUR_IPv6
    netmask 64

post-up /sbin/ip -f inet6 route add IPv6_GATEWAY dev eth0
post-up /sbin/ip -f inet6 route add default via IPv6_GATEWAY
pre-down /sbin/ip -f inet6 route del IPv6_GATEWAY dev eth0
pre-down /sbin/ip -f inet6 route del default via IPv6_GATEWAY
Additional IPv6 addresses can be added with the following lines in the configuration file: up ip -6 addr add ADDITIONAL_IPV6_1/IPv6_PREFIX dev eth0, up ip -6 addr add ADDITIONAL_IPV6_2/IPv6_PREFIX dev eth0 etc...
To ensure that the IPv6 is enabled or disabled whenever the eth0 interface is enabled or disabled, you need to add the following line to the configuration:
down ip -6 addr del ADDITIONAL_IPV6_1/IPv6_PREFIX dev eth0
down ip -6 addr del ADDITIONAL_IPV6_2/IPv6_PREFIX dev eth0
Configuration example:
auto eth0
iface eth0 inet dhcp
    accept_ra 0

iface eth0 inet6 static
    address 2607:5300:adce:f2cd::1
    netmask 64

# control-alias eth0
iface eth0 inet6 static
    address 2607:5300:xxxx:xxxx::/xx
    dns-nameservers 2001:41d0:3:163::1
    gateway 2607:5300:xxxx:xxff:ff:ff:ff:ff
Adding additional IPv6 addresses:
auto eth0
iface eth0 inet dhcp
    accept_ra 0

iface eth0 inet6 static
    address 2607:5300:adce:f2cd::1
    netmask 64
    up ip -6 addr add 2607:5300:adce:f2cd::2/64 dev eth0
    up ip -6 addr add 2607:5300:adce:f2cd::3/64 dev eth0
    down ip -6 addr del 2607:5300:adce:f2cd::2/64 dev eth0
    down ip -6 addr del 2607:5300:adce:f2cd::3/64 dev eth0

# control-alias eth0
iface eth0 inet6 static
    address 2607:5300:xxxx:xxxx::/xx
    dns-nameservers 2001:41d0:3:163::1
    gateway 2607:5300:xxxx:xxff:ff:ff:ff:ff
Step 4: Save the file and apply the changes
Save your changes to the file and then restart the network or reboot your server to apply the changes.
sudo /etc/init.d/networking restart
Step 5: Test the IPv6 connectivity
You can test the IPv6 connectivity by running the commands shown below:
ping6 -c 4 2001:4860:4860::8888

PING 2001:4860:4860::8888(2001:4860:4860::8888) 56 data bytes
64 bytes from 2001:4860:4860::8888: icmp_seq=1 ttl=57 time=4.07 ms
64 bytes from 2001:4860:4860::8888: icmp_seq=2 ttl=57 time=4.08 ms
64 bytes from 2001:4860:4860::8888: icmp_seq=3 ttl=57 time=4.08 ms
64 bytes from 2001:4860:4860::8888: icmp_seq=4 ttl=57 time=4.07 ms

--- 2001:4860:4860::8888 ping statistics ---
4 packets transmitted, 4 received, 0% packet loss, time 3003ms
rtt min/avg/max/mdev = 4.075/4.079/4.083/0.045 ms
If you are not able to ping this IPv6 address, check your configuration and try again. Also ensure that the machine you are testing from is connected with IPv6. If it still does not work, please test your configuration in Rescue mode.
Fedora 38 and later
The configuration example below is based on Fedora 39.
Fedora now uses keyfiles. NetworkManager previously stored network profiles in ifcfg format in this directory: /etc/sysconfig/network-scripts/. However, the ifcfg format is now deprecated. By default, NetworkManager no longer creates new profiles in this format. The configuration file is now found in /etc/NetworkManager/system-connections/.
In this example, our file is called cloud-init-eno1.nmconnection.
Step 1: Use SSH to connect to your server
Step 2: Create a backup
Info
Note that the name of the network file in our example may differ from your own. Please adjust to your appropriate name.
First, make a copy of the configuration file, so that you can revert at any time:
sudo cp -r /etc/NetworkManager/system-connections/cloud-init-eno1.nmconnection /etc/NetworkManager/system-connections/cloud-init-eno1.nmconnection.bak
Step 3: Amend the network configuration file
Amend the file by adding the necessary lines to it; do not modify anything in the original file. Replace the generic elements (i.e. YOUR_IPV6 and IPv6_PREFIX) with your specific values. Also, we have omitted the IPv4 configuration to avoid confusion, but the IPv6 configuration is made in the same configuration file.
[ipv6]
method=auto
may-fail=true
address1=2607:5300:xxxx:xxxx::/xx
address2=YOUR_IPV6/IPv6_PREFIX
gateway=2607:5300:xxxx:xxff:ff:ff:ff:ff
If you need to configure more IPv6 addresses, your configuration should look like this:
[ipv6]
method=auto
may-fail=true
address1=2607:5300:xxxx:xxxx::/xx
address2=ADDITIONAL_IPV6_1/IPv6_PREFIX
address3=ADDITIONAL_IPV6_2/IPv6_PREFIX
gateway=2607:5300:xxxx:xxff:ff:ff:ff:ff
Configuration example:
sudo nano /etc/NetworkManager/system-connections/cloud-init-eno1.nmconnection
Next, we amend the configuration file:
[ipv6]
method=auto
may-fail=true
address1=2607:5300:xxxx:xxxx::/xx
address2=2607:5300:adce:f2cd::1/64
gateway=2607:5300:xxxx:xxff:ff:ff:ff:ff
For multiple IPV6 addresses:
[ipv6]
method=auto
may-fail=true
address1=2607:5300:xxxx:xxxx::/xx
address2=2607:5300:adce:f2cd::1/64
address3=2607:5300:adce:f2cd::2/64
gateway=2607:5300:xxxx:xxff:ff:ff:ff:ff
Step 4: Save the file and apply the changes
Save your changes to the file and then restart the network or reboot your server to apply the changes.
sudo systemctl restart NetworkManager
Step 5: Test the IPv6 connectivity
You can test the IPv6 connectivity by running the commands shown below:
ping6 -c 4 2001:4860:4860::8888

PING 2001:4860:4860::8888(2001:4860:4860::8888) 56 data bytes
64 bytes from 2001:4860:4860::8888: icmp_seq=1 ttl=57 time=4.07 ms
64 bytes from 2001:4860:4860::8888: icmp_seq=2 ttl=57 time=4.08 ms
64 bytes from 2001:4860:4860::8888: icmp_seq=3 ttl=57 time=4.08 ms
64 bytes from 2001:4860:4860::8888: icmp_seq=4 ttl=57 time=4.07 ms

--- 2001:4860:4860::8888 ping statistics ---
4 packets transmitted, 4 received, 0% packet loss, time 3003ms
rtt min/avg/max/mdev = 4.075/4.079/4.083/0.045 ms
If you are not able to ping this IPv6 address, check your configuration and try again. Also ensure that the machine you are testing from is connected with IPv6. If it still does not work, please test your configuration in Rescue mode.
Debian 12, Ubuntu 20.04 and later
The configuration example below is based on Ubuntu 22.04 (Jammy Jellyfish).
The network configuration files are located in the directory /etc/netplan/. By default, the main configuration file is called 50-cloud-init.yaml.
Step 1: Use SSH to connect to your server
Step 2: Create the network configuration file
The best approach is to create a separate configuration file with a .yaml extension for configuring IPv6 addresses in the /etc/netplan/ directory. This way, you can easily revert the changes in the event of an error.
In our example, our file is named 51-cloud-init-ipv6.yaml:
sudo touch /etc/netplan/51-cloud-init-ipv6.yaml
Step 3: Amend the network configuration file
Using a text editor, amend the 51-cloud-init-ipv6.yaml file by adding the following lines to the file as shown in the example below.
Replace the generic elements (i.e. YOUR_IPV6 and IPV6_PREFIX) as well as the network interface (if your server is not using eno3) with your specific values.
network:
    version: 2
    ethernets:
         eno3:
            dhcp6: no
            match:
              name: eno3
            addresses:
              - YOUR_IPV6/IPV6_PREFIX
If you need to configure more IPv6 addresses, your configuration should look like this:
network:
    version: 2
    ethernets:
        eno3:
            dhcp6: no
            match:
              name: eno3
            addresses:
              - YOUR_IPV6/IPv6_PREFIX
              - ADDITIONAL_IPV6_1/IPv6_PREFIX
              - ADDITIONAL_IPV6_2/IPv6_PREFIX
Warning
NOTE: It is important to respect the alignment of each element in this file as represented in the example above. Do not use the tab key to create your spacing. Only the space key is needed.
Configuration example:
sudo nano /etc/netplan/51-cloud-init-ipv6.yaml
Next, we amend the configuration file:
network:
    version: 2
    ethernets:
          eno3:
            dhcp6: no
            match:
              name: eno3
            addresses:
              - 2607:5300:adce:f2cd::1/64
For multiple IPV6 addresses:
network:
    version: 2
    ethernets:
        eno3:
            dhcp6: no
            match:
              name: eno3
            addresses:
              - 2607:5300:adce:f2cd::1/64
              - 2607:5300:adce:f2cd::2/64
              - 2607:5300:adce:f2cd::3/64
Step 4: Test and apply the configuration
You can test your configuration using this command:
If it is correct, apply it using the following command:
Step 5: Test the IPv6 connectivity
You can test the IPv6 connectivity by running the command shown below:
ping6 -c 4 2001:4860:4860::8888

PING 2001:4860:4860::8888(2001:4860:4860::8888) 56 data bytes
64 bytes from 2001:4860:4860::8888: icmp_seq=1 ttl=57 time=4.07 ms
64 bytes from 2001:4860:4860::8888: icmp_seq=2 ttl=57 time=4.08 ms
64 bytes from 2001:4860:4860::8888: icmp_seq=3 ttl=57 time=4.08 ms
64 bytes from 2001:4860:4860::8888: icmp_seq=4 ttl=57 time=4.07 ms

--- 2001:4860:4860::8888 ping statistics ---
4 packets transmitted, 4 received, 0% packet loss, time 3003ms
rtt min/avg/max/mdev = 4.075/4.079/4.083/0.045 ms
CentOS 7, Alma Linux (8 & 9) and Rocky Linux (8 & 9)
The configuration example below is based on CentOS 7.
The network configuration file is located in the directory /etc/sysconfig/network-scripts. In our example, it is called ifcfg-eth0.
Step 1: Use SSH to connect to your server
Step 2: Create a backup
Info
Note that the name of the network file in our example may differ from your own. Please adjust to your appropriate name.
First, make a copy of the configuration file, so that you can revert at any time:
sudo cp -r /etc/sysconfig/network-scripts/ifcfg-eth0 /etc/sysconfig/network-scripts/ifcfg-eth0.bak
Step 3: Amend the network configuration file
In the open configuration file, add the following lines if they are missing. Replace the generic element (i.e. YOUR_IPv6, IPV6_GATEWAY and IPV6_PREFIX) with your specific values. Also, we have omitted the IPv4 configuration to avoid confusion, but the IPv6 configuration is made in the same configuration file.
IPV6INIT=yes
IPV6ADDR=YOUR_IPV6/IPV6_PREFIX
IPV6_DEFAULTGW=IPV6_GATEWAY
For Alma Linux and Rocky linux, the contents of the configuration file may differ from that shown above, in which case simply add the missing items. Do not replace anything in the original file.
If you need to configure multiple IPv6 addresses, add the following line:
IPV6ADDR_SECONDARIES="ADDITIONAL_IPV6_1/IPV6_PREFIX ADDITIONAL_IPV6_2/IPV6_PREFIX etc..."
Configuration example:
sudo nano /etc/sysconfig/network-scripts/ifcfg-eth0
Next, we amend the configuration file:
IPV6INIT=yes
IPV6ADDR=2607:5300:adce:f2cd::/64
IPV6_DEFAULTGW=2607:5300:adce:f2ff:ff:ff:ff:ff
For multiple IPV6 addresses:
IPV6INIT=yes
IPV6ADDR=2607:5300:adce:f2cd::
IPV6_DEFAULTGW=2607:5300:adce:f2ff:ff:ff:ff:ff
IPV6ADDR_SECONDARIES="2607:5300:adce:f2cd::1/64 2607:5300:adce:f2cd::2/64"
Step 4: Save the file and apply the changes
Save your changes to the file and then restart the network with one of the following commands:
sudo systemctl restart network
For Alma Linux and Rocky Linux
sudo systemctl restart NetworkManager
You can also reboot your server to apply the changes.
Step 5: Test the IPv6 connectivity
You can test the IPv6 connectivity by running the command shown below:
ping6 -c 4 2001:4860:4860::8888

PING 2001:4860:4860::8888(2001:4860:4860::8888) 56 data bytes
64 bytes from 2001:4860:4860::8888: icmp_seq=1 ttl=57 time=4.07 ms
64 bytes from 2001:4860:4860::8888: icmp_seq=2 ttl=57 time=4.08 ms
64 bytes from 2001:4860:4860::8888: icmp_seq=3 ttl=57 time=4.08 ms
64 bytes from 2001:4860:4860::8888: icmp_seq=4 ttl=57 time=4.07 ms

--- 2001:4860:4860::8888 ping statistics ---
4 packets transmitted, 4 received, 0% packet loss, time 3003ms
rtt min/avg/max/mdev = 4.075/4.079/4.083/0.045 ms
Windows Server 2016 and later
Step 1: Use RDP to connect to your server
Find more information in this guide.
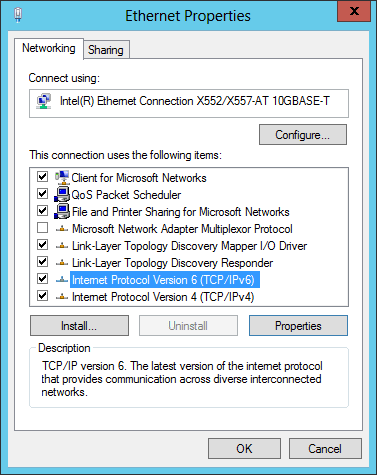
Step 2: Open your server's network configuration
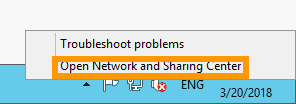
First, right-click on the network icon in the notification area to go to the Network and Sharing Center.
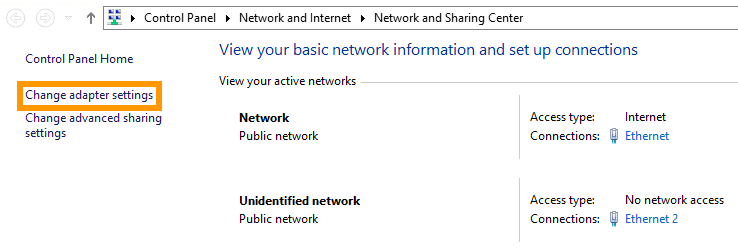
Click Change adapter settings.
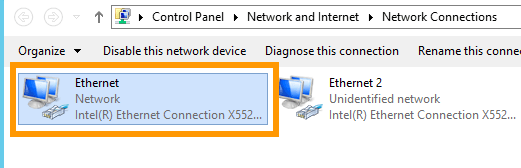
Right-click your network adapter, then click Properties.
Select Internet Protocol Version 6, then click Properties.
Step 3: Amend the network configuration
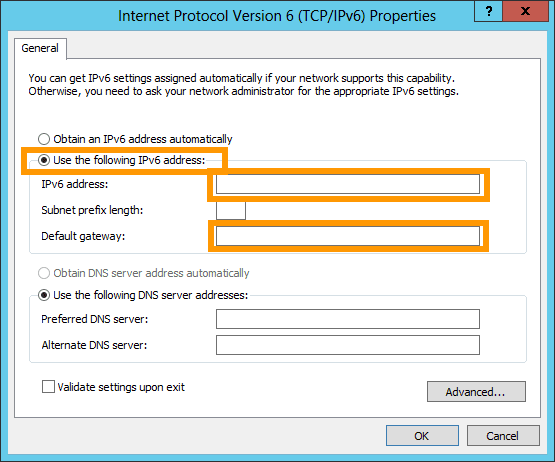
Enter your IPv6 configuration (IPv6 address and Default Gateway), check the Validate settings upon exit box and click the OK button to validate your changes.
Diagnostic
Have you configured your IPv6, but found that nothing works?
There is a simple operation to determine whether the error is in your configuration, or on the OVHcloud network.
First, put your server into rescue mode.
Next, use the template commands below to configure your IPv6 non-persistently, replacing ‘YOUR_IPV6’, ‘IPV6_PREFIX’ and 'IPV6_GATEWAY' with your own details:
ip addr add YOUR_IPV6/IPV6_PREFIX dev eth0
ip -6 route add IPV6_GATEWAY dev eth0
ip -6 route add default via IPV6_GATEWAY dev eth0
Test your network again via a ping6, for example:
If your server responds, there is likely an error in one of the steps taken for your initial configuration.
In any case, feel free to contact our support team and ask to review your configurations. You will need to provide:
- The operating system name and version you are using on your server.
- The name and directory of the network configuration file.
- The content of that file.
Go further
Browse all the Dedicated Servers guides.
Browse the rest of the OVHcloud US documentation for guides on our other products and services.
Learn more about Dedicated Servers on the OVHcloud US website.
