Overview of OVHgateway
"OVHgateway" is the name of the outgoing point of your cluster to the internet.
This guide will explain how this gateway works, and how to redeploy it.
Instructions
Technical details
The VM is based on Ubuntu 20.04 LTS (“The Focal Fossa”).
Warning
NOTE: OVHcloud recommends that you replace this gateway with one of your choice. You can use this guide: OVHgateway replacement.
The OVHgateway has a lightweight design, with 2 NICs, 1 vCPU, 1 GB of memory, and 20 GiB of disk space.
ens3 is the interface for the external network and owns the Additional IP address in the subnet base with VLAN 0.
ens4 is the interface for the internal network in the subnet infra with VLAN 1.
OVHcloud teams have customized the VM with an IPTABLES script.
Warning
NOTE: There is no way to connect with SSH or any other protocol. It is also not possible to log in from the console via Prism Central.
Warning
NOTE: The VM is used only to NAT traffic between hosts, CVM, VM, and Internet.
ICMP requests are only allowed in the private network.
User data script
The VM is deployed with cloud-init, a tool that applies user data to your instances automatically.
#cloud-config
---
hostname: gw
fqdn: gw.ovh.cloud
users:
  - name: ovh
    shell: /bin/nologin
disable_root: true
write_files:
  - path: /etc/netplan/50-cloud-init.yaml
    content: |
      network:
        version: 2
        renderer: networkd
        ethernets:
          ens3:
            addresses: [PUBLICIP]
            gateway4: PUBLICGW
            nameservers:
              addresses: [DNS]
          ens4:
            addresses: [PRIVATEIP]
  - path: /etc/systemd/system/firegateway.service
    content: |
      [Unit]
      Description=GatewayFirewall
      Wants=network.target network-online.target
      After=network.target network-online.target
      [Service]
      Type=simple
      ExecStart=/root/firegateway
      Restart=always
      TimeoutStartSec=0
      [Install]
      WantedBy=multi-user.target
  - path: /root/firegateway
    content: |
      #!/bin/bash
      iptables -F
      iptables -X
      iptables -t nat -F
      iptables -t nat -X
      iptables -t mangle -F
      iptables -t mangle -X
      iptables -P INPUT DROP
      iptables -P OUTPUT DROP
      iptables -P FORWARD ACCEPT
      iptables -A INPUT -i ens4 -p ICMP -j ACCEPT
      iptables -A OUTPUT -p ICMP -j ACCEPT
      iptables -A INPUT -i ens3 -m state --state ESTABLISHED,RELATED -j ACCEPT
      iptables -A INPUT -i ens4 -j ACCEPT
      iptables -t nat -A POSTROUTING -o ens3 -j MASQUERADE

runcmd:
  - netplan generate
  - netplan apply
  - /sbin/sysctl -w net.ipv4.conf.default.rp_filter=1
  - /sbin/sysctl -w net.ipv4.tcp_syncookies=1
  - /sbin/sysctl -w net.ipv4.conf.all.accept_redirects=0
  - /sbin/sysctl -w net.ipv4.conf.all.secure_redirects=0
  - /sbin/sysctl -w net.ipv4.conf.default.accept_source_route=0
  - sed -i s/#net.ipv4.ip_forward/net.ipv4.ip_forward/g /etc/sysctl.conf
  - /sbin/sysctl -w net.ipv4.ip_forward=1
  - iptables -t nat -A POSTROUTING -o ens3 -j MASQUERADE
  - chmod +x /root/firegateway
  - systemctl enable firegateway.service
  - systemctl disable ssh.service
  - apt remove -y wget curl ftp git htop mtr-tiny open-vm-tools tcpdump telnet tmux snapd openssh-server
  - apt update && apt upgrade -y
  - apt-get clean -y
  - apt autoremove -y
final_message: "The system is finally up, after $UPTIME seconds"
How to redeploy the VM gateway with the central Prism interface
To redeploy the gateway VM you will need:
- Additional IP address
- LAN subnet (subnet of CVM, Prism Central, AHV hypervisors)
- Subnet name
Check the Additional IP address
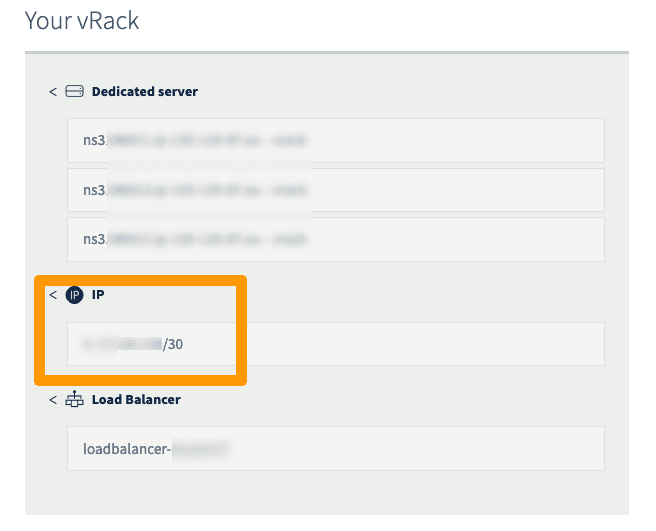
Log in to the OVHcloud Control Panel and open the management section of your vRack. Verify the Additional IP address used by the Nutanix Cluster.
Warning
NOTE: The following instructions will use the IP block 198.51.100.0/30 for example purposes.
For vRack purposes, the first, penultimate, and last addresses in any given IP block are always reserved for the network address, network gateway, and network broadcast respectively. This means that the first usable address is the second address in the block, as shown below:
198.51.100.0   Reserved: Network address
198.51.100.1   First usable IP
198.51.100.2   Reserved: Network gateway
198.51.100.3   Reserved: Network broadcast
Check the private subnet or gateway private IP address
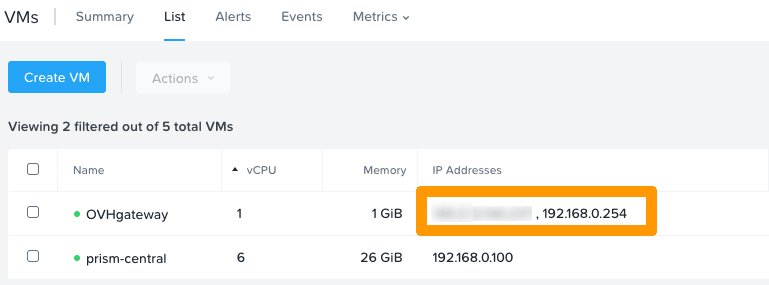
If the gateway still exists, go to the VM in the VM section of your Prism Central WebUI.
The gateway IP is displayed here.
However, if the gateway is not present, check the subnet by going to Hardware then Hosts in the Prism Central WebUI.
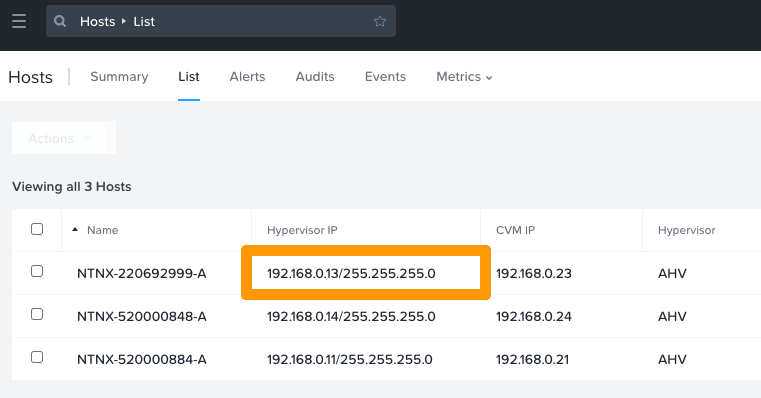
In this case, the subnet is 192.168.0.0/24. In the default configuration, the gateway IP address is therefore 192.168.0.254.
Retrieve the subnet name
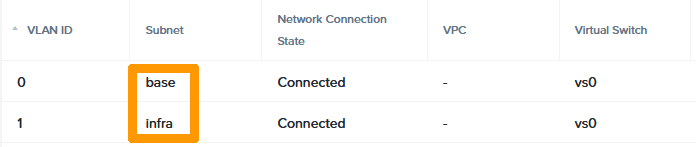
If the gateway still exists, go to the VM in the VM section of your Prism Central WebUI.
Click on the OVHgateway VM and open the NICs tab.
Step 2: Create the VM
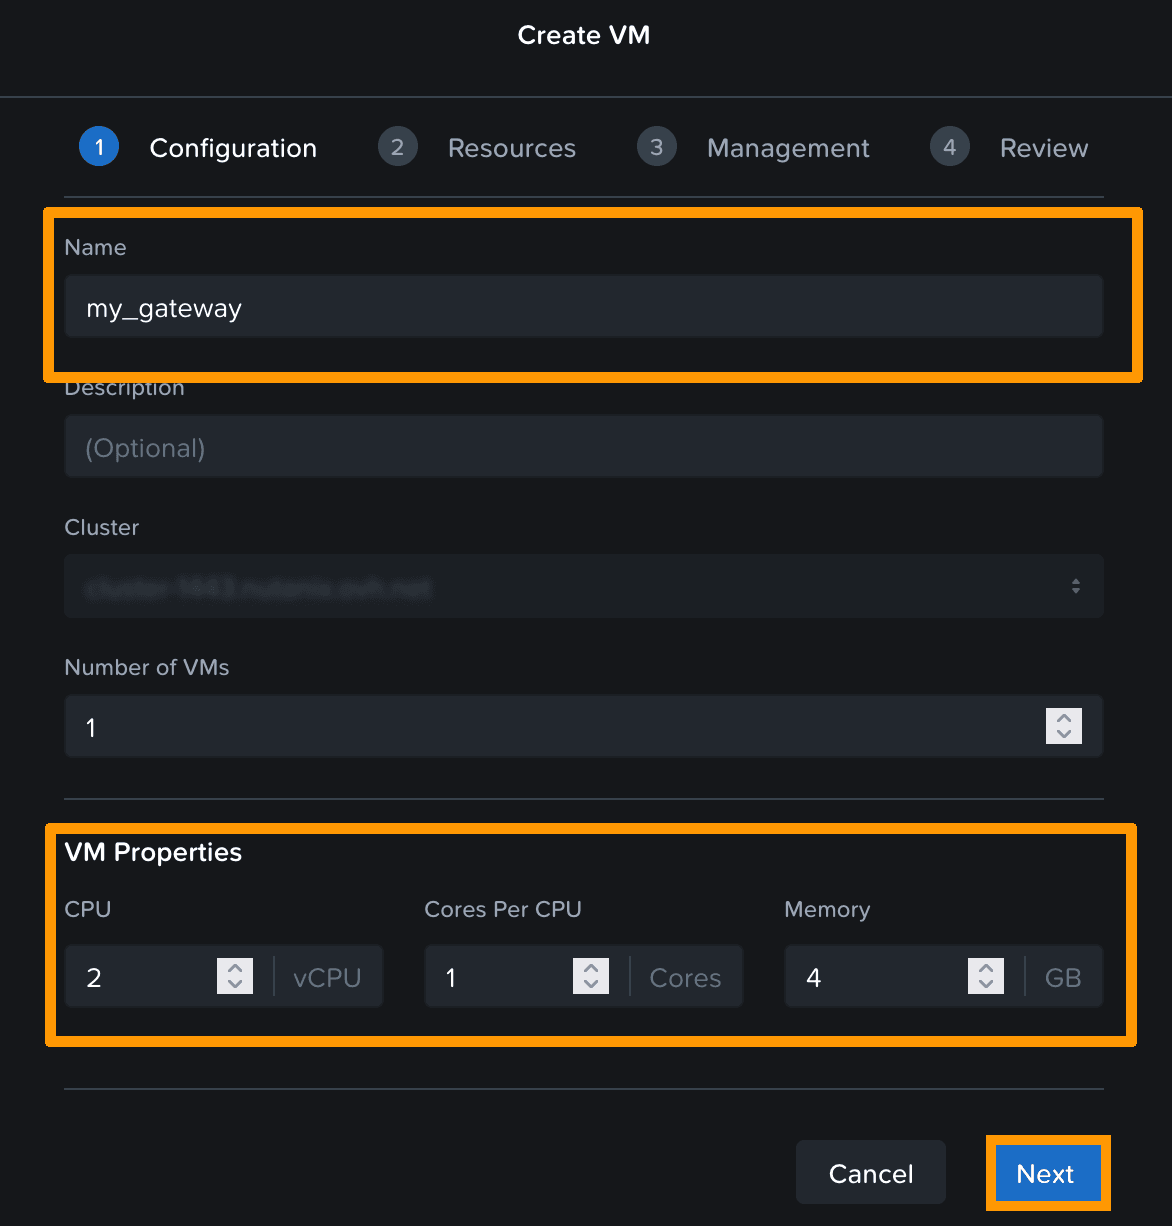
Log in to Prism Central and create a VM.
Customize the VM name and characteristics.
Click Next.
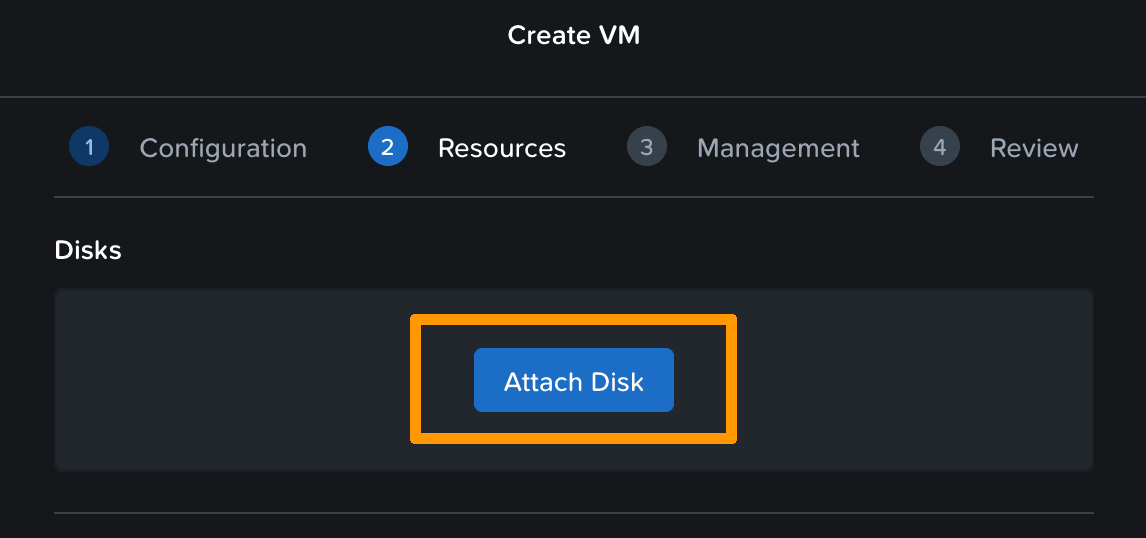
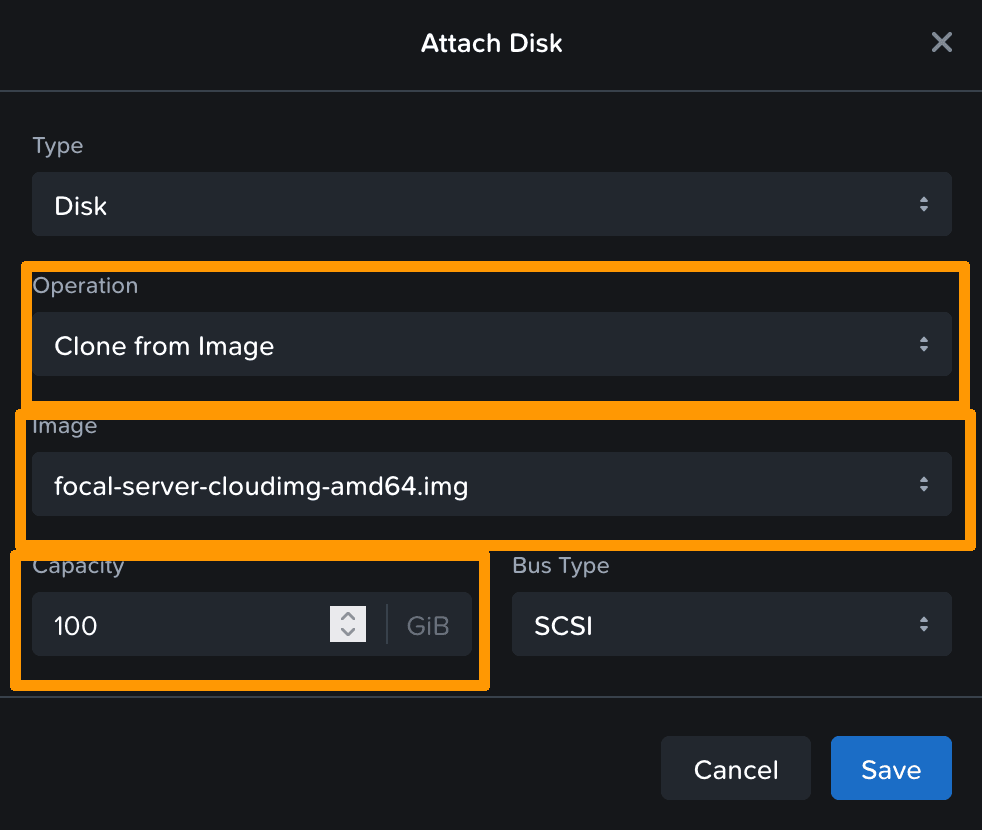
You then need to attach a disk. To do this, you can select the image used to create the original gateway.
Then add two nics to the “base” network:
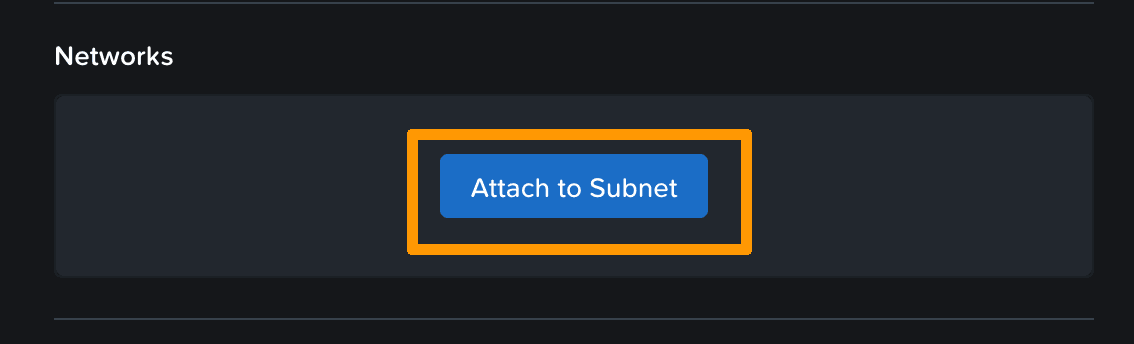
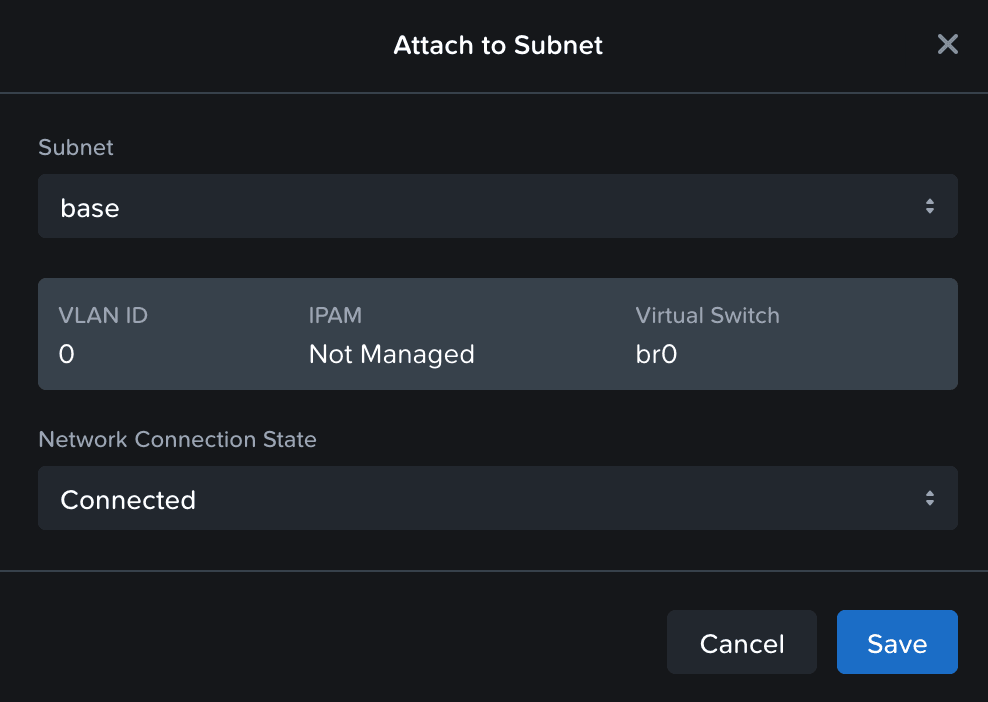
Click Next.
In the management interface, choose cloud-init in the “Guest customization” section.
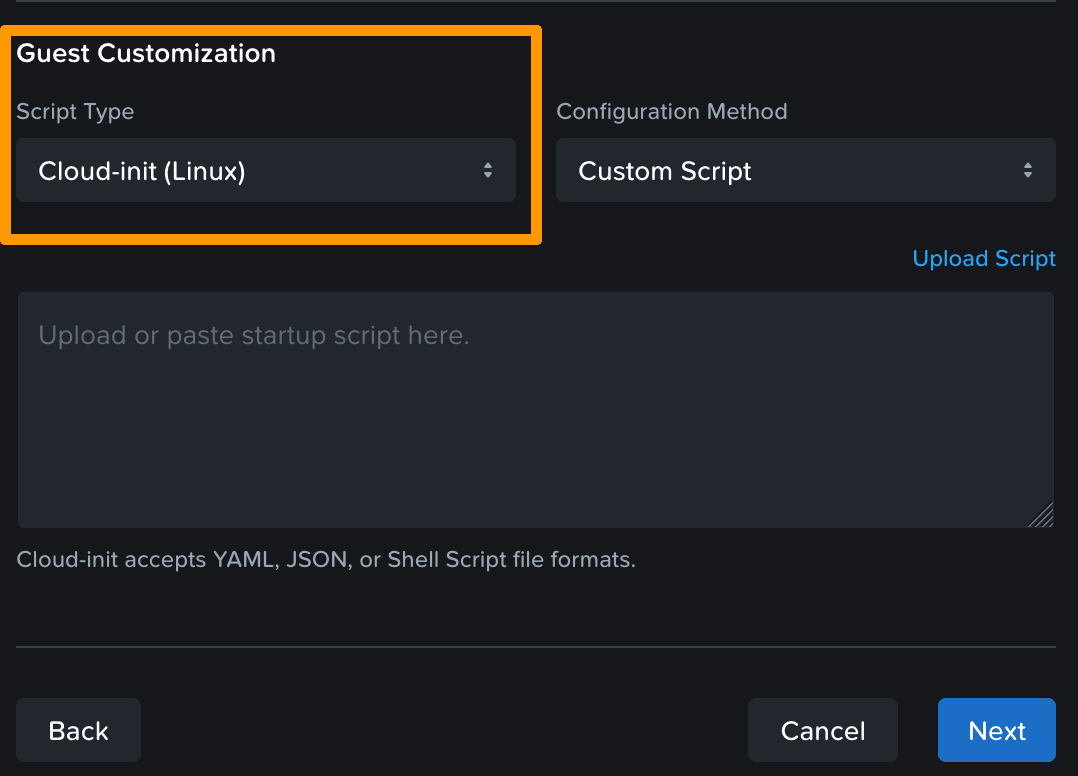
You now need to create a yaml script to define the parameters. This script contains the user data. When the system boots, these settings such as users, packets, files, etc. will be applied to the VM.
Below, you will find a template that you can modify with your values to create your VM.
Warning
NOTE: You can use the original VM creation file or use a custom file to create your own gateway. This is what we will see in this example.
- Replace the
hostname, fqdn, name, passwd, ssh-autorized-keys, and IP addresses with the values you want.
- This file creates the file for netplan, applies the configuration, and initializes a reboot.
- The password must be a hash value. You can generate it with the command below.
mkpasswd --method=SHA-512 --rounds=4096
#cloud-config
hostname: <yourhostname>
fqdn: <yourhostname.ovh.cloud>
users:
  - name: <yourusername>
    sudo: ['ALL=(ALL) NOPASSWD:ALL']
    groups: sudo
    shell: /bin/bash
    lock_passwd: false
    passwd: <yourhashpass>
    ssh-authorized-keys: <your public ssh key>
write_files:
   - path: /etc/netplan/50-cloud-init.yaml
     content: |
        network:
           version: 2
           renderer: networkd
           ethernets:
              ens3:
                addresses: [198.51.100.1/30]
                gateway4: 198.51.100.2
                nameservers:
                  addresses: [213.186.33.99]
              ens4:
                addresses: [192.168.0.254/24]


runcmd:
   - netplan generate
Paste this script into the box provided.
Click Next, then Create VM.
Warning
NOTE: Wait a few minutes for the VM to take into account all settings.
How to redeploy the VM gateway in the command line
To redeploy the gateway VM, you will need the following:
- Additional IP address
- LAN subnet (CVM hypervisor subnet, Prism Central, AHV)
- Subnet name
Check the Additional IP address
Log in to the OVHcloud Control Panel and access your vRack management. Check the Additional IP address used by the Nutanix cluster.
Warning
NOTE: The following instructions will use the IP block 198.51.100.0/30 as an example.
When using the vRack, the first, penultimate, and last addresses in a given IP block are always reserved for the network address, network gateway, and network broadcast respectively. This means that the first usable address is the second address in the block, as shown below:
198.51.100.0  Reserved: Network address
198.51.100.1   First usable IP
198.51.100.2   Reserved: Network gateway
198.51.100.3   Reserved: Network broadcast
Verify the private IP address of the subnet or private gateway
If the gateway still exists, go to the VM section of the Prism Central web interface.
The gateway IP is displayed here.
However, if the gateway is not present, check the subnet by going to the Hardware menu and then Hosts in the Prism Central web interface.
In this case, the subnet is 192.168.0.0/24. In the default configuration, the gateway IP address is 192.168.0.254.
Retrieve Subnet Name
If the gateway still exists, go to the VM section of the Prism Central web interface.
Click on the OVHgateway VM and open the NICs tab.
To deploy the VM, you need the UUID of the image and the network.
Open a terminal and run the following command:
curl -k -H Accept:application/json -H Content-Type:application/json -u "admin:PRISMADMINPASSWORD" -X POST https://fqdn-cluster:9440/api/nutanix/v3/images/list -d{} | jq .
Warning
NOTE: Please ensure that you enter your real password and FQDN in the settings.
Warning
NOTE: The “ jq . ” will provide a readable json.
{
  "api_version": "3.1",
  "metadata": {
    "total_matches": 1,
    "kind": "image",
    "length": 1,
    "offset": 0
  },
  "entities": [
    {
      "status": {
        "state": "COMPLETE",
        "name": "focal-server-cloudimg-amd64.img",
        "resources": {
          "retrieval_uri_list": [
            "https://127.0.0.1:9440/api/nutanix/v3/images/22c00053-a23e-4dae-a9a9-de0d60ce29ce/file"
          ],
          "current_cluster_reference_list": [
            {
              "kind": "cluster",
              "uuid": "0005dda3-c2a2-6485-5399-043f72b508a0"
            }
          ],
          "architecture": "X86_64",
          "size_bytes": 2361393152,
          "image_type": "DISK_IMAGE",
          "source_uri": "http://192.168.0.1:49200/focal-server-cloudimg-amd64.img"
        },
        `description`: `ubuntu-focal`
      },
      "spec": {
        "name": "focal-server-cloudimg-amd64.img",
        "resources": {
          "image_type": "DISK_IMAGE",
          "source_uri": "http://192.168.0.1:49200/focal-server-cloudimg-amd64.img",
          "architecture": "X86_64"
        },
        `description`: `ubuntu-focal`
      },
      "metadata": {
        "last_update_time": "2022-05-02T08:49:21Z",
        "kind": "image",
        "uuid": "54b919e1-b1e5-4d4a-b055-47ff298bf7d7",
        "spec_version": 0,
        "creation_time": "2022-05-02T08:49:21Z",
        "spec_hash": "00000000000000000000000000000000000000000000000000",
        "categories_mapping": {},
        "categories": {}
      }
    }
  ]
}
In the metadata, you will find the UUID, here: 54b919e1-b1e5-4d4a-b055-47ff298bf7d7, for the image named focal-server-cloudimg-amd64.img.
You then need to find the correct subnet UUID. Run the command below:
curl -k -H Accept:application/json -H Content-Type:application/json -u `admin:PRISMADMINPASSWORD` -X POST https://fqdn-cluster:9440/api/nutanix/v3/subnets/list -d{} | jq.
Warning
NOTE: Please ensure that you enter your real password and FQDN in the settings.
{
  "api_version": "3.1",
  "metadata": {
    "total_matches": 3,
    "kind": "subnet",
    "length": 3,
    "offset": 0
  },
  "entities": [
    {
      "status": {
        "state": "COMPLETE",
        "name": "base",
        "resources": {
          "vswitch_name": "br0",
          "subnet_type": "VLAN",
          "virtual_switch_uuid": "3dba2120-9467-4c57-8781-2b21b40485c1",
          "vlan_id": 0,
          "ip_usage_stats": {
            "num_macs": 2
          }
        },
        "cluster_reference": {
          "kind": "cluster",
          "name": "cluster-xxxx.nutanix.ovh.net",
          "uuid": "0005ee26-4f51-e468-2a6a-043f72b50ef0"
        }
      },
      "spec": {
        "name": "base",
        "resources": {
          "vswitch_name": "br0",
          "subnet_type": "VLAN",
          "virtual_switch_uuid": "3dba2120-9467-4c57-8781-2b21b40485c1",
          "vlan_id": 0
        },
        "cluster_reference": {
          "kind": "cluster",
          "name": "cluster-xxxx.nutanix.ovh.net",
          "uuid": "0005ee26-4f51-e468-2a6a-043f72b50ef0"
        }
      },
      "metadata": {
        "last_update_time": "2022-11-25T13:09:43Z",
        "kind": "subnet",
        "uuid": "3652d420-9f94-4350-8af7-b921d0761781",
        "spec_version": 0,
        "creation_time": "2022-11-25T13:09:43Z",
        "spec_hash": "00000000000000000000000000000000000000000000000000",
        "categories_mapping": {},
        "categories": {}
      }
    },
    {
      "status": {
        "state": "COMPLETE",
        "name": "infra",
        "resources": {
          "vswitch_name": "br0",
          "subnet_type": "VLAN",
          "virtual_switch_uuid": "3dba2120-9467-4c57-8781-2b21b40485c1",
          "vlan_id": 1,
          "ip_usage_stats": {
            "num_macs": 4
          }
        },
        "cluster_reference": {
          "kind": "cluster",
          "name": "cluster-xxxx.nutanix.ovh.net",
          "uuid": "0005ee26-4f51-e468-2a6a-043f72b50ef0"
        }
      },
      "spec": {
        "name": "infra",
        "resources": {
          "vswitch_name": "br0",
          "subnet_type": "VLAN",
          "virtual_switch_uuid": "3dba2120-9467-4c57-8781-2b21b40485c1",
          "vlan_id": 1
        },
        "cluster_reference": {
          "kind": "cluster",
          "name": "cluster-xxxx.nutanix.ovh.net",
          "uuid": "0005ee26-4f51-e468-2a6a-043f72b50ef0"
        }
      },
      "metadata": {
        "last_update_time": "2022-11-25T13:09:43Z",
        "kind": "subnet",
        "uuid": "e60826da-4aab-4810-b7d3-0604a3e16719",
        "spec_version": 0,
        "creation_time": "2022-11-25T13:09:43Z",
        "spec_hash": "00000000000000000000000000000000000000000000000000",
        "categories_mapping": {},
        "categories": {}
      }
    },
   ]
}
The result of the query returns the configuration of the subnets. You will need to find the UUIDs of these subnets, which are located below kind: subnet in the uuid variable as in this example:
3652d420-9f94-4350-8af7-b921d0761781 for VLAN base on VLAN 0e60826da-4aab-4810-b7d3-0604a3e16719 for VLAN infra on VLAN 1
Step 2: Create files needed for CLI deployment
To deploy the VM, you need two files: vm.json, describing the virtual machine, and the cloud-init.yaml configuration file that contains user data such as password, network, etc.
Create the vm.json file:
{
  "spec": {
    "name": "YOURVMNAME",
    "resources": {
      "power_state": "ON",
      "num_vcpus_per_socket": 4,
      "num_sockets": 1,
      "memory_size_mib": 4096,
      "disk_list": [
        {
          "disk_size_mib": 41264,
          "device_properties": {
            "device_type": "DISK",
            "disk_address": {
              "device_index": 0,
              "adapter_type": "SATA"
            }
          },
          "data_source_reference": {
            "kind": "image",
            "uuid": "54b919e1-b1e5-4d4a-b055-47ff298bf7d7"
          }
        }
      ],
      "nic_list": [
        {
          "nic_type": "NORMAL_NIC",
          "ip_endpoint_list": [
            {
              "ip_type": "DHCP"
            }
          ],
          "subnet_reference": {
            "kind": "subnet",
            "name": "base",
            "uuid": "3652d420-9f94-4350-8af7-b921d0761781"
          },
          "is_connected": true
        },
        {
          "nic_type": "NORMAL_NIC",
          "ip_endpoint_list": [
            {
              "ip_type": "DHCP"
            }
          ],
          "subnet_reference": {
            "kind": "subnet",
            "name": "infra",
            "uuid": "e60826da-4aab-4810-b7d3-0604a3e16719"
          },
          "is_connected": true
        }
      ],
      "guest_customization": {
        "cloud_init": {
          "user_data": "USERDATA"
        },
        "is_overridable": false
      }
    }
  },
  "api_version": "3.1.0",
  "metadata": {
    "kind": "vm"
  }
}
Warning
NOTE: You can adjust the parameters with your values, according to your needs: VM name, number of VCPU, RAM size, disk size, etc.
Check data_source_reference to ensure that the UUID is the UUID of your system image:
"data_source_reference": {
            "kind": "image",
            "uuid": "54b919e1-b1e5-4d4a-b055-47ff298bf7d7"
                         }
Also, check the UUID of your subnets :
          "subnet_reference": {
            "kind": "subnet",
            "name": "base",
            "uuid": "3652d420-9f94-4350-8af7-b921d0761781"
                              }
          "subnet_reference": {
            "kind": "subnet",
            "name": "infra",
            "uuid": "e60826da-4aab-4810-b7d3-0604a3e16719"
                              }
You now need to create the cloud-init.yaml file. This file contains user data. When the system boots, these settings such as users, packets, files, etc. will be applied to the VM.
Below, you will find a template that you can modify with your values to create your individual VM.
Warning
NOTE: You can use the original creation file or use a custom file to create your own gateway. This is what we will see in this example.
- Replace the
hostname, fqdn, name, passwd, ssh-autorized-keys, and IP addresses with the values you want.
- This file creates the file for netplan, applies the configuration, and initializes a reboot.
- The password must be a hash value. You can generate it with the command below.
mkpasswd --method=SHA-512 --rounds=4096
#cloud-config
hostname: <yourhostname>
fqdn: <yourhostname.ovh.cloud>
users:
  - name: <yourusername>
    sudo: ['ALL=(ALL) NOPASSWD:ALL']
    groups: sudo
    shell: /bin/bash
    lock_passwd: false
    passwd: <yourhashpass>
    ssh-authorized-keys: <your public ssh key>
write_files:
   - path: /etc/netplan/50-cloud-init.yaml
     content: |
        network:
           version: 2
           renderer: networkd
           ethernets:
              ens3:
                addresses: [198.51.100.1/30]
                gateway4: 198.51.100.2
                nameservers:
                  addresses: [213.186.33.99]
              ens4:
                addresses: [192.168.0.254/24]


runcmd:
   - netplan generate
Step 3: Create the VM
Transform the cloud-init.yaml into “base64” and place it in a variable:
USERDATA=$(base64 -w 0 cloud-init.yaml)
Then replace the string “USERDATA” in vm.json with the value of the variable USERDATA in the vm.json file:
sed -i s/USERDATA/${USERDATA}/g vm.json
Finally, use a cURL query to save and power on the VM:
curl -k -H Accept:application/json -H Content-Type:application/json -u "admin:PRISMADMINPASSWORD" -X POST https://fqdn:9440/api/nutanix/v3/vms -d @vm.json | jq .
Warning
NOTE: Wait a few minutes for the VM to take into account all settings.
Go further
Browse all the Nutanix guides.
Browse the rest of the OVHcloud US documentation for guides on our other products and services.
Learn more about Nutanix on OVHcloud on the OVHcloud US website.
