Configuring Network Settings in a Debian 10/11 VM
In this step, we will be configuring our interface settings. To do this, you must first open your interface configuration file. Do so in a text editor of your choice using the following command:
sudo vi /etc/network/interfaces
Edit the interfaces file to make it appear as follows:
# This file describes the network interfaces available on your system
# and how to activate them. For more information, see interfaces(5).

source /etc/network/interfaces.d/*

# The loopback network interface
auto lo
iface lo inet loopback

# The primary network interface
auto ens192
iface ens192 inet static
address 192.0.2.1
netmask 255.255.255.255
gateway 203.0.113.254
dns-nameservers 208.67.222.222 208.67.220.220
In this file, replace the following pieces of information as instructed:
- If you don't know the name of your interface, you can find it using the following command:
- Next to address, replace "192.0.2.1" with the additional IP to which you have added the vMAC in the OVHcloud Control Panel.
- Next to gateway, replace the "203.0.113.254" with the IPv4 Gateway of your server, found in the OVHcloud Control Panel. (See more here.)
- The DNS name servers listed are from OpenDNS. Feel free to use other name servers if you choose.
Now you will need to bring your NIC online. To do so, enter the following command:
sudo ip link set ens192 up
Finally, restart your networking service using the following command:
sudo systemctl restart networking
To test that the VM is fully connected to the Internet, ping example.com. If you get a response, you are good to go. If you do not, restart your VM and attempt the ping again.
Configuring Network Settings in an Ubuntu 24.04 VM
In this step, we will be configuring our interface settings. To do this, you must first open your interface configuration file. Do so in a text editor of your choice using the following command:
/etc/netplan/00-netcfg.yaml
Edit the interfaces file to make it appear as follows:
network:
  version: 2
  renderer: networkd
  ethernets:
    ens160:
      dhcp4: no
      dhcp6: no
      addresses:
        - 192.0.2.1/32
      nameservers:
        addresses:
          - 208.67.222.222
          - 208.67.220.220
      routes:
          - to: 0.0.0.0/0
            via: 203.0.113.254
            on-link: true
      match:
        macaddress: 00:00:00:0a:bc:00
In this file, replace the following pieces of information as instructed:
- If you don't know the name of your interface, you can find it using the following command:
- Next to addresses, replace "192.0.2.1/32" with the additional IP to which you have added the vMAC in the OVHcloud Control Panel.
- The DNS name servers listed are from OpenDNS. Feel free to use other name servers if you choose.
- Next to via, replace the "203.0.113.254" with the IPv4 Gateway of your server, found in the OVHcloud Control Panel. (See more here.)
- Next to macaddress, replace "00:00:00:0a:bc:00" with the virtual MAC address for your Additional IP. This information can be found in the OVHcloud Control Panel in the IP section.
Now you will need to bring your NIC online. To do so, enter the following command:
sudo ip link set ens160 up
Apply the netplan:
Finally, restart your networking service using the following command:
sudo systemctl restart systemd-networkd
To test that the VM is fully connected to the Internet, ping example.com. If you get a response, you are good to go. If you do not, restart your VM and attempt the ping again.
Configuring Network Settings in an Ubuntu 22.04 VM
In this step, we will be configuring our interface settings. To do this, you must first open your interface configuration file. Do so in a text editor of your choice using the following command:
/etc/netplan/1-netcfg.yaml
Edit the interfaces file to make it appear as follows:
network:
  version: 2
  renderer: networkd
  ethernets:
    ens160:
      dhcp4: no
      dhcp6: no
      addresses:
        - 192.0.2.1/32
      nameservers:
        addresses:
          - 208.67.222.222
          - 208.67.220.220
        routes:
          - to: 0.0.0.0/0
            via: 203.0.113.254
            on-link: true
        match:
          macaddress: 00:00:00:0a:bc:00
In this file, replace the following pieces of information as instructed:
- If you don't know the name of your interface, you can find it using the following command:
- Next to addresses, replace "192.0.2.1/32" with the additional IP to which you have added the vMAC in the OVHcloud Control Panel.
- The DNS name servers listed are from OpenDNS. Feel free to use other name servers if you choose.
- Next to via, replace the "203.0.113.254" with the IPv4 Gateway of your server, found in the OVHcloud Control Panel. (See more here.)
- Next to macaddress, replace "00:00:00:0a:bc:00" with the virtual MAC address for your Additional IP. This information can be found in the OVHcloud Control Panel in the IP section.
Now you will need to bring your NIC online. To do so, enter the following command:
sudo ip link set ens160 up
Apply the netplan:
Finally, restart your networking service using the following command:
sudo systemctl restart systemd-networkd
To test that the VM is fully connected to the Internet, ping example.com. If you get a response, you are good to go. If you do not, restart your VM and attempt the ping again.
Configuring Network Settings in an Ubuntu 18.04 VM
Canonical, the developer of Ubuntu, implemented the use of Netplan for easy-to-use network configuration as of version 17.x.
To configure the network interface, open the 01-netcfg.yaml file in a text editor of your choice using the following command:
sudo vi /etc/netplan/01-netcfg.yaml
Edit the file to make it appear as follows:
# This file describes the network interfaces available on your system
# For more information, see netplan(5).
network:
  version: 2
  renderer: networkd
  ethernets:
    ens160:
      dhcp4: no
      dhcp6: no
      addresses:
        - 192.0.2.1/32
      nameservers:
        addresses:
          - 208.67.222.222
          - 208.67.220.220
      routes:
        - to: 0.0.0.0/0
          via: 203.0.113.254
          on-link: true
In this file, replace the following pieces of information as instructed:
- If you replace the VMXNET3 NIC with another one, your NIC may use a different naming convention. If it does, replace "ens160" in the file with the name of your interface. If you don't know the name of your interface, you can find it using the following command:
- Next to addresses, replace "192.0.2.1" with the additional IP to which you have added the vMAC in the OVHcloud Control Panel plus the subnet you wish to use in CIDR notation.
- The DNS name server addresses listed are from OpenDNS. Feel free to use other name servers if you choose.
- Next to via, replace the "203.0.113.254" with the IPv4 Gateway of your server, found in the OVHcloud Control Panel. (See more here.)
Now apply the Netplan settings with the following command:
To test that the VM is fully connected to the Internet, ping example.com. If you get a response, you are good to go. If you do not, restart your VM and attempt the ping again.
Configuring Network Settings in a CentOS 7 VM
In this step, we will be configuring our interface settings. To do this, first navigate to the network-scripts directory using the following command:
cd /etc/sysconfig/network-scripts
Use the ls command to view the content of the directory.
Locate your interface file (e.g. ifcfg-ensXXX) and then open it in a text editor of your choice using the following command:
Warning
NOTE: In our example the interface file is ifcfg-ens192.
Edit the interfaces file to make it appear as follows, changing only what is in red:
TYPE=Ethernet
PROXY_METHOD=none
BROWSER_ONLY=no
BOOTPROTO=none
DEFROUTE=yes
IPV4_FAILURE_FATAL=no
IPV6INIT=yes
IPV6_AUTOCONF=yes
IPV6_DEFROUTE=yes
IPV6_FAILURE_FATAL=no
IPV6_ADDR_GEN_MODE=stable-privacy
NAME=ens192
UUID=*DO NOT edit this field!*
DEVICE=ens192
ONBOOT=yes
IPADDR=192.0.2.1
NETMASK=255.255.255.0
GATEWAY=203.0.113.254
DNS1=208.67.222.222
DNS2=208.67.220.220
In this file, check/replace/add the following pieces of information as instructed:
- For IPADDR, replace "192.0.2.1" with the additional IP that you added a vMAC to in the OVHcloud Control Panel.
- For GATEWAY, replace the "203.0.113.254" with the IPv4 Gateway of your server, found in the OVHcloud Control Panel. (See more here.)
Warning
NOTE: The DNS name servers listed are from OpenDNS. Feel free to use whichever name servers you prefer.
Next, enable the NIC by restarting the network service:
sudo systemctl restart network
To test that the VM is fully connected to the Internet, ping example.com. If you get a response, you are good to go. If you do not, restart your VM and attempt the ping again.
Configuring Network Settings in a Windows Server 2019 VM
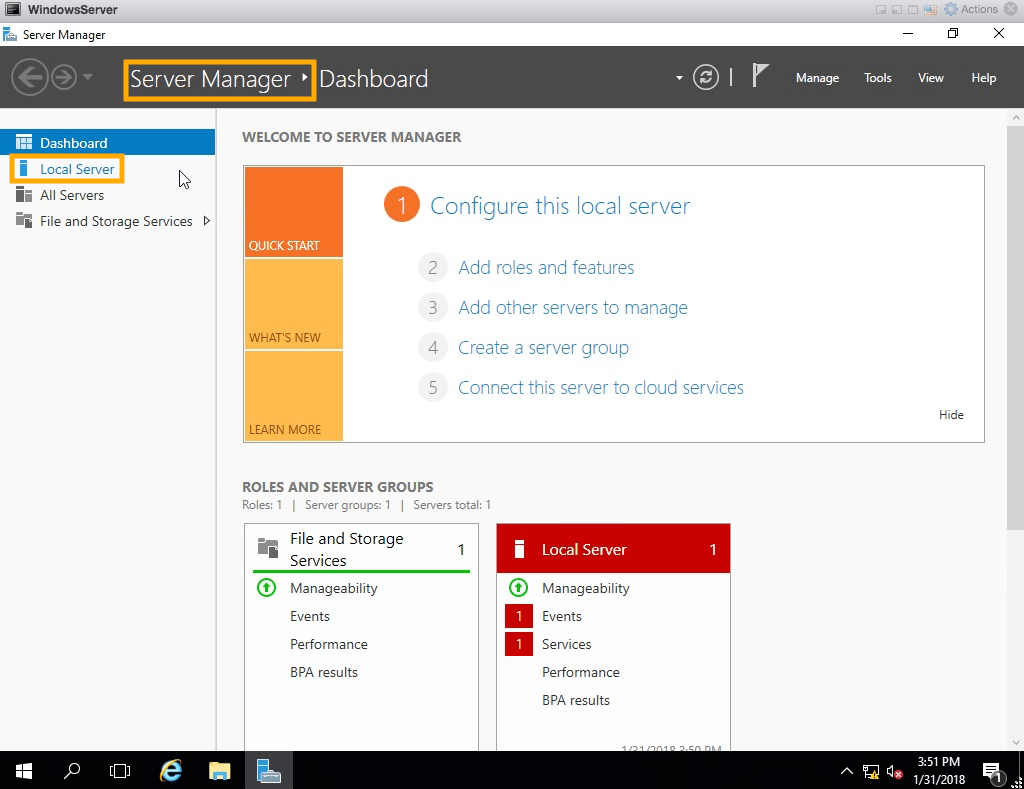
In this step, we will be configuring our interface settings. To do this, navigate to the Server Manager. From the left-hand column, click the Local Server option.
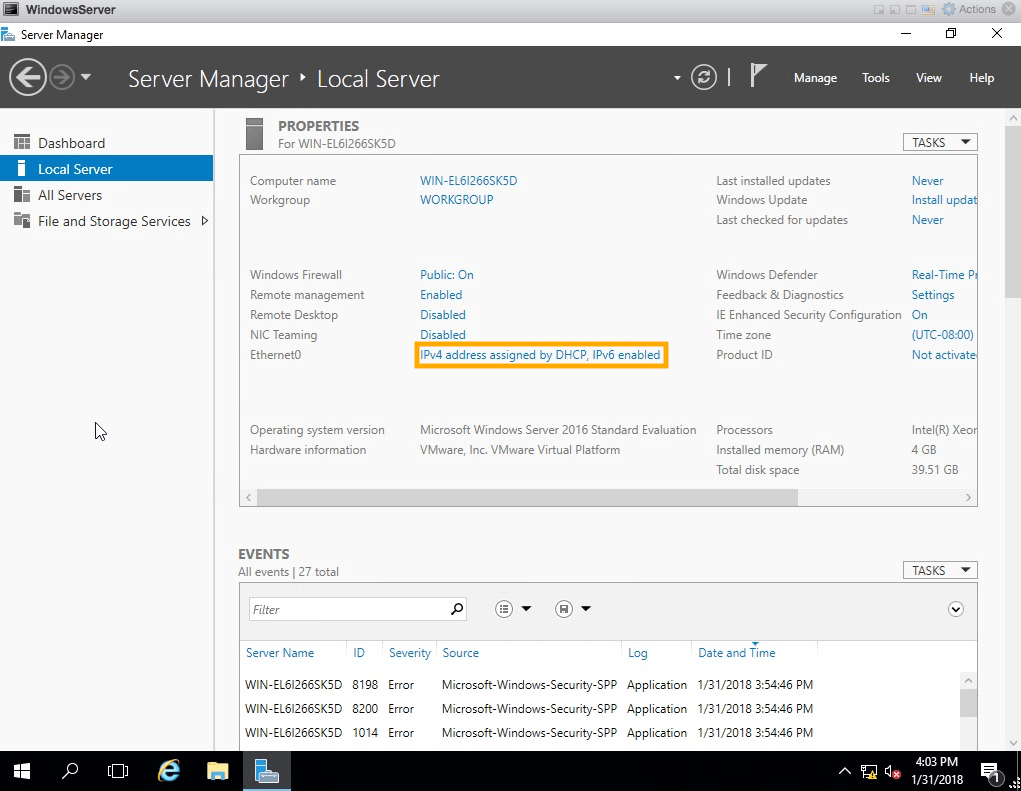
We want to change the default Ethernet0 option. To do so, click IPv4 address assigned by DHCP, IPv6 enabled.
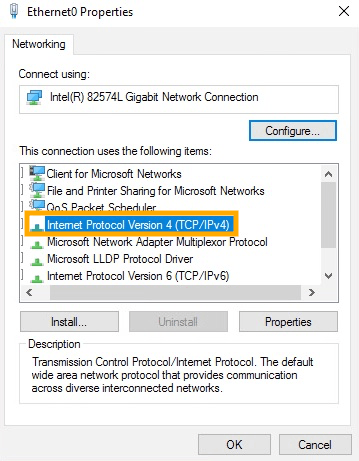
Next, right-click on Ethernet0 and select the Properties option from the drop-down menu. From the ensuing menu, double-click the Internet Protocol Version 4 (TCP/IPv4) option.
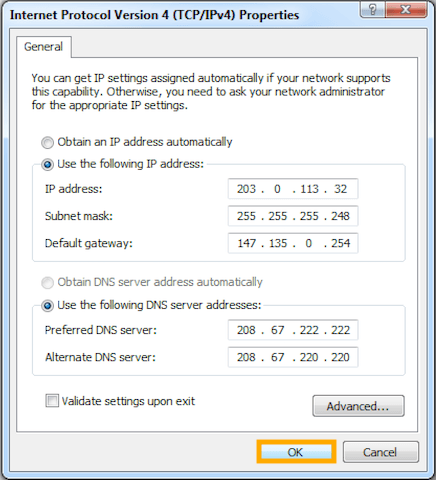
This will allow you to configure your interface to use the IP address, gateway, and DNS name servers of your choice. Configure it as follows:
- Next to IP address, replace "203.0.113.32" with the additional IP to which you have added the vMAC in the OVHcloud Control Panel.
- Next to Subnet mask, replace "255.255.255.248" with the correct netmask depending on the size of the block of IPs you have purchased. For instance, if you are using a /28 block, put "240" in the last octet.
- Next to Default gateway, replace the "203.0.113.254" with the IPv4 Gateway of your server, found in the OVHcloud Control Panel. (See more here.)
- The DNS nameservers listed are from OpenDNS. Feel free to use other name servers here, if you choose.
Click OK after making these changes.
To test that the VM is fully connected to the Internet, ping example.com. If you get a response, you are good to go. If you do not, restart your VM and attempt the ping again.