
Configuration of an OVHcloud Load Balancer service with HTTP/HTTPS
This guide aims to help you create your first HTTP/HTTPS service using the OVHcloud Load Balancer solution. We will configure a simple OVHcloud Load Balancer service to distribute HTTP traffic for a service, such as a website.
A front-end will be created to listen on port 80, while another listens on port 443 with an SSL/TLS certificate. These front-ends will be configured to direct their traffic to a common HTTP server cluster. This server cluster can have one or more servers, depending on the configuration you have chosen.
As a reminder, the OVHcloud Load Balancer has four primary components:
front-ends- server
clustersand theirservers - the advanced
routesbetween the front-ends and server clusters SSL/TLSconnections that can encrypt TCP and/or HTTP connections
Requirements
- An OVHcloud Load Balancer service
- Access to the OVHcloud Control Panel or OVHcloud API
- A configured server cluster
- A configured front-end
- An SSL certificate
Topics
- Access your OVHcloud Load Balancer service
- Add a server cluster
- Add a server
- Add a front-end
- Add an SSL/TLS certificate
- Apply the changes
- Confirmation
Introduction
This guide will take you through the required steps; depending on the way you have designed your architecture, some configurations may vary.
If you have not done so already, we recommend reading a general introduction to the OVHcloud Load Balancer service before you get started: Introduction to the OVHcloud Load Balancer.
NOTE: The order in which elements are created is important. In particular, the server clusters must be configured before we can attach an SSL/TLS certificate or servers to them. The front-ends must be configured after the server clusters to configure the front-end’s default cluster.
Instructions
Access your OVHcloud Load Balancer service
From the OVHcloud Control Panel, select Bare Metal Cloud from the top navigation bar. Expand the Network section in the left-hand menu, click Load Balancer, and select your service.
On the Home tab, you will see the following:
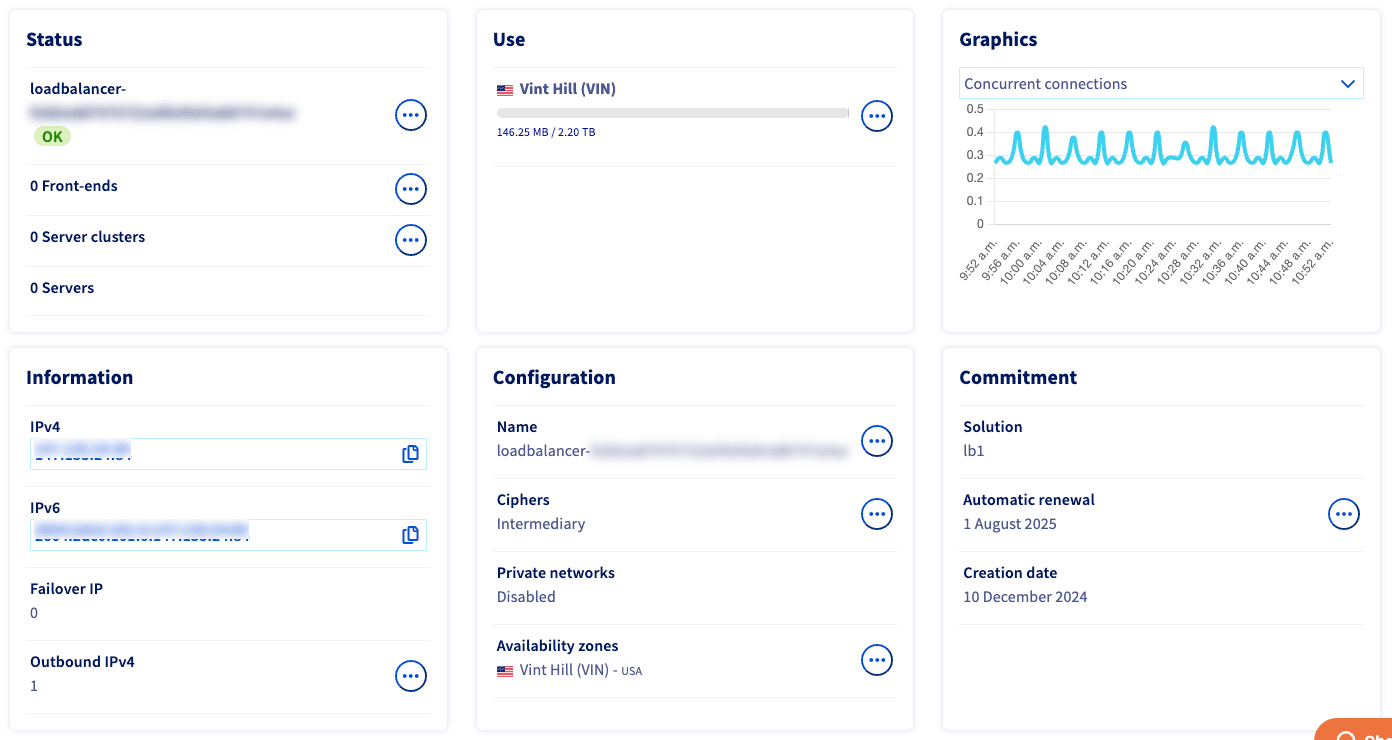
For more information about the features of the OVHcloud Control Panel, see our Managing your Load Balancer service via the Control Panel guide.
Add a server cluster
We will add a cluster of HTTP servers to our service, which is the part that balances traffic to the servers.
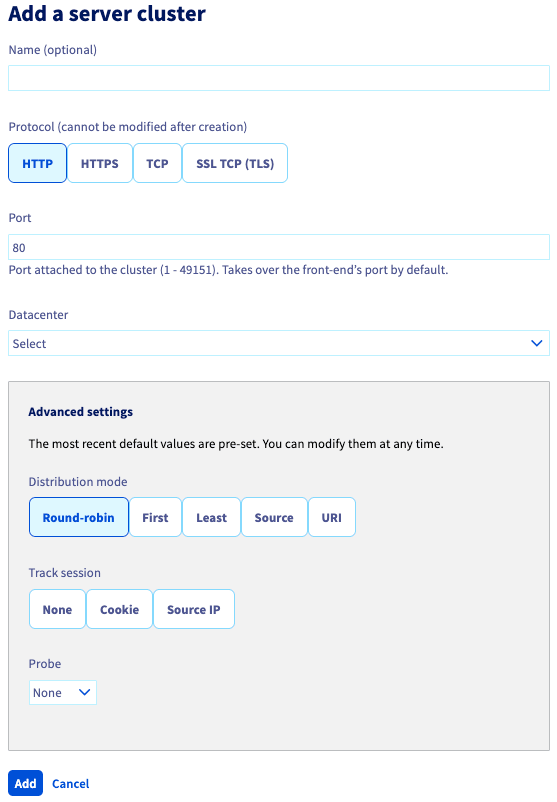
In the OVHcloud Control Panel, click the Server clusters tab, and then the Add a server cluster button.

On the next screen, fill in the fields:
-
Name (optional)
-
Protocol:
HTTP -
Port
InfoWe recommend explicitly defining a port (generally port 80 for a web service). If no ports are specified, your OVHcloud Load Balancer will automatically use the same port as the corresponding front-end, and the probes will not be able to work as intended.
- Datacenter
NOTE: If you add several servers to your cluster, we advise configuring an HTTP availability probe. When a probe is configured, the OVHcloud Load Balancer service can automatically disable a server that is down or under maintenance, so that your web users are not affected.
Click Add when you are finished.
Your server cluster will be listed in the Server clusters tab.
Add a server
We will now add a server to our server cluster.
In the OVHcloud Control Panel, from the Server clusters tab, expand the cluster to which you want to add a server, and click the Add a server button.
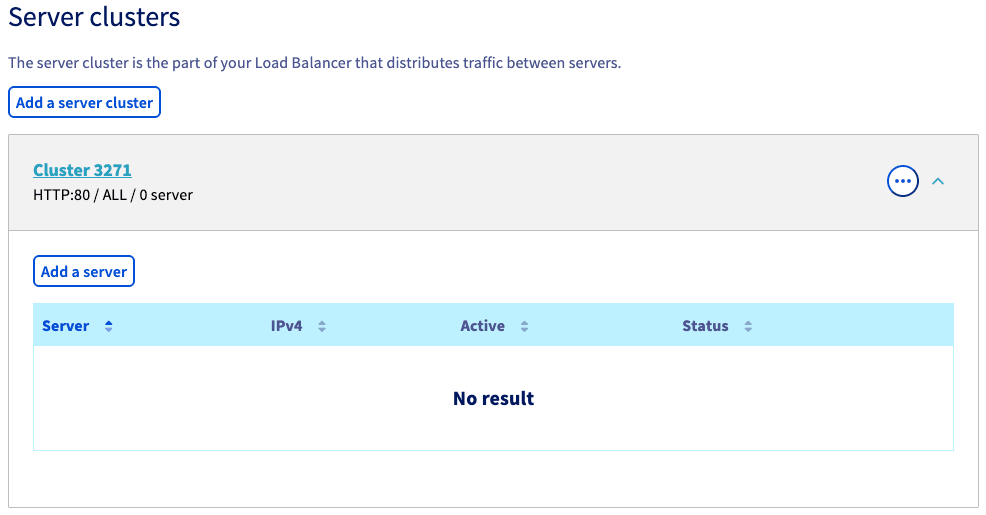
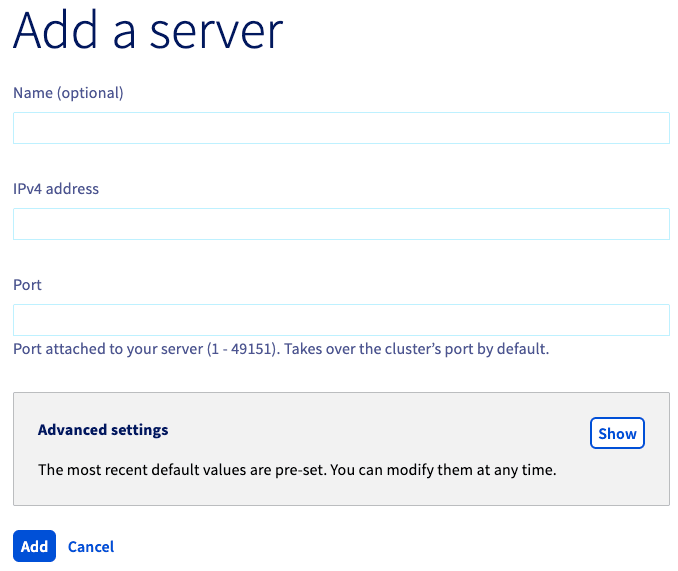
On the next page, fill in the fields:
-
Name (optional)
-
IPv4 address
-
Port
InfoIf a server does not use the same port as the one defined earlier in the cluster, you may overload it by configuring a server. However, we recommend only using this parameter in advanced cases to keep the configuration as standardized and easy to maintain as possible.
Click Add once you have filled in the fields.
Your server will be listed in the Server clusters tab.
Add a front-end
We will now add a front-end to our service, and connect it to our server cluster. The front-end is the part of your OVHcloud Load Balancer that exposes your service on the internet. First, we will only configure it in HTTP, without an SSL/TLS certificate.
Click each tab across the top to view all content.
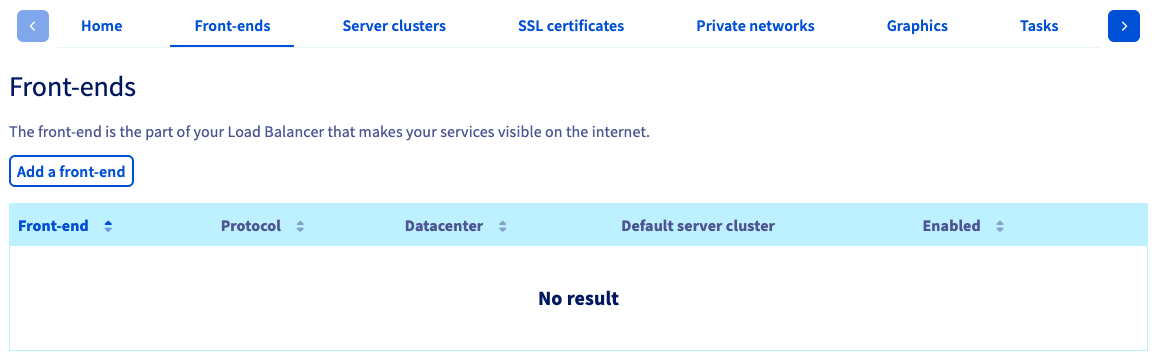
In the OVHcloud Control Panel, select the Front-ends tab and click Add a front-end.
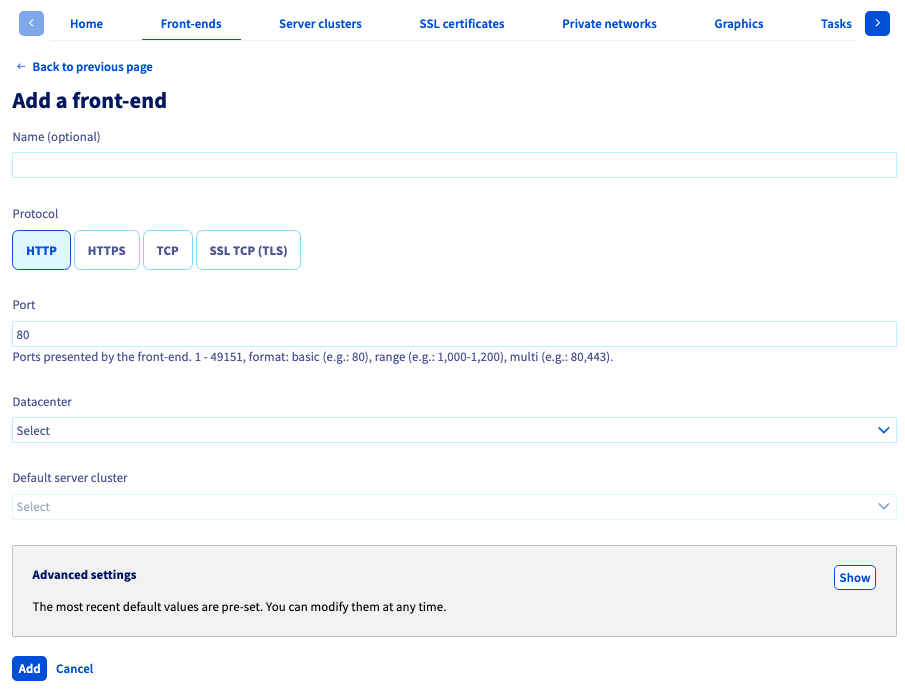
On the next page, fill in the fields:
-
Name (optional)
-
Protocol:
HTTP -
Port
InfoUse port 80 for a standard HTTP web service. If you want your service to be available across several ports at once, you can specify a list of ports, separated by commas, or a range of ports, in the format "START_PORT-END_PORT".
-
Datacenter
-
Default server cluster
InfoIf you have routed Additional IPs to your OVHcloud Load Balancer service, you can also attach a front-end to one or more specific Additional IPs.
Click Add once you have filled in the fields.
Your front-end will appear in the Front-ends tab.
Add an SSL/TLS certificate
The section above describes the general configuration of an HTTP front-end. This next section describes the additional steps you need to take to activate support of HTTPS protocol on an HTTP front-end. In particular, you need to:
- switch over the front-end to port 443, which is standard for HTTPS protocol
- configure an SSL/TLS certificate to authenticate and encrypt connections
Whether you choose to configure your service via the API or the OVHcloud Control Panel, you can choose from two methods for adding an SSL/TLS certificate. The choice of method will depend on your needs, as well as the solutions currently set up. You can either:
- Import an existing SSL/TLS certificate.
- Order an automatically managed SSL/TLS certificate. DV and EV certificates will be available to order soon.
If you choose to import an SSL/TLS certificate that you have already ordered and managed yourself, you will need to renew it periodically and update it in your OVHcloud Load Balancer service. Most certificates are valid for one year. Some remain valid for longer periods. However, Let's Encrypt certificates need to be renewed every three months. We recommend using your OVHcloud Load Balancer to automatically manage the service for Let’s Encrypt certificates so that you do not miss the expiry dates.
If you opt for a certificate managed by the OVHcloud Load Balancer service, it will be automatically ordered, validated, installed, and renewed periodically by your OVHcloud Load Balancer. For the validation and renewal operations to work, the domains you are ordering this certificate for need to be routed to your OVHcloud Load Balancer service. This means that your domain’s A and AAAA DNS records must point to your OVHcloud Load Balancer’s IPv4 and IPv6 fields respectively, or one of its Additional IPs. When you order, you will receive an email that will guide you through the validation steps.
To ensure that your service remains accessible when you switch your domain to your OVHcloud Load Balancer service’s IP address to validate your certificate, it is good practice to start by configuring and testing all of the HTTP configurations on port 80. This way, your website will remain accessible without any interruptions. If the website already has an HTTPS connection and you want to switch to certificates managed by your OVHcloud Load Balancer service, you can import your existing certificates, configure and test your HTTPS front-end, and order a new certificate for the same domain. It will be taken into account automatically when your old certificate expires.
The certificates configured on your OVHcloud Load Balancer service are automatically available for all of the front-ends on your service that have SSL options enabled.
TLS 1.3 support
With the constant evolution of Internet security standards, OVHcloud is committed to providing the latest and most secure technologies for your services. The OVHcloud Load Balancer now supports TLS 1.3.
What is TLS 1.3?
TLS 1.3 is the latest version of the TLS protocol, offering significant improvements in security and performance over TLS 1.2. Key benefits include a faster handshake process, reducing the time needed to establish secure connections, and the use of more secure cipher suites to strengthen the security of transmitted data.
Why use TLS 1.3 with OVHcloud Load Balancer?
By integrating TLS 1.3, your OVHcloud Load Balancer will benefit from enhanced security and improved performance, ensuring an optimal user experience for your visitors. Reduced handshake times speed up page loading, while security enhancements ensure that your data is protected with the latest, most secure standards.
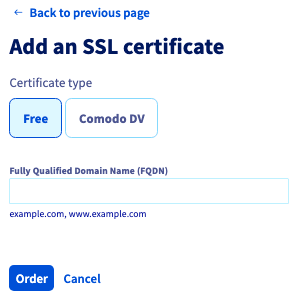
The list of SSL/TLS certificates configured on the OVHcloud Load Balancer can be found in the SSL certificates tab. In this interface, you can select one of the two options mentioned further up, i.e. importing an existing certificate (Add an SSL certificate) and managed automatically by your OVHcloud Load Balancer (Order an SSL certificate).
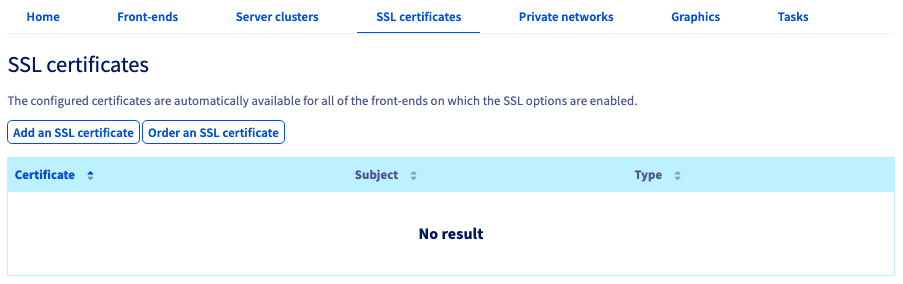
Adding a Certificate
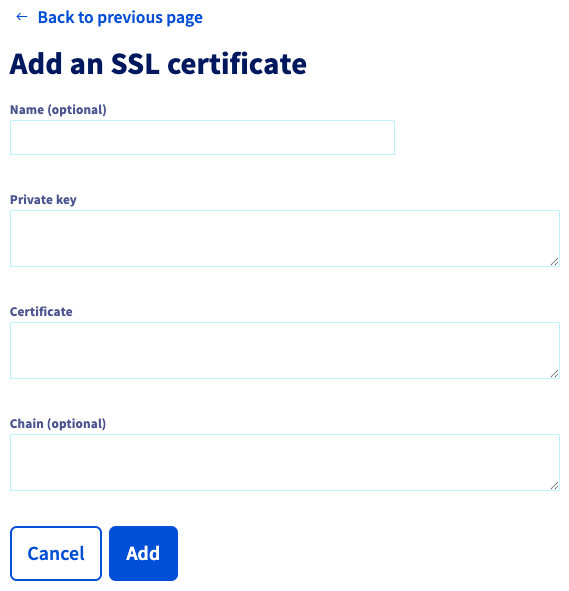
On the following screen, fill in the fields:
- Name (optional)
- Private key
- Certificate
- Chain (optional)
Ordering a Certificate
On the following screen:
- Select a Certificate type
- Provide a Fully Qualified Domain Name (FQDN)
Click Order once you have filled in the fields. Your certificate will appear in the certificate list.
Click Add once you have filled in the fields. Your certificate will appear in the certificate list.
Once your certificates have been configured, you can create an HTTPS front-end, on the same model as the HTTP front-end created earlier on with port 443, and the SSL option enabled. You can also choose to enable the HSTS option. With this option enabled, web browsers will remember that this website should no longer be visited without HTTPS after the first time the web user visits in HTTPS. This way, you can improve your infrastructure’s overall security by protecting it against ‘man-in-the-middle’ attacks, where a malicious party can make it seem as though your website is not available in HTTPS, forcing your web users to switch to HTTP.
NOTE: Although adding this additional level of security is important, we recommend waiting for a while before you enable this option, to ensure that there are no issues with your website forming HTTPS connections. Once HSTS has been enabled, you cannot undo the change.
Apply the changes
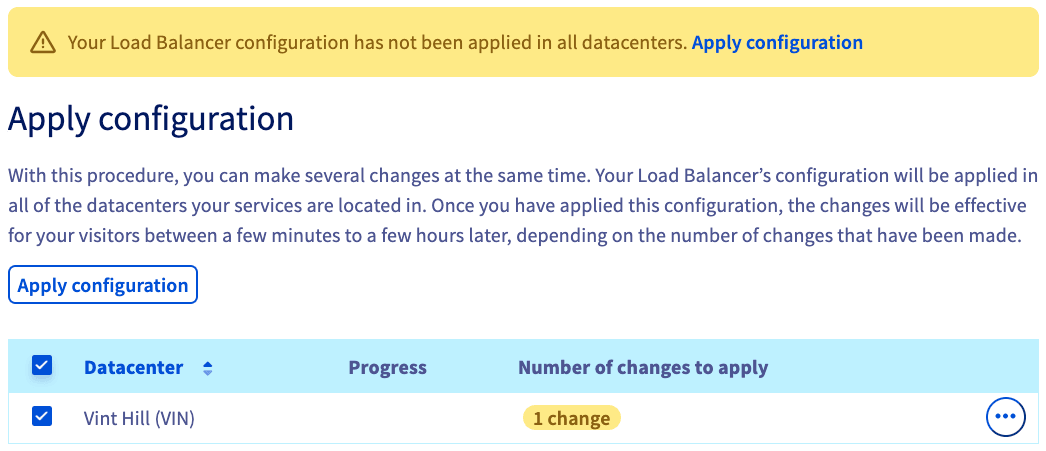
The modifications made to your OVHcloud Load Balancer must be explicitly applied in each of the data centers configured for your OVHcloud Load Balancer service. Only then will they be visible to your website visitors. This way, you can make complex configuration changes in one go.
If you have several data centers, you must apply the same configuration for each of them.
In the OVHcloud Control Panel, click Apply configuration in the yellow banner.
On the next screen, select ☑ your Datacenter and click Apply configuration again.
Confirmation
Once you have completed all of these steps, you should have a functional load balancing service. You can check the service status by visiting your website.
Go further
Browse all the Load Balancer guides.
Browse the rest of the OVHcloud US documentation for guides on our other products and services.
Learn more about Load Balancer on the OVHcloud US website.