Manage your OKMS access certificate
Learn how to configure and manage the OKMS access certificate for your Data Security products.
Requirements
Instructions
OKMS access certificate description
To communicate with your OKMS domain, you will need to create an access certificate.
Access certificates to an OKMS domain are used for the Key Management Service (KMS). This will be used for any interaction with the domain, either to create encryption keys or to carry out operations with them.
An access certificate is only valid for the domain for which it was generated.
Warning
NOTE: Only the certificate creation with a CSR is covered by the PCI-DSS certification.
Create an access certificate from the KMS
From the OVHcloud Control Panel
It's possible to create this certificate from the dedicated entry of the KMS. From the OVHcloud Control Panel, navigate to the Key Management Service section via the Identity, Security & Operations menu.
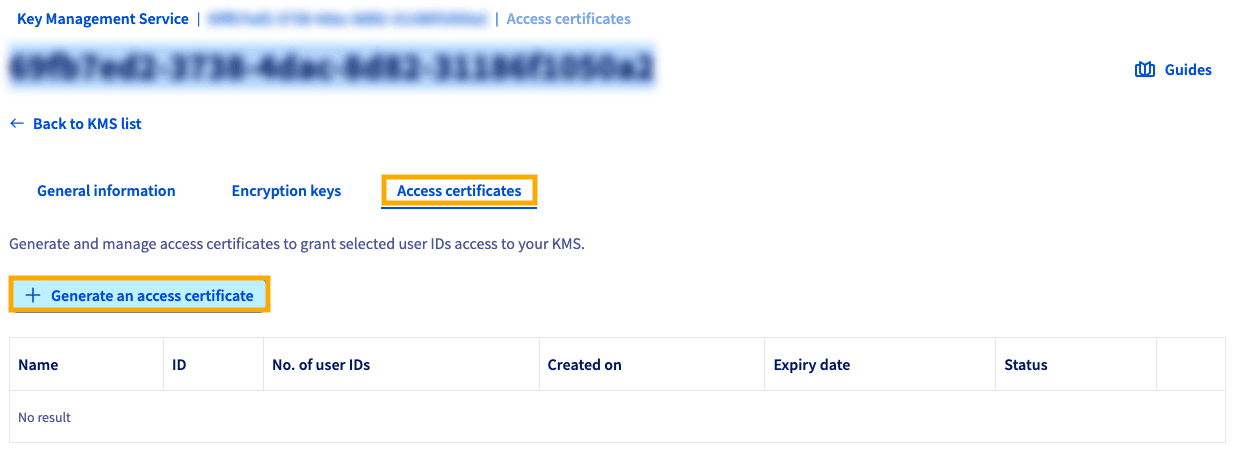
Then, select the Access certificates tab and click + Generate an access certificate.
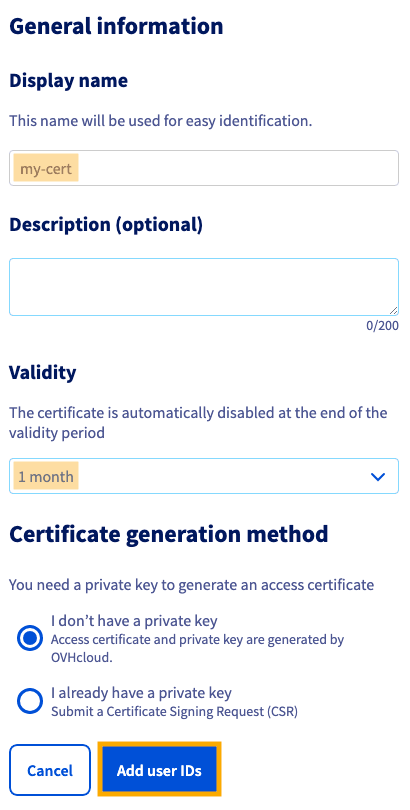
If you do not provide a CSR, OVHcloud will generate the access certificate along with a private key.
On the next screen, provide a name for your certificate, choose a validity period, select a generation method (via OVHcloud or your own), and click Add user IDs.
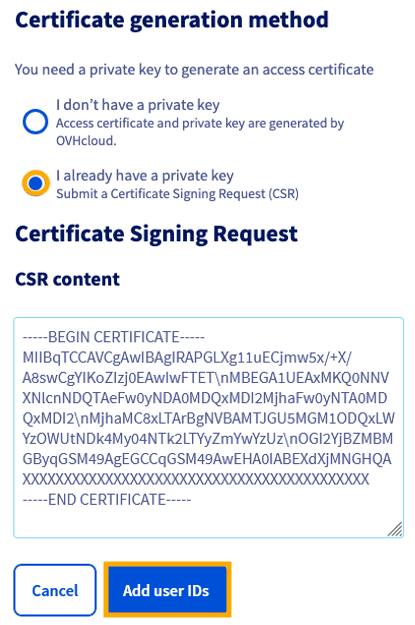
If you have your own private key, add the contents of your certificate into the field, and click Add user IDs.
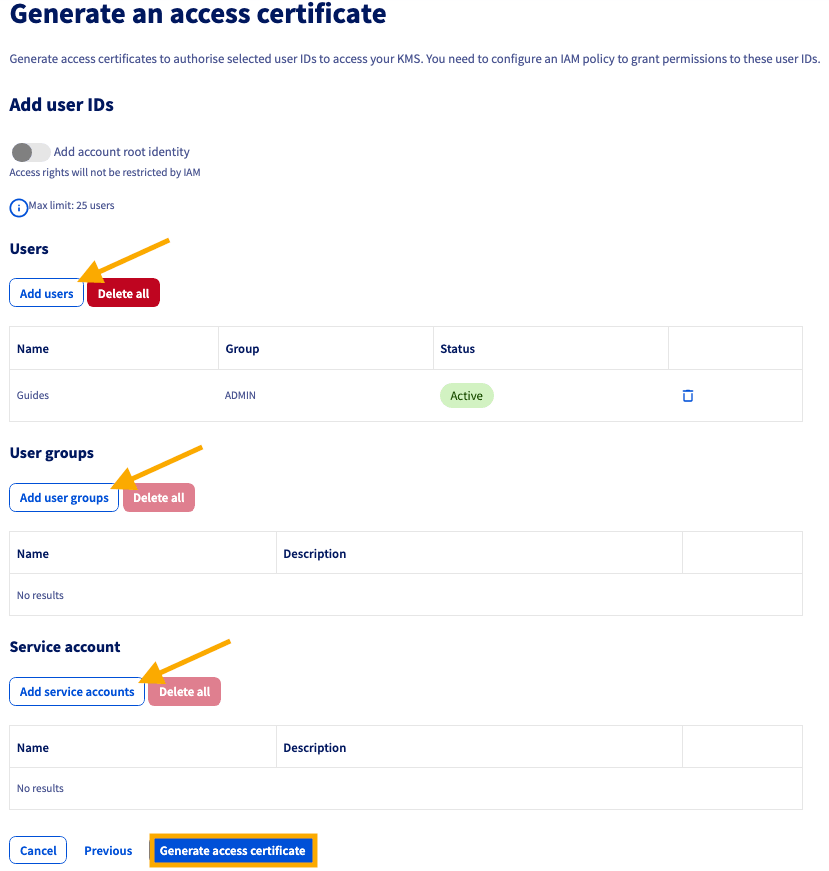
The second part of the form allows you to indicate the OVHcloud identities associated to this certificate that will be used to calculate access rights via the OVHcloud IAM.
It is possible to add the root identity to the certificate so not to be constrained by the OVHcloud IAM.
Add your users, groups, and/or service accounts, then click Generate access certificate.
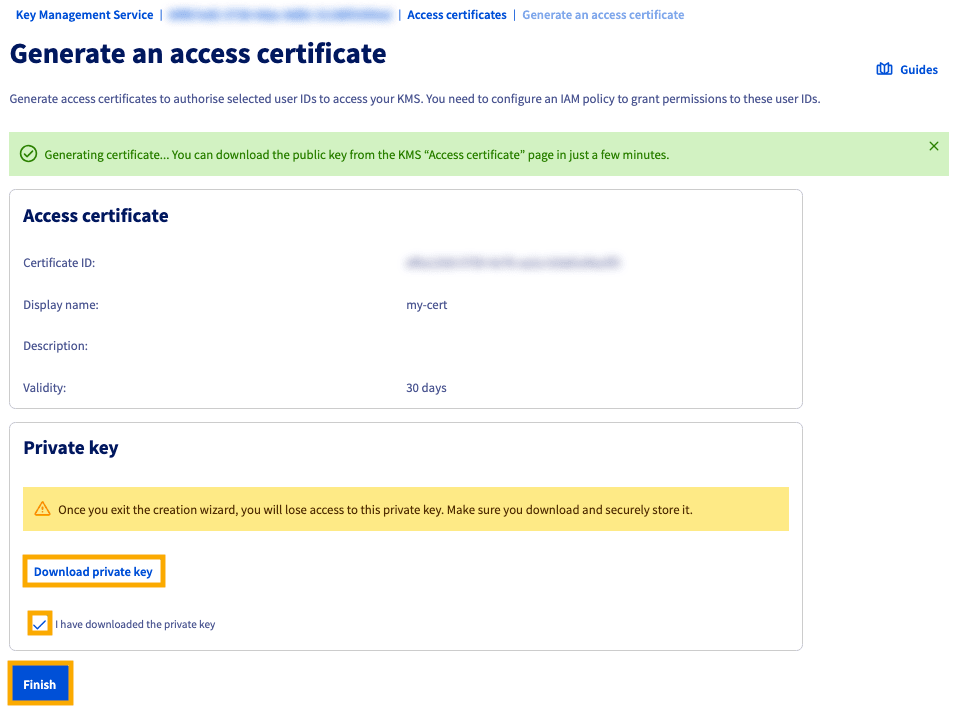
On the next screen, be sure to Download private key and confirm by checking ☑ the box. Then click Finish.
Warning
NOTE: The private key will no longer be accessible at a later stage. If you lose it, you will need to regenerate a certificate.
Warning
NOTE: The privateKeyPEM field needs to be edited so that all instances of \n are replaced by carriage returns.
Finally, you can download the public key of the certificate from the dashboard by clicking the more options ... button and selecting Download.
From the OVHcloud API
You can generate this certificate by letting OVHcloud generate the private key, or by providing your Certificate Signing Request (CSR) in the case that you have your own private key.
You can generate a certificate via the following API:
The following information is required:
- name: the name of the certificate
- identityURNs: list of OVHcloud identities in URN format that will be provided to the IAM for calculating access rights
- description: certificate description (optional)
- certificateType: certificate signature algorithm (ECDSA or RSA) - ECDSA by default (optional)
- validity: certificate validity duration in days - 365 days by default (optional)
Info
For the ACCOUNT_NIC, the following API call will retrieve that information. It is in the format "az123-ovh" and is listed in the "account" line of the API response:
Example of certificate creation with root account:
{
  "description": "My root access credential",
  "identityURNs": [
    "urn:v1:us:identity:account:<ACCOUNT_NIC>"
  ],
  "name": "root",
  "validity": 30
}
Example of certificate creation with local user:
Info
NOTE: A user policy with the correct permissions for accessing the KMS should be created and applied to the user.
{
  "description": "My access credential",
  "identityURNs": [
    "urn:v1:us:identity:user:<ACCOUNT_NIC>/<IAM_USER>",
    "urn:v1:us:identity:group:<ACCOUNT_NIC>/<IAM_GROUP>"
  ],
  "name": "John Smith",
  "validity": 30
}
The API then returns the certificate creation status:
{
  "id": "f18b5e0d-75b8-40a3-9b0e-XXXXXX",
  "name": "John Smith",
  "description": "My access credential",
  "identityURNs": [
    "urn:v1:us:identity:user:xxxxx-ovh/john.smith",
    "urn:v1:us:identity:group:xxxxx-ovh/my_group"
  ],
  "certificateType": "ECDSA",
  "status": "CREATING",
  "fromCSR": false,
  "privateKeyPEM": "-----BEGIN EC PRIVATE KEY-----\nMHcCAQEEIDOfWuMVQxl5quoURzThF4zTI9YYTmylSaPjneLBwP+2oAoGCCqGSM49\nAwEHoUQDQgAERd1eMw0YdAD+E9oSymGc4bCL1mfJl0EZwoM2ya/uKFFVFnGMnckg\nXXXXXXXXXXXXXXX==\n-----END EC PRIVATE KEY-----\n",
  "createdAt": "2024-04-04T12:26:28.856619+02:00",
  "expiredAt": "2025-04-04T12:26:28.856616+02:00"
}
Copy the value of the privateKeyPEM field to a domain.key file
Danger
WARNING: The private key will no longer be accessible at a later stage. If you lose it, you will need to regenerate a certificate.
Warning
NOTE: The privateKeyPEM field will need to be edited so that all instances of \n are replaced by carriage returns.
Then copy the certificate ID and access its details via the API:
The API returns the certificate in PEM:
{
  "id": "f18b5e0d-75b8-40a3-9b0e-XXXXXX",
  "name": "John Smith",
  "description": "My access credential",
  "identityURNs": [
    "urn:v1:us:identity:user:xxxxx-ovh/john.smith",
    "urn:v1:us:identity:group:xxxxx-ovh/my_group"
  ],
  "status": "READY",
  "fromCSR": false,
  "certificateType": "ECDSA",
  "certificatePEM": "-----BEGIN CERTIFICATE-----\nMIIBqTCCAVCgAwIBAgIRAPGLXg11uECjmw5x/+X/A8swCgYIKoZIzj0EAwIwFTET\nMBEGA1UEAxMKQ0NNVXNlcnNDQTAeFw0yNDA0MDQxMDI2MjhaFw0yNTA0MDQxMDI2\nMjhaMC8xLTArBgNVBAMTJGU5MGM1ODQxLWYzOWUtNDk4My04NTk2LTYyZmYwYzUz\nOGI2YjBZMBMGByqGSM49AgEGCCqGSM49AwEHA0IABEXdXjMNGHQA/hPaEsphnOGw\ni9ZnyZdBGcKDNsmv7ihRVRZxjJ3JICEusleqD4lE27DAAdzbRdqAhpCqsTks+sSj\nZzBlME4GA1UdEQEB/wREMEKgQAYKKwYBBAGCNxQCA6AyDDBva21zLmRvbWFpbjpl\nOTBjNTg0MS1mMzllLTQ5ODMtODU5Ni02MmZmMGM1MzhiNmIwEwYDVR0lBAwwCgYI\nKwYBBQUHAwIwCgYIKoZIzj0EAwIDRwAwRAIgdWGYm1UQMg0sTIgROFH5mWiAh/lk\nDlyP5HhrWyFB9BICIDl5wtUWgCmo6TjOqXXXXXXXXXXXXXX\n-----END CERTIFICATE-----",
  "createdAt": "2024-04-04T12:26:28.856619+02:00",
  "expiredAt": "2025-04-04T12:26:28.856616+02:00"
}
Copy the value of the certificatePEM field to a client.cert file.
Warning
NOTE: The certificatePEM field will need to be edited so that all instances of \n are replaced by carriage returns.
If you have your own private key, it is possible to use it by providing a CSR.
You can generate a certificate via the following API:
The following information is required:
-
name: the name of the certificate
-
identityURNs: list of OVHcloud identities in URN format that will be provided to the IAM for calculating access rights
-
description: certificate description (optional)
-
validity: certificate validity duration in days - 365 days by default (optional)
-
csr: the content of the CSR
Warning
NOTE: The CSR needs to be in JSON format. The CSR file will need to be edited so that there are no carriage returns; rather, \n will have to be inserted where the line breaks were previously. You can see this in practice in the example below. If you need assistance, there are third-party tools available online to adjust content into the correct JSON format.
Example of certificate creation:
{
  "csr": "-----BEGIN CERTIFICATE REQUEST-----\nMIICvDCCAaQCAQAwdzELMAkGA1UEBhMCVVMxDTALBgNVBAgMBFV0YWgxDzANBgNV\nBAcMBkxpbmRvbjEWMBQGA1UECgwNRGlnaUNlcnQgSW5jLjERMA8GA1UECwwIRGln\naUNlcnQxHTAbBgNVBAMMFGV4YW1wbGUuZGlnaWNlcnQuY29tMIIBIjANBgkqhkiG\n9w0BAQEFAAOCAQ8AMIIBCgKCAQEA8+To7d+2kPWeBv/orU3LVbJwDrSQbeKamCmo\nwp5bqDxIwV20zqRb7APUOKYoVEFFOEQs6T6gImnIolhbiH6m4zgZ/CPvWBOkZc+c\n1Po2EmvBz+AD5sBdT5kzGQA6NbWyZGldxRthNLOs1efOhdnWFuhI162qmcflgpiI\nWDuwq4C9f+YkeJhNn9dF5+owm8cOQmDrV8NNdiTqin8q3qYAHHJRW28glJUCZkTZ\nwIaSR6crBQ8TbYNE0dc+Caa3DOIkz1EOsHWzTx+n0zKfqcbgXi4DJx+C1bjptYPR\nBPZL8DAeWuA8ebudVT44yEp82G96/Ggcf7F33xMxe0yc+Xa6owIDAQABoAAwDQYJ\nKoZIhvcNAQEFBQADggEBAB0kcrFccSmFDmxox0Ne01UIqSsDqHgL+XmHTXJwre6D\nhJSZwbvEtOK0G3+dr4Fs11WuUNt5qcLsx5a8uk4G6AKHMzuhLsJ7XZjgmQXGECpY\nQ4mC3yT3ZoCGpIXbw+iP3lmEEXgaQL0Tx5LFl/okKbKYwIqNiyKWOMj7ZR/wxWg/\nZDGRs55xuoeLDJ/ZRFf9bI+IaCUd1YrfYcHIl3G87Av+r49YVwqRDT0VDV7uLgqn\n29XI1PpVUNCPQGn9p/eX6Qo7vpDaPybRtA2R7XLKjQaF9oXWeCUqy1hvJac9QFO2\n97Ob1alpHPoZ7mWiEXXXXXXXXXXXXX\n-----END CERTIFICATE REQUEST-----",
  "description": "My access credential",
  "identityURNs": [
    "urn:v1:us:identity:user:xxxxx-ovh/john.smith",
    "urn:v1:us:identity:group:xxxxx-ovh/my_group"
  ],
  "name": "John Smith",
  "validity": 30
}
The API then returns the certificate creation status:
{
  "id": "f18b5e0d-75b8-40a3-9b0e-XXXXXX",
  "name": "John Smith",
  "description": "My access credential",
  "identityURNs": [
    "urn:v1:us:identity:user:xxxxx-ovh/john.smith",
    "urn:v1:us:identity:group:xxxxx-ovh/my_group"
  ],
  "status": "CREATING",
  "fromCSR": true,
  "certificateType": "ECDSA",
  "createdAt": "2024-04-04T12:26:28.856619+02:00",
  "expiredAt": "2025-04-04T12:26:28.856616+02:00"
}
Copy the ID of the certificate and access its details via the API:
The API returns the certificate in PEM:
{
  "id": "f18b5e0d-75b8-40a3-9b0e-XXXXXX",
  "name": "John Smith",
  "description": "My access credential",
  "identityURNs": [
    "urn:v1:us:identity:user:xxxxx-ovh/john.smith",
    "urn:v1:us:identity:group:xxxxx-ovh/my_group"
  ],
  "status": "READY",
  "fromCSR": true,
  "certificateType": "ECDSA",
  "certificatePEM": "-----BEGIN CERTIFICATE-----\nMIIBqTCCAVCgAwIBAgIRAPGLXg11uECjmw5x/+X/A8swCgYIKoZIzj0EAwIwFTET\nMBEGA1UEAxMKQ0NNVXNlcnNDQTAeFw0yNDA0MDQxMDI2MjhaFw0yNTA0MDQxMDI2\nMjhaMC8xLTArBgNVBAMTJGU5MGM1ODQxLWYzOWUtNDk4My04NTk2LTYyZmYwYzUz\nOGI2YjBZMBMGByqGSM49AgEGCCqGSM49AwEHA0IABEXdXjMNGHQA/hPaEsphnOGw\ni9ZnyZdBGcKDNsmv7ihRVRZxjJ3JICEusleqD4lE27DAAdzbRdqAhpCqsTks+sSj\nZzBlME4GA1UdEQEB/wREMEKgQAYKKwYBBAGCNxQCA6AyDDBva21zLmRvbWFpbjpl\nOTBjNTg0MS1mMzllLTQ5ODMtODU5Ni02MmZmMGM1MzhiNmIwEwYDVR0lBAwwCgYI\nKwYBBQUHAwIwCgYIKoZIzj0EAwIDRwAwRAIgdWGYm1UQMg0sTIgROFH5mWiAh/lk\nDlyP5HhrWyFB9BICIDl5wtUWgCmo6TjOqXXXXXXXXXXXXXX\n-----END CERTIFICATE-----",
  "createdAt": "2024-04-04T12:26:28.856619+02:00",
  "expiredAt": "2025-04-04T12:26:28.856616+02:00"
}
Copy the value of the certificatePEM field to a client.cert file.
Go further
Using OVHcloud Key Management Service (KMS)
Browse all the Key Management Service (KMS) guides.
Browse the rest of the OVHcloud US documentation for guides on our other products and services.
Learn more about Key Management Service on the OVHcloud US website.
