
File Storage Service - Getting started
OVHcloud provides a File Storage Service powered by OpenStack Manila. This service offers managed NFS shares on private networks, supporting ReadWriteMany (RWX) access across multiple instances or Kubernetes pods.
It can be accessed via OVHcloud API, OpenStack CLI and API, Manila CSI, OVHcloud Control Panel, and Terraform.
Requirements
NOTE: To see instructions for use with a dedicated server, scroll to the bottom of this article.
- You already have a private network available in your project.
- A Public Cloud instance in your OVHcloud account
- An OpenStack CLI ready environment
OVHcloud Control Panel Access
- Direct link: Public Cloud Projects
- Navigation path:
Public Cloud> Select your project
Instructions
Some features of the File Storage service, such as snapshots, are not yet available in the OVHcloud Control Panel. You can use the OVHcloud APIs, OpenStack CLI, or Manila CSI for these features.
1. Create a share
In the left sidebar, go to Storage > File Storage, then click + Create a share.
Enter the share name, then filter by deployment mode to select the target region.
Set the performance level and size (in GiB), associate a private network, and click Confirm to complete the share creation.
2. Authorize a client VM (ACL)
Retrieve the private IP address of your client VM and ensure it is on the same private network as the share.
Once the share is created, click on it to open its dashboard, then go to the Access Control List (ACL) tab.
Click + Add a new access, enter the private IP address or a CIDR range (e.g., 10.1.0.123 or 10.1.0.0/24), and select the permissions:
Read-only: read access onlyRead and write: full read/write access
File Storage can only be used with OVHcloud Private IPs (vRack).
To remove an access rule, click the trash icon on the right side of the ACL entry.
3. Mount the share on your client VM
Linux
Retrieve the mount path (displayed as Mount Path in the General information tab of your share), then connect to your client VM and install the NFS utilities:
sudo apt update && sudo apt install -y nfs-commonCreate a mount point and mount the share:
sudo mkdir -p /mnt/share
sudo mount -t nfs4 <NFS_MOUNT_PATH> /mnt/share
Verify the mount:
df -h /mnt/shareSave the mount configuration in fstab for easy remounting:
echo "<NFS_MOUNT_PATH> /mnt/share nfs nfsvers=4 defaults,noauto 0 0" | sudo tee -a /etc/fstabThis lets you remount the NFS share after a reboot with the mount /mnt/share command.
Windows
Retrieve the mount path (displayed as Mount Path in the General information tab of your share), and edit the path to have the following format: \\server_ip\shares\share-<share_Id>.
Create a mount point and mount the share by entering the following command in your client VM:
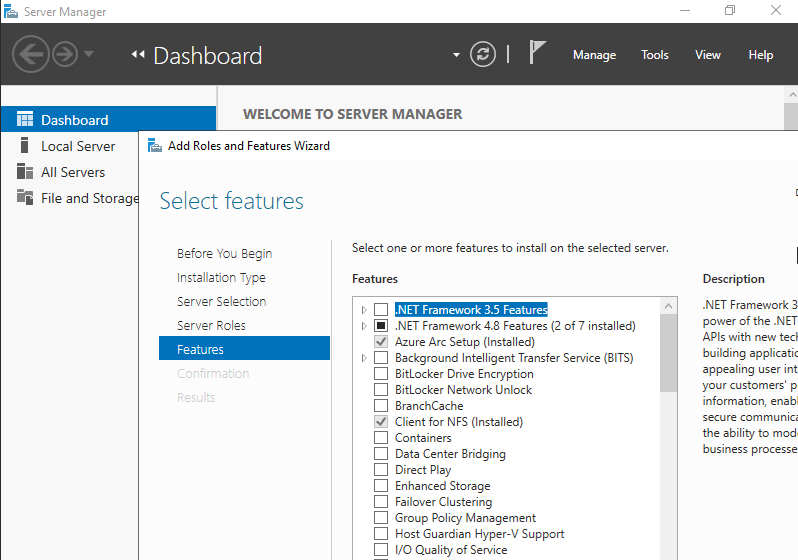
mount.exe <edited_mount_path>On your Windows VM, open the Server manager, choose Add roles and features, and select your server.
Skip to the Features section, check ☑️ the Client for NFS option, and save your changes.
To verify the mount point, open File Explorer to see your share.
1. Create a share
Identify your private network and subnet
Before creating or attaching a File Storage service, you must identify the target private network.
Retrieve the network ID and subnet ID of your private network:
Both the network ID and subnet ID should have the format: abc12345-def6-4abc-8def-123456abcdef.
Example output
[
  {
    "id": "581fad02-158d-4dc6-81f0-c1ec2794bbec",
    "name": "Ext-Net",
    "visibility": "public",
    "vlanId": null
  },
  {
    "id": "[NETWORK_ID]",
    "name": "<private_network_name>",
    "visibility": "private",
    "vlanId": 2701,
      "status": "ACTIVE",
    "subnetIds": [
      "<private_network_subnetId>"
  ]
  }
]
Create a 150 GiB NFS share attached to your private network:
Example input:
{
 "description": "string",
 "name": "string",
 "networkId": "<private_network_networkId>",
 "size": 150,
 "subnetId": "private_network_subnetId",
 "type": "standard-1az"
}
List your shares and wait until the newly created one appears with status available:
NOTE: The share ID should have the format abc12345-def6-4abc-8def-123456abcdef.
Example output:
{
    "id": "<shareId>",
    "region": "string",
    "name": "string",
    "description": "string",
    "status": "available",
    "size": 150,
    "type": "standard-1az",
    "protocol": "NFS",
    "isPublic": false,
    "networkId": "<private_network_networkId>",
    "subnetId": "<private_network_subnetId>",
    "shareNetworkId": "<shareNetworkId>",
    "availabilityZone": "",
    "capabilities": [
      {
        ...
      },
    ],
    "createdAt": "2026-05-07T13:19:30.814655Z"
  }
Retrieve the share details using the share ID:
NOTE: You will need the path in Step 3.
Example output:
{
  "id": "abc12345-def6-4abc-8def-123456abcdef",
  "region": "string",
  "name": "string",
  "description": "string",
  "status": "available",
  "size": 150,
  "type": "standard-1az",
  "protocol": "NFS",
  "isPublic": false,
  "networkId": "<private_network_networkId>",
  "subnetId": "<private_network_subnetId>",
  "shareNetworkId": string",
  "availabilityZone": "",
  "exportLocations": [
    {
      "id": "string",
      "path": "10.1.0.12:/shares/share-abc12345-def6-4abc-8def-123456abcdef"
    }
  ],
  "capabilities": [
    {
      ...
    }
  ],
  "createdAt": "2026-05-07T13:19:30.814655Z"
}
2. Authorize a client VM
Retrieve the private IP address of your client VM and ensure it is on the same private network as the share.
Grant access to the share using the VM’s private IP (e.g., 10.1.0.123) via ACL management:
Example output:
{
  "accessLevel": "rw",
  "accessTo": "10.1.0.123",
  "createdAt": "2026-01-14T10:26:14.446Z",
  "id": "<acl_id>",
  "status": "active",
  "updatedAt": "2026-01-14T10:26:14.446Z"
}
Verify access to the NFS share from the authorized client VM:
3. Mount the share on your client VM
Connect to your client VM and install the NFS utilities required to mount the share:
sudo apt update && sudo apt install -y nfs-commonCreate a mount point and mount the share:
sudo mkdir -p /mnt/share
sudo mount -t nfs4 10.1.0.12:/shares/share-abc12345-def6-4abc-8def-123456abcdef /mnt/share
Save the mount configuration in fstab for easy remounting:
echo "10.1.0.12:/shares/share-abc12345-def6-4abc-8def-123456abcdef /mnt/share nfs nfsvers=4 defaults,noauto 0 0" | sudo tee -a /etc/fstabThis lets you remount the NFS share after a reboot with the mount /mnt/share command..
4. Verify the mount and check capacity and usage
Once the NFS share is mounted, verify its available space and usage:
df -h /mnt/shareExample output:
Filesystem                          Size  Used  Avail Use% Mounted on
10.1.0.12:/shares/share-abc1... 150G 100M 150G 1% /mnt/shareNote: Use this to monitor the storage capacity and usage of your NFS share.
Additional requirements
- Make sure your OpenStack user has the
AdministratororShare operatorrole.
1. Install the Manila CLI plugin
If the Manila commands are not yet available, install the plugin:
sudo apt update && sudo apt install -y python3-manilaclientVerify the installation:
openstack share --helpYou should see commands such as:
- share create
- share list
- share network create
- share access create
2. Check available share types
List the share types available in your region:
openstack share type list --os-region-name <REGION_NAME>Expected output:
+----------+--------------+------------+------------+
| ID       | Name         | Visibility | Is Default |
+----------+--------------+------------+------------+
| acceb7b4 | standard-1az | public     | True       |
+----------+--------------+------------+------------+The type standard-1az uses driver_handles_share_servers = True, which means you must attach a share network when creating a share.
3. Create a share network
Identify your private network and subnet:
openstack network list --os-region-name <REGION_NAME>
openstack subnet list --os-region-name <REGION_NAME>
Retrieve their IDs:
openstack network show --os-region-name <REGION_NAME> -c id -f value <PRIVATE_NETWORK_NAME>
openstack subnet show --os-region-name <REGION_NAME> -c id -f value <PRIVATE_SUBNET_NAME>Both network and subnet IDs should look like: abc12345-def6-4abc-8def-123456abcdef
Create a share network linked to your private network:
openstack share network create \
  --os-region-name <REGION_NAME> \
  --name <my-share-network-name> \
  --neutron-net-id <NETWORK_ID> \
--neutron-subnet-id <SUBNET_ID>NOTE: Replace <my-share-network-name> with your chosen name for the share network.
Verify the share network:
openstack share network list --os-region-name <REGION_NAME>
4. Create an NFS share
Create a 150 GB NFS share:
openstack share create \
  --os-region-name <REGION_NAME> \
  --share-type standard-1az \
  --share-network <my-share-network-name> \
  --name <my-first-share-name> \
NFS 150NOTE: Replace with the name you want to assign to your share.
Monitor the share status until it becomes available:
openstack share list --os-region-name <REGION_NAME>
5. Authorize a client VM
Ensure your client VM is in the same private network as the share.
Retrieve the VM’s private IP address:
openstack server show --os-region-name <REGION_NAME> <VM_NAME> -c addresses -f valueExample output:
{'my-private-net': ['10.1.0.123', '57.123.88.111']}Grant access to the share using the VM’s private IP (e.g., 10.1.0.123):
openstack share access create \
  --os-region-name <REGION_NAME> \
  <my-first-share-name> \
  ip 10.1.0.123
Verify access:
openstack share access list --os-region-name <REGION_NAME> <my-first-share-name>
6. Retrieve the export path
Get the NFS export location:
openstack share export location list --os-region-name <REGION_NAME> <my-first-share-name>Example output:
10.1.0.12:/shares/share-abc12345-def6-4abc-8def-123456abcdefThis export path is used to mount the share on your client VM.
7. Mount the share on your client VM
Connect to your client VM and install the NFS utilities required to mount the share:
sudo apt update && sudo apt install -y nfs-commonCreate a mount point and mount the share:
sudo mkdir -p /mnt/share
sudo mount -t nfs4 10.1.0.12:/shares/share-abc12345-def6-4abc-8def-123456abcdef /mnt/share
Verify the mount:
df -h /mnt/shareSave the mount configuration in fstab for easy remounting:
echo "10.1.0.12:/shares/share-abc12345-def6-4abc-8def-123456abcdef /mnt/share nfs nfsvers=4 defaults,noauto 0 0" | sudo tee -a /etc/fstabThis lets you remount the NFS share after a reboot with the mount /mnt/share command.
8. Check capacity and usage
Once the NFS share is mounted, verify its available space and usage:
df -h /mnt/shareExample output:
Filesystem                          Size  Used  Avail Use% Mounted on
10.1.0.12:/shares/share-abc1... 150G 100M 150G 1% /mnt/shareThis lets you monitor the storage capacity and usage of your NFS share.
9. Manage the share lifecycle
Resize the share:
Only extending a share is allowed for now; shrinking is not supported.
openstack share resize --os-region-name <REGION_NAME> <my-first-share-name> 200Delete a share:
openstack share delete --os-region-name <REGION_NAME> <my-first-share-name>Delete the share network:
openstack share network delete --os-region-name <REGION_NAME> <my-share-network-name>NOTE: Ensure no active shares are using the network before deleting it.
10. Troubleshooting
| Symptom | Cause | Solution |
|---|---|---|
Unknown command ['share'] | Manila CLI not installed | Install it with sudo apt install python3-manilaclient |
Share network must be set | Using a DHSS=True share type | Provide --share-network |
| Cannot mount NFS | IP not authorized or wrong network | Ensure VM is in the same private subnet and access rule is created |
| Share stuck in creating | Invalid network ID or subnet | Check NETWORK_ID and SUBNET_ID |
1. Additional requirements
- Helm CLI installed on your local machine.
- OpenStack CLI configured and ready to use.
- Krew (kubectl plugin manager) installed.
- Stern (kubectl log tailing plugin) installed via Krew.
- A Kubernetes cluster deployed in a private network within a Public Cloud region where Manila endpoints are accessible.
- Ensure that your OpenStack user has the Administrator or Share Operator role.
This guide works with both Managed Kubernetes Service (MKS) clusters and self-managed Kubernetes clusters.
2. Installing Helm command line
curl -fsSL -o get_helm.sh https://raw.githubusercontent.com/helm/helm/main/scripts/get-helm-3
chmod 700 get_helm.sh
./get_helm.sh
3. Installing Krew and Stern tools
Run the following command to install Krew in your environment:
(
  set -x; cd "$(mktemp -d)" &&
  OS="$(uname | tr '[:upper:]' '[:lower:]')" &&
  ARCH="$(uname -m | sed -e 's/x86_64/amd64/' -e 's/\(arm\)\(64\)\?.*/\1\2/' -e 's/aarch64$/arm64/')" &&
  KREW="krew-${OS}_${ARCH}" &&
  curl -fsSLO "https://github.com/kubernetes-sigs/krew/releases/latest/download/${KREW}.tar.gz" &&
  tar zxvf "${KREW}.tar.gz" &&
  ./"${KREW}" install krew
)
export PATH="${KREW_ROOT:-$HOME/.krew}/bin:$PATH"
Once Krew is installed, install Stern with:
kubectl krew install stern
4. Installing OpenStack CLI
Prepare your environment to use the OpenStack API by installing python-openstackclient, following this guide.
Install the Manila client to manage File Storage shares:
pip install python-manilaclientUpdate your shell completion script to enable OpenStack share autocompletion.
5. Install the CSI NFS driver
Add the Helm chart repository:
helm repo add csi-driver-nfs https://raw.githubusercontent.com/kubernetes-csi/csi-driver-nfs/master/charts
helm repo update
List available releases of the NFS CSI chart:
helm search repo -l csi-driver-nfsInstall the chosen Helm chart release:
Replace the optional flags --wait -v=5 --debug as needed for debugging or synchronous installation.
helm install csi-driver-nfs csi-driver-nfs/csi-driver-nfs \
  --namespace kube-system \
  --version v4.11.0 \
  [--wait -v=5 --debug]
Follow the NFS CSI logs:
kubectl stern -n kube-system -l app.kubernetes.io/instance=csi-driver-nfs
6. Install the Manila CSI driver
Add the Helm chart repository:
helm repo add cpo https://kubernetes.github.io/cloud-provider-openstack
helm repo update
List available releases of the Manila CSI:
helm search repo -l openstack-manila-csiInstall the chosen Helm chart release:
helm install manila-csi cpo/openstack-manila-csi --version 2.33.1 --namespace kube-system [--values ./csi-config/helm-chart-values.yaml]Follow the Manila CSI logs:
kubectl stern -n kube-system -l app=openstack-manila-csi
7. Preparing OpenStack resources for Manila CSI
7.1. Create a dedicated OpenStack user for Manila
You need a separate OpenStack user to manage Manila resources. This user can be created:
- Through the OVHcloud Control Panel (Public Cloud > Settings > Users & Roles)
- Or via the OVHcloud CLI
7.2. Collect OpenStack project and user details
Download your project’s openrc file from the OVHcloud Control Panel and note the following credentials:
- os-userName
- os-password
- os-domainName
- os-projectDomainID
- os-projectName
Once you have these values, create a file named secrets.yaml with the following content. This Kubernetes Secret allows the Manila CSI driver to authenticate against OpenStack and manage Manila resources in your cluster.
apiVersion: v1
kind: Secret
metadata:
  name: csi-manila-secrets
  namespace: default
stringData:
  # Mandatory
  os-authURL: "https://auth.cloud.ovh.net/v3"
  os-region: "SBG5"

  # Openstack authentication
  os-userName: "<os-userName>"
  os-password: "<os-password>"
  os-domainName: "default"
  os-projectName: "os-projectName"
  os-projectDomainID: "default"
Then, apply it to your Kubernetes cluster:
kubectl apply -f secrets.yaml7.3. Configure the OpenStack shared network
Manila requires a share network because the driver is configured with DHSS=true (driver_handles_share_servers).
This resource is managed by the owner of the OpenStack project.
# List private networks attached to your MKS cluster
openstack --os-region-name SBG5 network list

# Retrieve the network ID
openstack --os-region-name SBG5 network show -c id -f value <PRIVATE_NETWORK_NAME>

# Retrieve the subnet ID linked to this network
openstack --os-region-name SBG5 subnet show -c id -f value <PRIVATE_SUBNET_NAME>

# Create the Manila share network
openstack --os-region-name SBG5 share network create \
  --name mks-manila-csi-tests \
  --neutron-net-id <PRIVATE_NETWORK_ID> \
  --neutron-subnet-id <PRIVATE_SUBNET_ID>
Example output:
+-----------------------------------+----------------------------------------------------------+
| Field                             | Value                                                    |
+-----------------------------------+----------------------------------------------------------+
| created_at                        | 2025-10-04T14:12:25.111776                               |
| description                       | None                                                     |
| id                                | 07363bc7-be2a-4a7d-b675-09844b344b3b                     |
| name                              | mks-manila-csi-tests                                     |
| network_allocation_update_support | True                                                     |
| project_id                        | <PROJECT_ID>                                             |
| security_service_update_support   | True                                                     |
| share_network_subnets             |                                                          |
|                                   | id = 90cf66fc-23eb-4dce-80a3-bf8fa3a912c3                |
|                                   | availability_zone = None                                 |
|                                   | created_at = 2025-10-04T14:12:25.126327                  |
|                                   | updated_at = None                                        |
|                                   | segmentation_id = None                                   |
|                                   | neutron_net_id = <PRIVATE_NETWORK_NAME>                  |
|                                   | neutron_subnet_id = <PRIVATE_SUBNET_NAME>                |
|                                   | ip_version = None                                        |
|                                   | cidr = None                                              |
|                                   | network_type = None                                      |
|                                   | mtu = None                                               |
|                                   | gateway = None                                           |
| status                            | active                                                   |
| updated_at                        | None                                                     |
+-----------------------------------+----------------------------------------------------------+
8. Configure the Manila CSI driver
Once the OpenStack share network is created, and before configuring the Manila CSI driver, you need to define the CIDR range used by your Kubernetes nodes. This ensures that the nodes can access the Manila shares.
Edit the runtime ConfigMap:
Create a file named manila-runtime-configmap.yaml and update the nfs.matchExportLocationAddress field to match your cluster’s CIDR:
apiVersion: v1
kind: ConfigMap
metadata:
  name: manila-csi-runtimeconf-cm
  namespace: default
  annotations:
    meta.helm.sh/release-name: manila-csi
    meta.helm.sh/release-namespace: default
  labels:
    app.kubernetes.io/managed-by: Helm
data:
  runtimeconfig.json: |
    {
      "nfs": {
        # When mounting an NFS share, select an export location with
        # this IP address. No match between this address and
        # at least a single export location for this share will
        # result in an error.
        # Expects a CIDR-formatted address. If prefix is not provided,
        # /32 or /128 prefix is assumed for IPv4 and IPv6 respectively.
        "matchExportLocationAddress": "<SUBNET_CIDR>"
      }
    }
Example:
"nfs":
  "matchExportLocationAddress": "10.42.0.0/16"
Apply the ConfigMap to your Kubernetes cluster:
# Optional if runtime config is already defined in Helm values
kubectl apply -f manila-runtime-configmap.yaml
9. Creating NFS shares via dynamic provisioning
To enable the Manila CSI driver to dynamically create Manila shares and use them as Kubernetes volumes, you must define a StorageClass in your cluster. This StorageClass specifies the shared network that will be used to create and grant access to NFS exports.
Retrieve the shared network ID, using the OpenStack CLI to get the ID of your shared network:
openstack --os-region-name SBG5 share network list -f value -c IDConfigure the StorageClass:
- Create a file named
dynamic-storageclass.yamlwith the following content:
apiVersion: storage.k8s.io/v1
kind: StorageClass
metadata:
  name: csi-manila-nfs
provisioner: nfs.manila.csi.openstack.org
allowVolumeExpansion: true
parameters:
  # Manila share type
  # default value: default
  # openstack share type list to find proper value
  type: standard-1az
  # /!\ MANDATORY /!\
  # openstack share network list
  shareNetworkID: "<OS_SHARE_NETWORK_ID>"
  nfs-shareClient: "<SUBNET_CIDR>"

  csi.storage.k8s.io/provisioner-secret-name: csi-manila-secrets
  csi.storage.k8s.io/provisioner-secret-namespace: default
  csi.storage.k8s.io/controller-expand-secret-name: csi-manila-secrets
  csi.storage.k8s.io/controller-expand-secret-namespace: default
  csi.storage.k8s.io/node-stage-secret-name: csi-manila-secrets
  csi.storage.k8s.io/node-stage-secret-namespace: default
  csi.storage.k8s.io/node-publish-secret-name: csi-manila-secrets
csi.storage.k8s.io/node-publish-secret-namespace: default- Update the
parameter.shareNetworkIDvalue with the shared network identifier. - Update the
parameter.nfs-shareClientvalue with the subnet CIDR defined during cluster creation.
Create the dynamic StorageClass, applying the StorageClass to your cluster:
# A StorageClass cannot be updated. If modifications are needed, delete and recreate it.
kubectl apply -f dynamic-storageclass.yaml
Once the StorageClass is created, create a file named nfs-pvc.yaml defining a PersistentVolumeClaim (PVC) that uses this StorageClass. For example, request a 150GiB volume with ReadWriteMany (RWX) access:
apiVersion: v1
kind: PersistentVolumeClaim
metadata:
  name: nfs-share-pvc
spec:
  accessModes:
    - ReadWriteMany
  resources:
    requests:
      storage: 150Gi
  storageClassName: csi-manila-nfs
kubectl apply -f nfs-pvc.yamlAfter applying the PVC, list the newly created Manila shares in your Public Cloud project:
openstack --os-region SBG5 share listExample output:
+--------------------------------------+------------------------------------------+------+-------------+-----------+-----------+-----------------+------+-------------------+
| ID                                   | Name                                     | Size | Share Proto | Status    | Is Public | Share Type Name | Host | Availability Zone |
+--------------------------------------+------------------------------------------+------+-------------+-----------+-----------+-----------------+------+-------------------+
| 9484d5f3-7bf7-486b-b88e-40bbedeet9f3 | pvc-78135a68-c6f4-48fe-8644-454b387a3ad4 |  150 | NFS         | available | False     | standard-1az    |      | nova              |
+--------------------------------------+------------------------------------------+------+-------------+-----------+-----------+-----------------+------+-------------------+
Create a file named nfs-deployment.yaml with the following content:
apiVersion: apps/v1
kind: Deployment
metadata:
  name: nfs-share
  labels:
    app: nfs-share
spec:
  replicas: 2
  selector:
    matchLabels:
      app: nfs-share
  template:
    metadata:
      labels:
        app: nfs-share
    spec:
      containers:
      - name: web-server
        resources:
          limits:
            cpu: 250m
            memory: 256Mi
          requests:
            cpu: 100m
            memory: 256Mi
        image: nginx
        imagePullPolicy: IfNotPresent
        volumeMounts:
          - name: nfs-share-pvc
            mountPath: /var/lib/www
      volumes:
      - name: nfs-share-pvc
        persistentVolumeClaim:
          claimName: nfs-share-pvc
          readOnly: false
Deploy the web server with 2 replicas, which will mount and share the previously created RWX volume:
kubectl apply -f nfs-deployment.yamlTo verify RWX functionality, use kubectl exec to connect to one pod and create a file in the mounted directory (e.g., /var/lib/www/). Then, connect to the second pod and check that the file is visible. If it is, your Manila share exposed through NFS is functioning correctly.
10. Resize an NFS share using dynamic provisioning
Resizing an NFS share is only supported for:
- Dynamically provisioned PersistentVolumeClaims (PVCs)
- Unmounted volumes (you must downscale your deployment before resizing to avoid errors)
At this time, only the share extension is supported — shrinking a volume is not possible.
To resize an existing Manila share:
Scale down the deployment to ensure the volume is unmounted:
kubectl scale deployment nfs-share --replicas 0Patch the PVC to request a new size (for example, 280Gi):
kubectl patch pvc nfs-share-pvc -p '{ "spec": { "resources": { "requests": { "storage": "280Gi" }}}}'Verify that the OpenStack share has been updated:
openstack --os-region SBG5 share show <SHARE_ID>If the share has been successfully extended, scale the deployment back up:
kubectl scale deployment nfs-share --replicas 2Attempting to resize a PVC that is not dynamically provisioned by a StorageClass will result in an error such as:
error: persistentvolumeclaims "existing-nfs-share-pvc" could not be patched: persistentvolumeclaims "existing-nfs-share-pvc" is forbidden: only dynamically provisioned pvc can be resized and the storageclass that provisions the pvc must support resize
11. Mounting an existing Manila share as a volume in Pods
As shown earlier, a Kubernetes StorageClass can dynamically create Manila shares exposed via NFS. Alternatively, you can use a pre-provisioned Manila share and mount it directly in a Pod.
Create a new share with the OpenStack CLI:
openstack --os-region SBG5 share create \
  --share-type <SHARE_TYPE> \
  --share-network <SHARE_NETWORK_ID> \
  --name <NFS_SHARE_NAME> \
  SHARE_PROTOCOL SHARE_SIZE
Where:
SHARE_TYPEisstandard-1azby default. You can check existing share types with:
openstack --os-region SBG5 share type listSHARE_NETWORK_IDis the identifier of your shared network.NFS_SHARE_NAMEis the name of your NFS share.SHARE_PROTOCOLis the protocol to use (currently, only NFS is supported).SHARE_SIZEis the size to allocate to your NFS volume (in GiB).
Create a share access rule:
openstack --os-region SBG5 share access create <NFS_SHARE_NAME> ip <SUBNET_CIDR>Where:
SHARE_ACCESS_NAMEis the name of the share.SUBNET_CIDRis the CIDR used when configuring the Manila CSI runtime.
Retrieve the NFS share ID and the share access ID, then create a file named static-provisioning.yaml and update the volumeAttributes.shareID and volumeAttributes.shareAccessID parameters:
apiVersion: v1
kind: PersistentVolume
metadata:
  name: preprovisioned-nfs-share
  labels:
    name: preprovisioned-nfs-share
spec:
  accessModes:
  - ReadWriteMany
  capacity:
    storage: 150Gi
  csi:
    driver: nfs.manila.csi.openstack.org
    volumeHandle: preprovisioned-nfs-share
    nodeStageSecretRef:
      name: csi-manila-secrets
      namespace: default
    nodePublishSecretRef:
      name: csi-manila-secrets
      namespace: default
    volumeAttributes:
      shareID: <SHARE_ID>
      shareAccessID: <SHARE_ACCESS_ID>
---
apiVersion: v1
kind: PersistentVolumeClaim
metadata:
  name: existing-nfs-share-pvc
spec:
  accessModes:
  - ReadWriteMany
  resources:
    requests:
      storage: 150Gi
  storageClassName: "" # <--- Prevent default Cinder CSI usage
  selector:
    matchExpressions:
    - key: name
      operator: In
      values: ["preprovisioned-nfs-share"]
Apply the manifest to create a PersistentVolume and its PersistentVolumeClaim using the pre-provisioned NFS share. The Manila share will be used only if the pod claiming the PVC is deployed in your cluster:
kubectl apply -f static-provisioning.yamlDeploy a pod that mounts this share:
kubectl apply -f pod.yamlUse kubectl exec to access the pod and run df -h to verify the pre-created Manila share is properly mounted.
Useful CLI
With your OpenStack credentials loaded in the environment, you can manage Manila shares using the OpenStack CLI. Common commands include:
openstack share list # List all shares
openstack share type list # List available share types
openstack share access list|create|delete [${SHARE_ID}] # Manage access rules for a specific share
openstack share list|create|delete [${SHARE_ID}] # Create, list, or delete a share by its ID
openstack share message list # to see error related to Manila resources
Useful resources
1. Additional requirements
- You already have a working Terraform environment.
You can find useful examples in the public-cloud-examples repository.
2. Declare the OpenStack provider
Add the following configuration to your main.tf to specify the required Terraform providers:
vim main.tf

terraform {
  required_providers {
    ovh = {
      source  = "ovh/ovh"
    }

    openstack = {
      source  = "terraform-provider-openstack/openstack"
    }
  }
}
This block ensures that Terraform uses the correct providers for managing OVH and OpenStack resources.
3. Retrieve information about your private network
Add the following blocks to your main.tf file to fetch details about your private network and subnet:
data "openstack_networking_network_v2" "private_network" {
  name   = "<YOUR_PRIVATE_NETWORK_NAME>"
  region = "<YOUR_REGION_NAME>"
}

data "openstack_networking_subnet_v2" "private_subnet" {
  name   = "<YOUR_PRIVATE_SUBNET_NAME>"
  region = "<YOUR_REGION_NAME>"
}
These data blocks allow Terraform to query OpenStack and retrieve the necessary details of your private network and subnet, which are required for configuring the File Storage service.
4. Create a share network
Add the following resource to your main.tf to create a share network for your File Storage service:
resource "openstack_sharedfilesystem_sharenetwork_v2" "sharenetwork" {
  name              = "<YOUR_SHARE_NETWORK_NAME>"
  region            = "<YOUR_REGION_NAME>"
  neutron_net_id    = data.openstack_networking_network_v2.private_network.id
  neutron_subnet_id = data.openstack_networking_subnet_v2.private_subnet.id
}
This resource creates a share network in OpenStack, associating it with your existing private network and subnet. It is required to provision and manage shared file systems.
5. Create an NFS share
Add the following resource to your main.tf to create an NFS share on your File Storage service:
vim main.tf


resource "openstack_sharedfilesystem_share_v2" "share" {
  name             = "<YOUR_SHARE_NAME>"
  region           = "<YOUR_REGION_NAME>"
  share_type       = "standard-1az"
  share_proto      = "NFS"
  size             = 150
  share_network_id = openstack_sharedfilesystem_sharenetwork_v2.sharenetwork.id
}
This resource provisions an NFS share in OpenStack, linked to the previously created share network. Adjust the size and share_type according to your requirements.
6. Authorize a client VM
Ensure that your client VM is connected to the same private network as your share.
Retrieve the VM's private IP address:
openstack server show --os-region-name <YOUR_REGION_NAME> <YOUR_CLIENT_VM_NAME> -c addresses -f valueExample output:
{'my-private-net': ['10.1.0.123', '57.123.88.111']}Use the private IP (e.g., 10.1.0.123) to grant access to the NFS share:
resource "openstack_sharedfilesystem_share_access_v2" "share_access" {
  share_id     = openstack_sharedfilesystem_share_v2.share.id
  region       = "<YOUR_REGION_NAME>"
  access_type  = "ip"
  access_to    = "10.1.0.123"
  access_level = "rw"
}
This resource authorizes the specified client VM to access the NFS share with read/write permissions.
7. Retrieve the export path
Add the following output block to your main.tf to retrieve the NFS share export path:
output "export_path" {
  value = openstack_sharedfilesystem_share_v2.share.export_locations[0].path
}
This output provides the NFS export path, which client VMs can use to mount the share.
8. Mount the share on your client VM
Connect to your client VM and install the NFS utilities required to mount the share:
sudo apt update && sudo apt install -y nfs-commonCreate a mount point and mount the share:
sudo mkdir -p /mnt/share
sudo mount -t nfs4 <NFS_EXPORT_PATH> /mnt/share
Replace <NFS_EXPORT_PATH> with the export path retrieved from Terraform (e.g., 10.1.0.12:/shares/share-abc12345-def6-4abc-8def-123456abcdef).
Verify the mount:
df -h /mnt/shareSave the mount configuration in fstab for easy remounting:
echo "<NFS_EXPORT_PATH> /mnt/share nfs nfsvers=4 defaults,noauto 0 0" | sudo tee -a /etc/fstabThis lets you remount the NFS share after a reboot with the mount /mnt/share command.
9. Check capacity and usage
Once the NFS share is mounted, verify its available space and usage:
df -h /mnt/shareExample output:
Filesystem                          Size  Used  Avail Use% Mounted on
10.1.0.12:/shares/share-abc1...     150G  100M   150G   1% /mnt/share
This command shows the total size, used space, and available space on your mounted NFS share.
To connect with a dedicated server
To use File Storage Service with a dedicated server, you will follow a similar process; the difference will be that, rather than authorizing a Public Cloud instance to connect to the share, you will authorize your dedicated server.
You will need the following products in your OVHcloud account:
Notes:
- While these steps are for a dedicated server, this process should work with other services, such as VMware.
- Ensure that there are no overlapping IP address used throughout this process.
- If a VLAN is configured, ensure that the same VLAN is used across the involved servers and shares.
-
Add your dedicated server to your vRack (see more information).
-
In your Public Cloud project, create a private network using the same vRack that your server is on.
DangerWARNING: Your server and private network must be on the same vRack.
-
Get the Network ID and Subnet ID of that private network you just created.
-
Following the instructions above, create a File Storage share using that Network ID and Subnet ID.
-
Following the instructions above, add the IP address of your dedicated server to the share's ACL.
Go further
Browse all the File Storage guides.
Browse the rest of the OVHcloud US documentation for guides on our other products and services.
Learn more about File Storage on the OVHcloud US website.