Activate a Windows License for an Instance in Private Mode
Learn how to configure the public interface for your Public Cloud instances within your vRack.
Unlike Windows instances created in the public network, Windows instances created with private network mode (vRack) do not have their Windows licenses automatically enabled. In this case, you must activate the license manually to access all Windows services.
Requirements
We recommend that you read our guide on Accessing the Horizon interface to familiarize yourself with Horizon.
Instructions
Attach an "Ext-Net" public port to an instance
Via Horizon
Log in to the Horizon interface using the method listed in the first part of this guide.
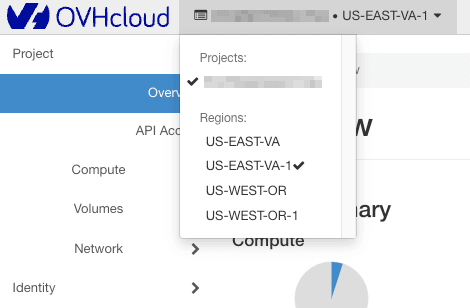
Choose the proper work zone.
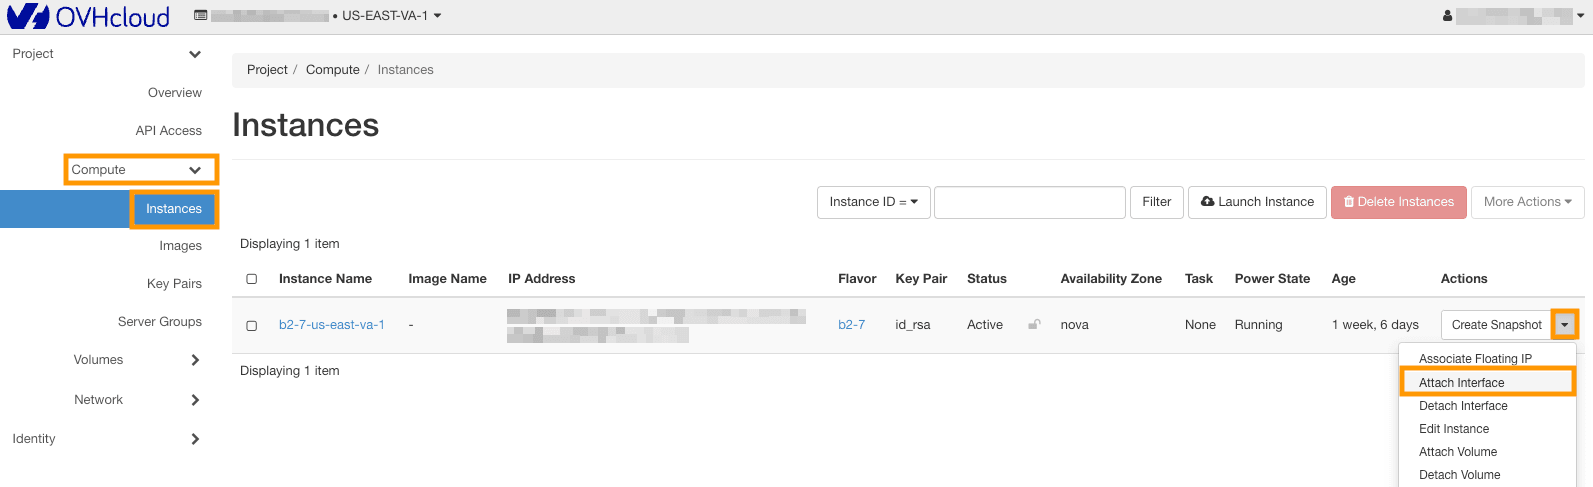
Select Compute and then Instances from the menu.
To add an interface, click on the arrow in the “Actions” column to access the possible actions on the instance. Select Attach Interface:
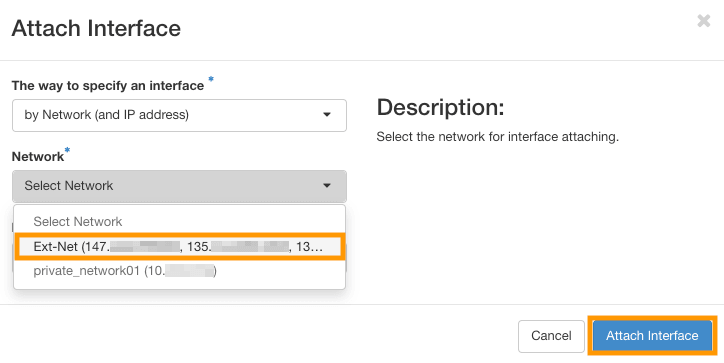
Select your interface and confirm.
Via the OpenStack API
Before continuing, we recommend reading these guides:
First, retrieve all the necessary information:
openstack server list
+--------------------------------------+-------------------+--------+---------------------------------------------------------------------+----------------------------------------+----------+
| ID                                   | Name              | Status | Networks                                                            | Image                                  | Flavor   |
+--------------------------------------+-------------------+--------+---------------------------------------------------------------------+----------------------------------------+----------+
| f095ad19-5c0a-4ef5-8e01-b3590bc9c6f1 | MyInstance        | ACTIVE |                                                                     | Windows Server 2016 Standard (Desktop) | win-b2-7 |
+--------------------------------------+-------------------+--------+---------------------------------------------------------------------+----------------------------------------+----------+
- ID of public and private networks
openstack network list
-----------------------------------------------------------------------------------------+
| ID                                   | Name              | Subnets                                                                                                                                                                                                                                                                  |
+--------------------------------------+-------------------+--------------------------------------------------------------------------------------------------------------------------------------------------------------------------------------------------------------------------------------------------------------------------+
| 1ca87837-7860-47a3-8916-c9c516841bf2 | Ext-Net-Baremetal | 1db089a7-1bd9-449f-8e3b-4ea61e666320, 4a614403-b8aa-4291-bd59-0cb2c81c4deb                                                                                                                                                                                               |
| 7394fc68-0f77-40d7-a274-388e7e75d82c | vlan 0            | f3fb67dc-7419-49da-b26c-7f64c480eb63                                                                                                                                                                                                                                     |
| 7a0e67da-70f3-48ed-a6e7-5ec265916211 | private-net       | 57d9faac-f01c-43a2-8866-d9b1dd02cb9e, 5cb270a9-3795-4286-96fe-f3bfa3a328e5                                                                                                                                                                                               |
| b2c02fdc-ffdf-40f6-9722-533bd7058c06 | Ext-Net           | 0f11270c-1113-4d4f-98de-eba83445d962, 1a6c6b72-88e9-4e94-ac8b-61e6dbc4792c, 22e2d853-1b86-48f3-8596-9d12c7693dc7, 4aa6cac1-d5cd-4e25-b14b-7573aeabcab1, 7d6352a6-dbed-4628-a029-fcc3986ae7d6, 9f989c4b-c441-4678-b395-e082c300356e, b072b17b-ef1d-4881-98c7-e0d6a1c3dcea|
+--------------------------------------+-------------------+--------------------------------------------------------------------------------------------------------------------------------------------------------------------------------------------------------------------------------------------------------------------------+
With the previously retrieved items, you can create a public port named "Ext-Net" on the subnet "Ext-Net" and attach it to the instance:
openstack port create --network b2c02fdc-ffdf-40f6-9722-533bd7058c06 Ext-Net
+-------------------------+----------------------------------------------------------------------------------------+
| Field                   | Value                                                                                  |
+-------------------------+----------------------------------------------------------------------------------------+
| admin_state_up          | UP                                                                                     |
| allowed_address_pairs   |                                                                                        |
| binding_host_id         | None                                                                                   |
| binding_profile         | None                                                                                   |
| binding_vif_details     | None                                                                                   |
| binding_vif_type        | None                                                                                   |
| binding_vnic_type       | normal                                                                                 |
| created_at              | 2023-01-20T10:12:17Z                                                                   |
| data_plane_status       | None                                                                                   |
| description             |                                                                                        |
| device_id               |                                                                                        |
| device_owner            |                                                                                        |
| device_profile          | None                                                                                   |
| dns_assignment          | None                                                                                   |
| dns_domain              | None                                                                                   |
| dns_name                | None                                                                                   |
| extra_dhcp_opts         |                                                                                        |
| fixed_ips               | ip_address='2001:41d0:304:400::128f', subnet_id='4aa6cac1-d5cd-4e25-b14b-7573aeabcab1' |
|                         | ip_address='57.128.42.227', subnet_id='22e2d853-1b86-48f3-8596-9d12c7693dc7'           |
| id                      | ed34add5-aa76-4aab-97af-815724d76e2c                                                   |
| ip_allocation           | immediate                                                                              |
| mac_address             | fa:16:3e:68:35:9c                                                                      |
| name                    | Ext-Net                                                                                |
| network_id              | b2c02fdc-ffdf-40f6-9722-533bd7058c06                                                   |
| numa_affinity_policy    | None                                                                                   |
| port_security_enabled   | True                                                                                   |
| project_id              | 2098640de5e547289e3740b09e725ecc                                                       |
| propagate_uplink_status | None                                                                                   |
| qos_network_policy_id   | None                                                                                   |
| qos_policy_id           | None                                                                                   |
| resource_request        | None                                                                                   |
| revision_number         | 2                                                                                      |
| security_group_ids      | 9f60804a-0ecf-4738-a4d8-30a6bb0d20c2                                                   |
| status                  | DOWN                                                                                   |
| tags                    |                                                                                        |
| tenant_id               | 2098640de5e547289e3740b09e725ecc                                                       |
| trunk_details           | None                                                                                   |
| updated_at              | 2023-01-20T10:12:18Z                                                                   |
+-------------------------+----------------------------------------------------------------------------------------+
Retrieve the UUID of the "Ext-Net" port:
openstack port list --name Ext-Net
+--------------------------------------+---------+-------------------+---------------------------------------------------------------------------------------+--------+
| ID                                   | Name    | MAC Address       | Fixed IP Addresses                                                                    | Status |
+--------------------------------------+---------+-------------------+---------------------------------------------------------------------------------------+--------+
| ed34add5-aa76-4aab-97af-815724d76e2c | Ext-Net | fa:16:3e:68:35:9c | ip_address='2001:41d0:304:400::128f', subnet_id='4aa6cac1-d5cd-4e25-b14b-7573aeabcab1'| DOWN   |
|                                      |         |                   | ip_address='57.128.42.227', subnet_id='22e2d853-1b86-48f3-8596-9d12c7693dc7'          |        |
+--------------------------------------+---------+-------------------+---------------------------------------------------------------------------------------+--------+
Attach the port to the instance:
openstack server add port <server_id> <port_id>
Activate your Windows license
To activate Windows, you must go through Powershell.
Once you have logged in to your Windows instance, right-click on the Start menu and select Windows PowerShell.
Enter the following command:
The Windows license will be activated for 180 days.
You will need to repeat this operation every 180 days.
Info
In the meantime, if you want to isolate your instance from the public network, you can disable the public port you have created via Horizon or the OpenStack API. You can also disable the network port directly via Windows.
To check the license status and expiration date, use the following command:
Go further
Browse all the Compute guides.
Browse the rest of the OVHcloud US documentation for guides on our other products and services.
Learn more about Public Cloud Compute on the OVHcloud US website.
