
How to create and use authentication keys for SSH connections to OVHcloud servers
Learn how to create and manage authentication key pairs on your local device and use them to connect to remote servers.
The SSH protocol enables a secure communication channel over public networks in a client-server architecture. Key pairs can be used to authenticate these SSH connections between two trusted hosts, for example a desktop client and a remote server.
A key set consists of a public key that can be shared and a private key that remains secret. Placed on a server, the public key allows any client that has the corresponding private key to connect to it without the need to enter a password.
This method is usually the best compromise between security and convenience.
Requirements
- A Dedicated Server or a VPS
- A remote connection client application compatible with the OpenSSH protocol
This guide is not applicable for standard Windows Server installations since they rely on the Remote Desktop Protocol (RDP) for connections. However, SSH connections are used for the OVHcloud rescue mode. You can find more information in the Go further section of this guide.
Topics
- Creating an SSH key pair
- Adding SSH keys to your server
- Managing multiple SSH keys on your local device
- Importing your SSH key into the OVHcloud Control Panel
- Adding a default rescue SHH key to your server
Instructions
Be sure to consult our "Getting Started" guides:
- For a dedicated server
- For a dedicated server of the Eco product line
- For a VPS
Creating key pairs for OpenSSH connections
The following instructions cover two methods of using SSH keys:
- Creating an OpenSSH key pair and connecting to a server from the command line SSH client
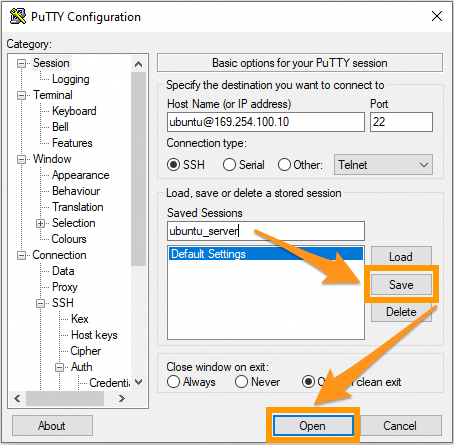
- Creating a PuTTY key pair and connecting to a server from the PuTTY SSH client
You can use both methods side by side but keep in mind that PuTTY stores key files in a specific format which makes them incompatible with SSH key files created with the OpenSSH client. This means that a private key created with the command line SSH client will have to be converted to the PuTTY format first and vice versa.
Creating an SSH key pair from the command line
From a Mac computer or a device with a Linux OS installed, open the command line application (Terminal).
Verify that you have a folder named .ssh in your $HOME directory. If the folder does not exist, create it:
On a current Windows OS, open the command prompt by typing "cmd" into the search bar (or open Powershell from the menu).
Go to the directory .ssh for your active Windows user (by default: C:\Users\WindowsUsername\.ssh):
Use the following command to create a 4096 bit ED25519 key:
Using the option -t with this command allows you to specify a different encryption method, for example:
The command line will prompt you to save the newly created key in the standard file:
You can confirm with Enter to accept the proposed file name or enter an individual name. This is relevant if more than one key pair is placed in the .ssh directory. You can find more information about this in the section on managing multiple SSH keys.
This example uses the standard file names id_rsa and id_rsa.pub.
You can protect your SSH key with a passphrase at the next prompt. This is recommended for added security.
NOTE: Remote access to your server is only as secure as the client device storing the private key. Protecting your device and files from unauthorized access is therefore crucial when using SSH keys.
For convenience and security purposes, consider using a password manager on your device, such as the open source solution KeePass.
All SSH keys should be stored in the .ssh directory. The public key files will have .pub added to the filename.
To view and export your public key, use the command cat on your .pub key file. Copy the full key string to the clipboard to add it to your server next.
In a MacOS Terminal you can use the commands pbcopy and pbpaste to handle key strings faster. For example, use this command to copy the key from the file id_rsa.pub to the clipboard: pbcopy < ~/.ssh/id_rsa.pub
On a Windows OS, you can open the file with the Notepad application from the File Explorer (right-click on the file and select Open with) or use one of the following commands (in \Users\WindowsUsername\.ssh):
cmd
powershell
Copy the full key string to the clipboard to add it to your server next.
Clipboard usage:
When working from a Windows command line, use a right-click to paste the content of your clipboard into the command line window. To copy a string from the command line window, highlight it, then press Enter. You can also find these functions via a right-click on the menu bar.
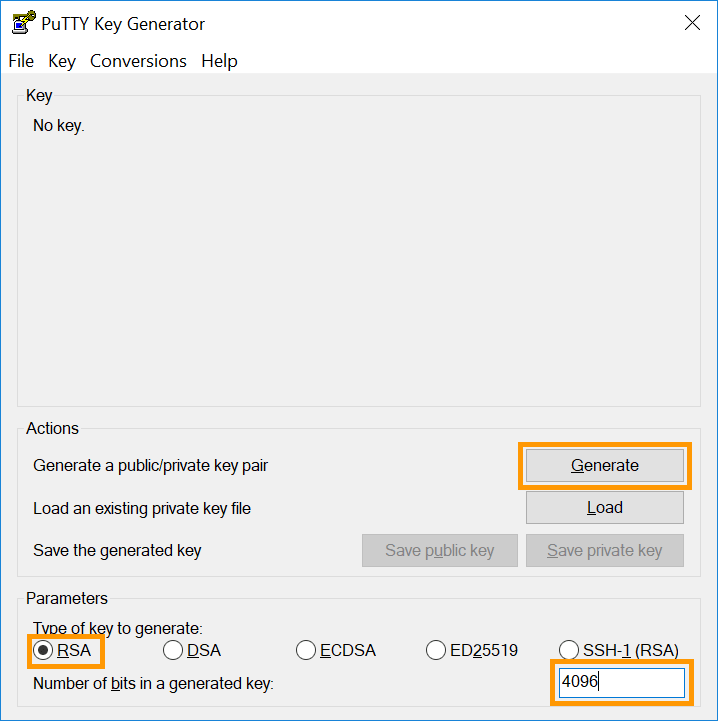
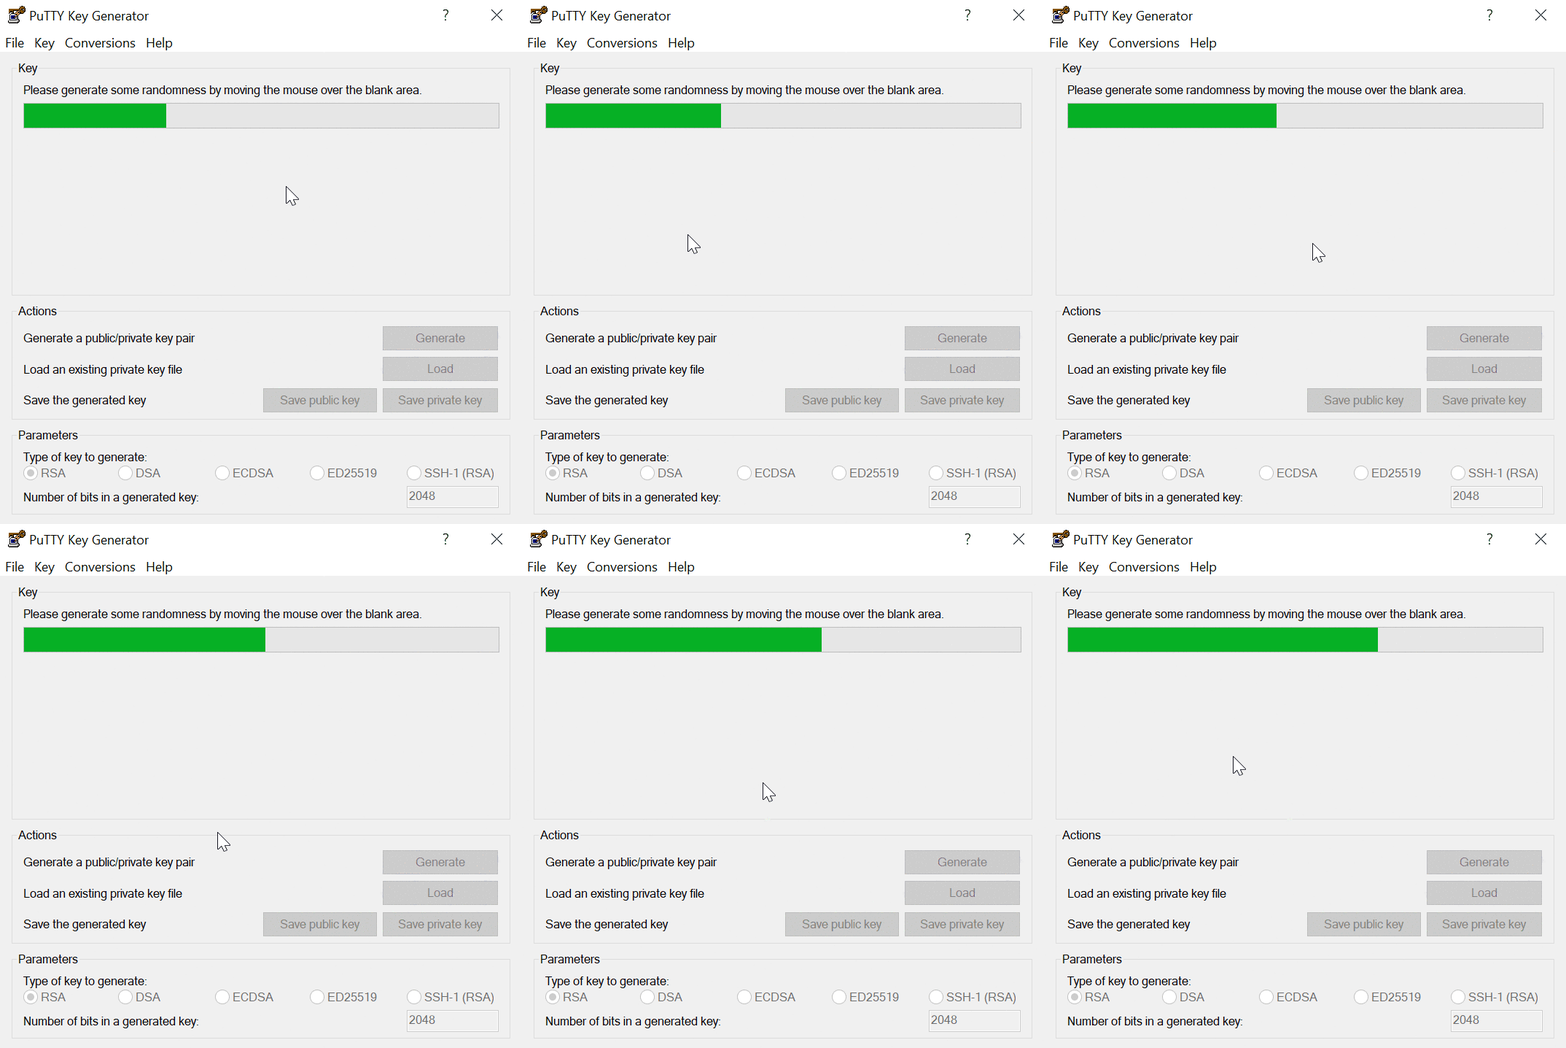
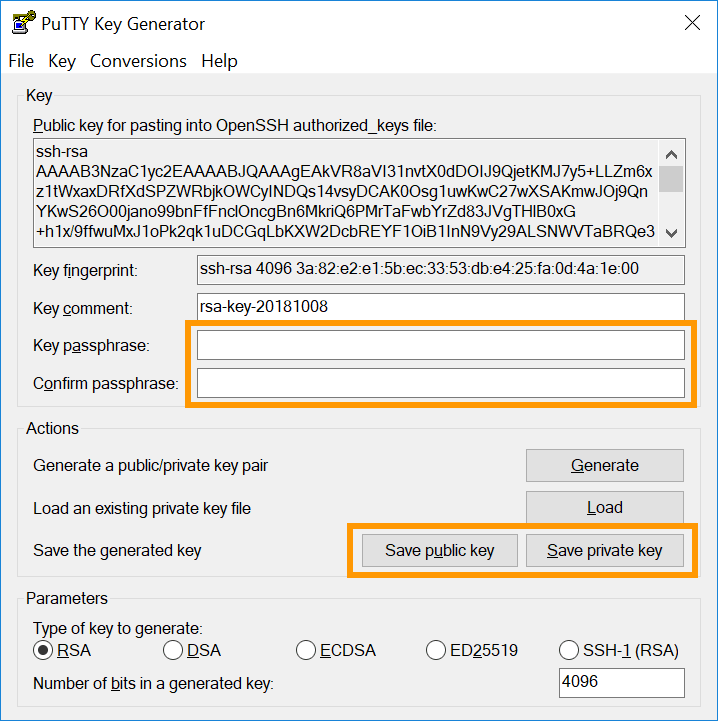
Adding SSH keys to your server
Transferring public keys created on systems based on GNU/Linux, MacOS, or BSD
If you have created your SSH key pairs on a GNU/Linux, MacOS, or BSD based system, you can use the command ssh-copy-id to add the public keys to your server.
The ssh-copy-id utility copies public keys to the file ~/.ssh/authorized_keys on the specified remote server and will automatically create the file in this directory if necessary.
By default, ssh-copy-id will try to transfer all public keys inside your local user's ~/.ssh directory. In order to add a single public key, you can specify this key file with the option -i followed by the file path:
Example:
You will be prompted for the user's password. If the process was successful, you will receive a message similar to the one below.
If you receive an error message instead, you can always add your public keys manually by following the steps described below.
As a best practice and for security reasons, a single key pair should not be used by multiple users. Since each user on GNU/Linux systems has their own authorized_keys file in ~/.ssh/, you can use the command ssh-copy-id as shown above and adapt KeyFileName and user after you have created the key pair.
Adding public keys to a server manually
Connect to your server and make sure you are in your user's $HOME directory. Create the folder .ssh (if it does not exist):
To store the key for the current user, open (or create) the file authorized_keys with your preferred text editor (nano is used in this example):
Paste your public key into this file. Save the file and exit the editor. Reboot your server (sudo reboot) or only restart the OpenSSH service with one of the following commands (the appropriate command may vary depending on your OS):
To verify that your key has been set up properly, connect to your server with the following command. Replace "user" with the username for which the keys were created and "IP_ADDRESS" with the IP address (or hostname) of the server you want to access:
Example:
Adding additional public keys to your server
To add SSH keys for other users accessing your server, repeat the key creation steps but use the appropriate $HOME folder or Windows Users directory of the user in question to create and store the SSH keys (or execute the commands on this person's dedicated device). Then add the new public key to the server in authorized_keys as described above.
Removing public keys from your server
Open the file authorized_keys as described above and remove the key string that corresponds to the user having their access revoked.
Save the file and exit the editor.
Managing multiple SSH keys on your local device
You might want to use multiple SSH key pairs to connect to different remote hosts.
Since all keys should be placed in the folder .ssh on your local device, the file names have to be different. When you create a new key pair and you are asked to provide a file name, enter a name of your choice. Match it to the name of your server for example.
When connecting to the corresponding server, specify the name of the key file in addition to the user and server details:
Example:
As noted in previous sections, the same instructions will work on a Windows client. Only replace ~/ with the file path of your Windows user folder, by default C:\Users\WindowsUsername\. (Example: ssh -i C:\Users\Username\.ssh/myVPS_rsa ubuntu@203.0.113.100).
The alternative to adding the option -i each time is to edit a file named config inside the folder ~/.ssh (\Users\Username\.ssh for Windows). You can use it to configure details for different connections (username, port, key file, optional parameters, etc.)
If this file exists inside .ssh, it probably contains some information already. Depending on your working environment, consider creating a backup copy of the original first.
Example of .ssh folder content:
With the config file, multiple SSH connections can be stored along with their individual parameters, in addition to standard values. Using the full potential of this file can become complex, since it is most useful for experienced users managing multiple servers on a regular basis.
Following is a simple example to explain how to configure an SSH connection to a VPS.
Open the file and add the following lines at the top:
You can then connect to the VPS with the alias name you have defined as Host:
Only the server IP and the key file were specified in the previous example but more details can be added. To configure an SSH connection to a second server with the username "rocky", the modified SSH port "49160" and the private key in the file "myserver_rsa", extend the file content as shown in this example:
You can then connect to this server by entering:
You can read the corresponding man page for more information.
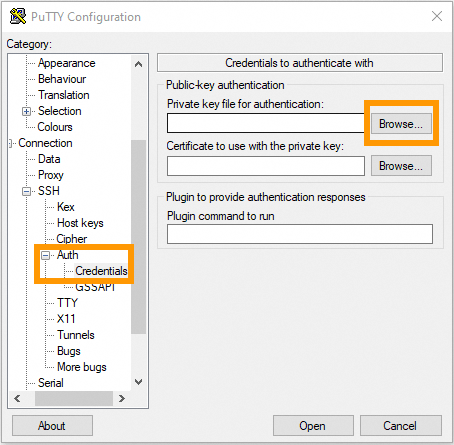
Importing your SSH key into the OVHcloud Control Panel
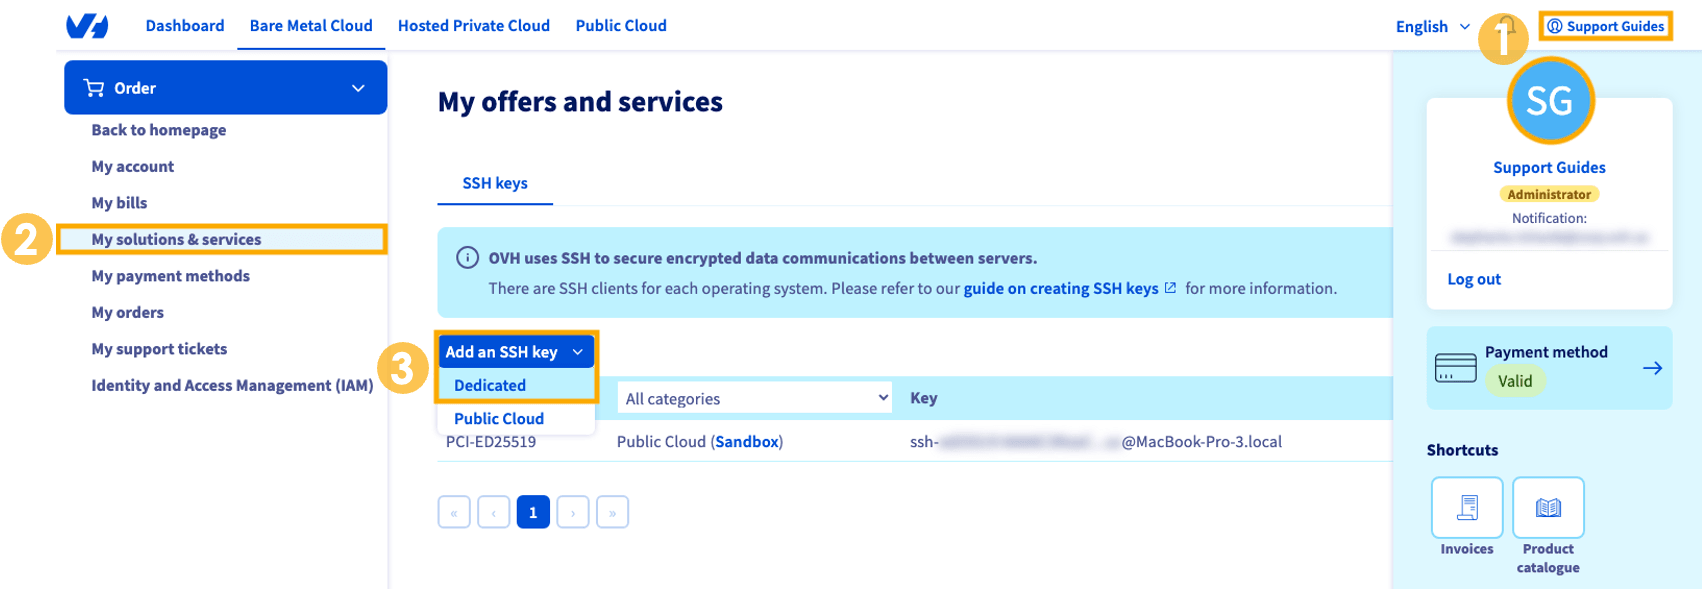
The OVHcloud Control Panel allows you to store public keys, if they were created with one of the supported encryption types. This feature can save you some time when you configure a new server or reinstall one because you do not have to add the public key to your server manually.
From the OVHcloud Control Panel:
- Select your
nameandinitialsin the upper-right hand corner. - Select
My solutions & servicesfrom the left-hand navigation menu. - In the SSH keys tab, click on
Add an SSH keyand selectclass="action"Dedicatedfrom the drop-down menu.
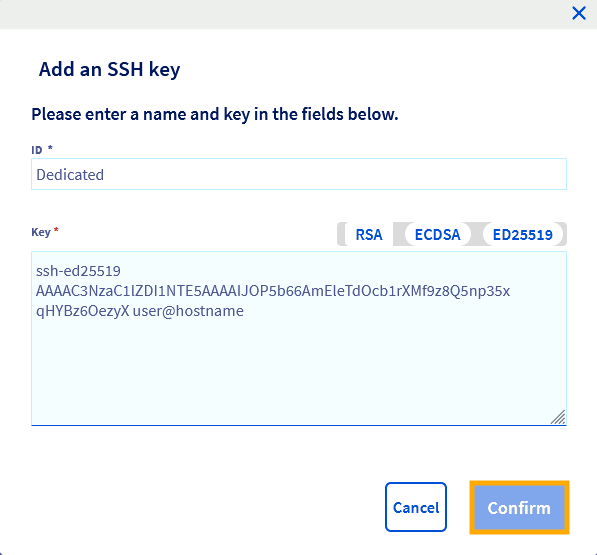
In the new window, enter an ID (a name of your choice) for the key. Paste the key string (copied from your .pub file or the PuTTYgen window) into the Key field.
If you have copied the full output, the identifier after the key should already be appended. Note that to store your key, you will need to specify your local identifier after the pasted key. (See the example format below.) This is a requirement of the OVHcloud Control Panel. Click Confirm to store your public key.
All keys saved in the Dedicated section are available to preinstall on a dedicated server or a VPS. Regarding SSH keys for Public Cloud services, please refer to this guide.
Adding a default rescue SSH key to your server
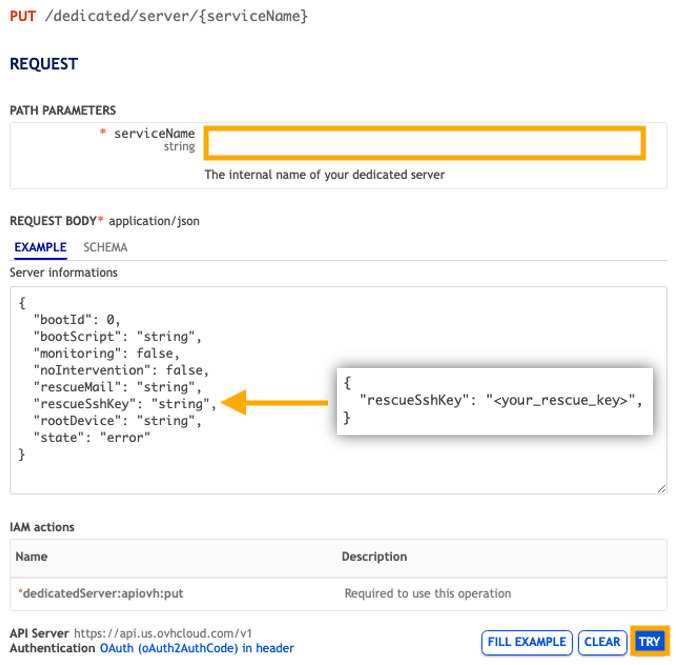
You can add a default rescue SSH key to your server via the OVHcloud API.
- add your serviceName
- replace rescueSshKey with your rescue key
- delete all other values from the EXAMPLE
- click
Try
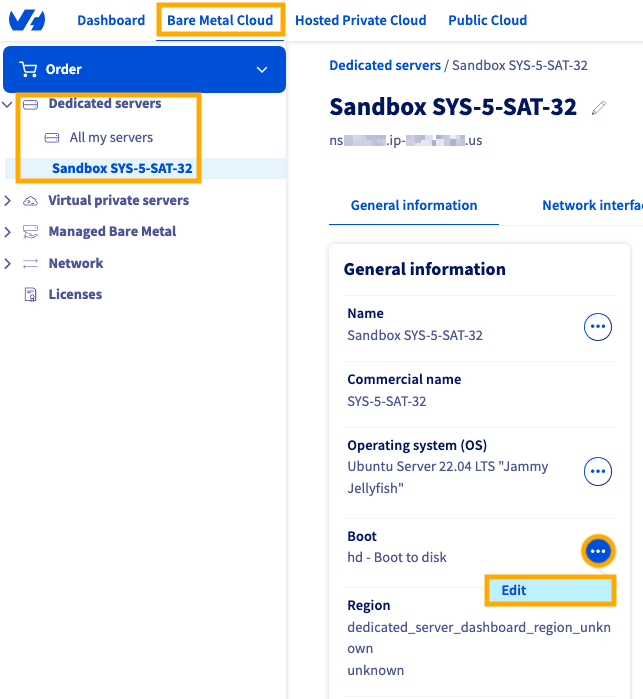
You can verify the success of this API call through the OVHcloud Control Panel:
- Select
Bare Metal Cloudfrom the top navigation bar. - In the left-hand menu, click
Dedicated serversand select your server. - Next to Boot click the more options
...button and selectEdit.
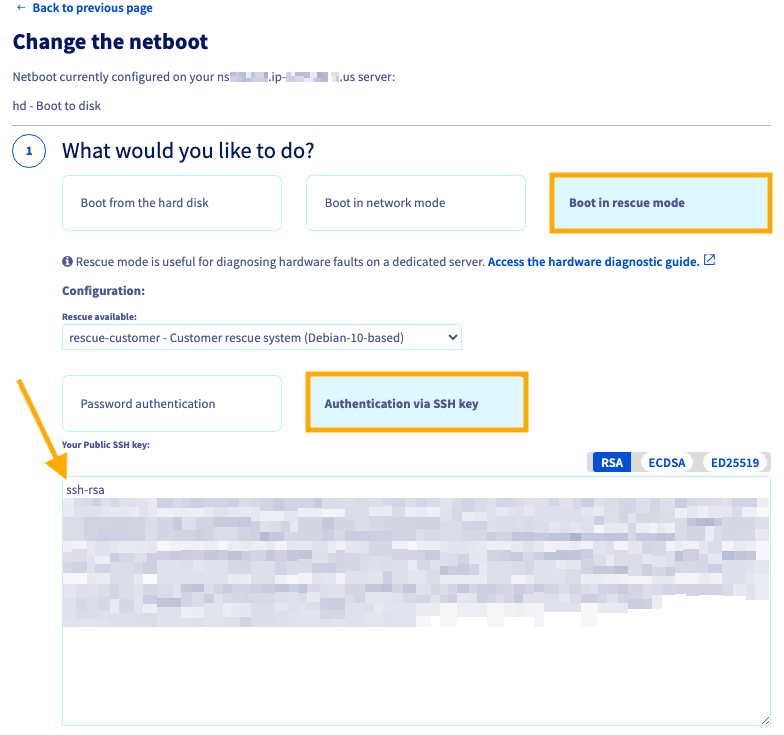
On the next screen, select Boot in rescue mode and Authentication via SSH key. You can see your current rescue SSH key in the Your Public SSH key field.
Go further
Related articles:
Browse all the Dedicated Servers guides.
Browse the rest of the OVHcloud US documentation for guides on our other products and services.
Learn more about Dedicated Servers on the OVHcloud US website.
If you need training or technical assistance to implement our solutions, contact your sales representative or click on this link to get a quote and ask our Professional Services experts for a custom analysis of your project.