
Cloning a VM
Requirements
- Being an administrative contact of your VMware on OVHcloud infrastructure (to receive login credentials)
- A user account with access to vSphere (created in the OVHcloud Control Panel)
Instructions
Clone a VM
Cloning enables quick and efficient deployment of similar virtual machines (VMs). You can clone a VM directly into another VM or convert it into a template.
- Cloning to a VM is a fast way to duplicate a complete VM and its configuration.
- Cloning to a template is the preferred method for creating a master image that can be used to deploy many VMs.
Clone to VM
In the vSphere Web Client, go to the Hosts and Clusters dashboard. Navigate to your VM, right-click on it, select Clone, and choose Clone to Virtual Machine....
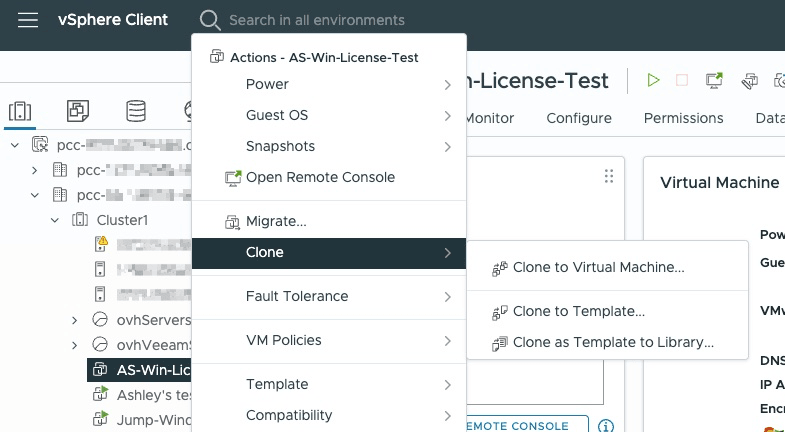
On the following screen, you can configure your new clone.
-
Select a name and folder: Name the clone VM and select its data center location.
-
Select a compute resource: Select the clone VM compute location.
-
Select storage: Select the clone VM storage location.
-
Select clone options:
- Customizing the operating system will trigger sysprep on the first use of the VM.
- Customizing this virtual machine's hardware allows for modification of VM capabilities (HDD size, network elements, etc.)
- Powering on a virtual machine after creation is not recommended, as you may have to apply changes before startup to prevent issues (network conflicts, most notably if you use fixed IPs).
-
Ready to complete: Review and click
Finish.
If you cloned without any customization, make sure it is safe to boot the new VM. If it is coned from a fixed IP VM, you should disable the Network Card to avoid IP conflicts, for example.
Clone to Template
In the vSphere Web Client, go to the Hosts and Clusters dashboard. Navigate to your VM, right-click on it, select Clone, and choose Clone to Template....
On the following screen, you can configure your new template.
- Select a name and folder: Name the template VM and select its data center location.
- Select a compute resource: Select the template VM compute location.
- Select storage: Select the template VM storage location.
- Ready to complete: Review and click
Finish.
When the process is finished, you will not see your template until you deploy a new VM using the "Deploy from a Template" option.
Go further
Browse all the VMware on OVHcloud guides.
Browse the rest of the OVHcloud US documentation for guides on our other products and services.
Learn more about VMware on OVHcloud on the OVHcloud US website.