
Configuring IPv6 on a VPS
This article is about Primary IPv6 configuration on a public interface. You can also configure Additional IP addresses on your VPS using this guide.
NOTE: OVHcloud provides services for which you are responsible for their configuration and management. You are therefore responsible for their proper functioning.
This tutorial is designed to help you as much as possible with common tasks. If you are having difficulty performing these actions, please contact a specialized service provider. OVHcloud cannot provide you with technical support in this regard.
Requirements
- A Virtual Private Server in your OVHcloud account
- Administrative access (root) via SSH or remote desktop (Windows) to your server
- A basic understanding of networking
- Access to the OVHcloud Control Panel or OVHcloud API
Instructions
The following sections contain configurations for the distributions we currently offer, as well as the most commonly used distributions/operating systems. The first step is always to log in to your server via SSH or a GUI login session (RDP for a Windows VPS). The examples below presume you are logged in as a user with elevated permissions (Administrator/sudo).
NOTE: On the recent Linux operating systems we offer for VPS, the IPv6 address is configured by default. If this is the case, you don't need to configure it. Please check your operating system's configuration file before making any changes.
Please take note of the following terminology that will be used in code examples and instructions of the guide sections below:
Step 1: Retrieve the necessary network information
The first step is to identify the IPv6 address and the IPv6 gateway assigned to your server. There are two ways of doing this:
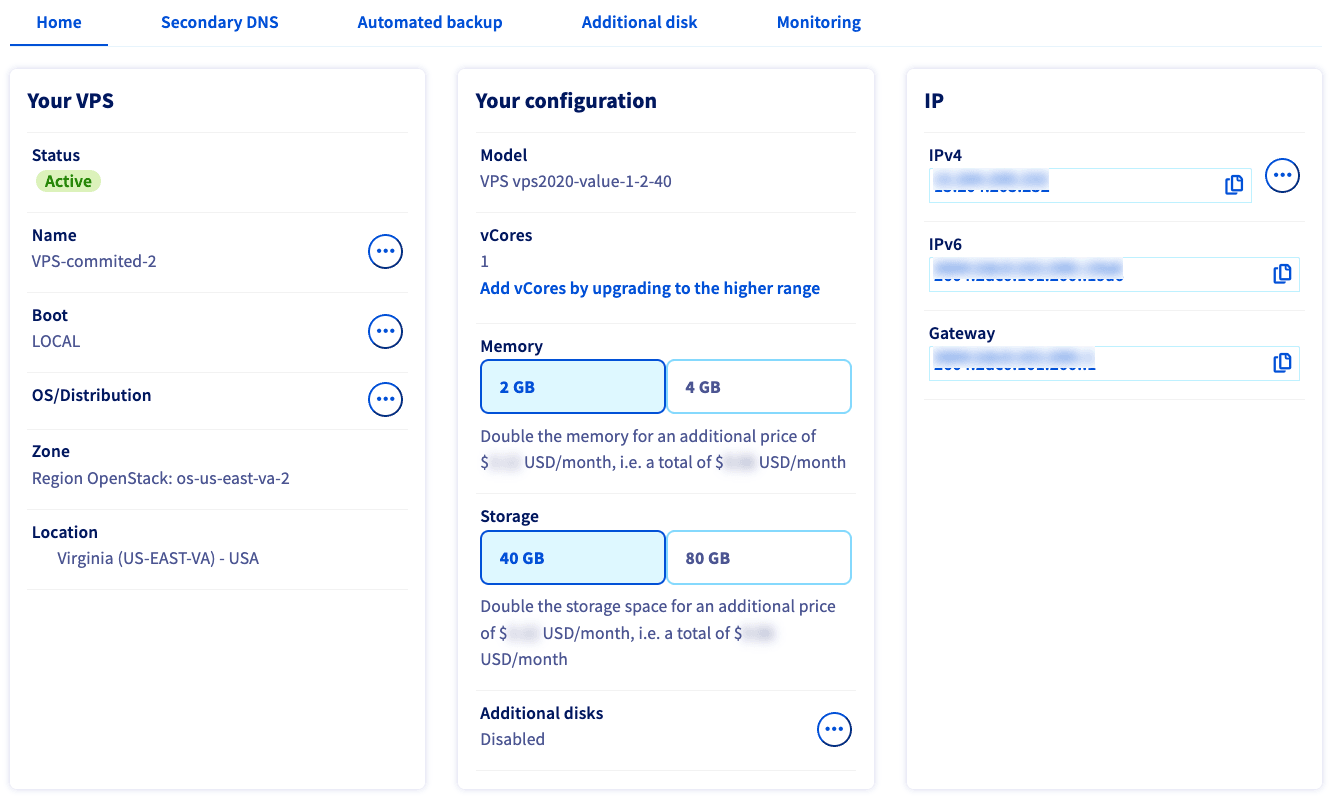
Log into the OVHcloud Control Panel and navigate to your VPS via the Bare Metal Cloud and Virtual private servers menus.
The IPv6 address and the IPv6 gateway assigned to your server will appear in the IP panel of the Home tab. Once you have copied them, continue with applying the IPv6 configuration.
Step 2: Apply the IPv6 configuration
Once you have gathered the necessary information for the IPv6 configuration, log in to your VPS via SSH. If you require assistance, please refer to this guide: How to get started with SSH connections.
There are several ways to apply the IPv6 configuration. Use whichever method best suits your situation and requirements:
- Non-persistent application
- Persistent application on Debian and its derivatives
- Persistent application on Red Hat and its derivatives
- Persistent application on Fedora 42 and later
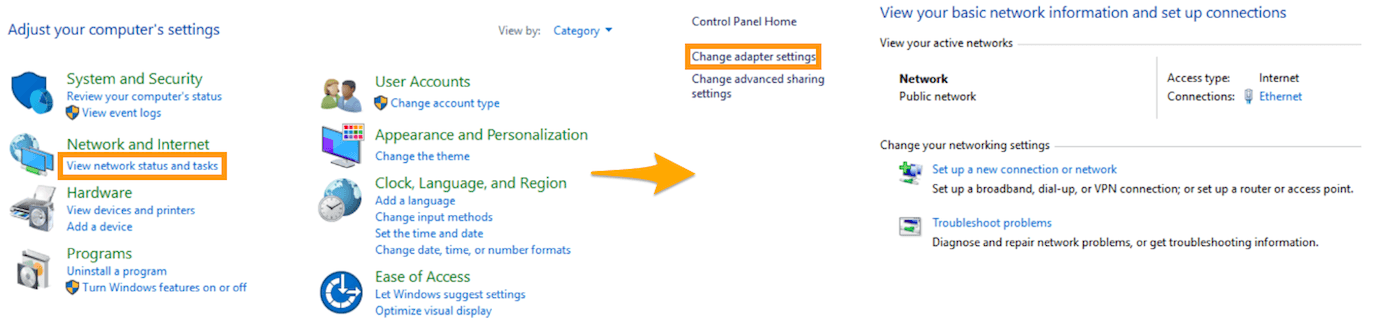
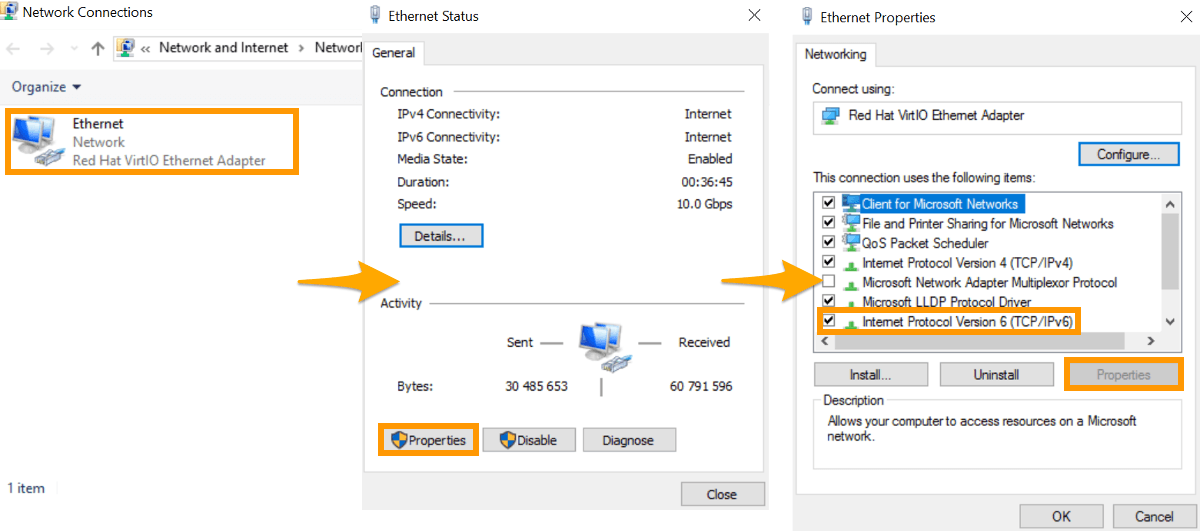
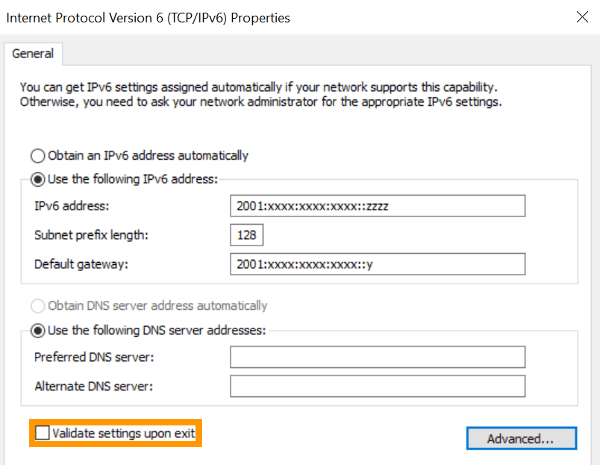
- Persistent application on Windows Server
NOTE: VPS LE instances have two interfaces by default. The IPv6 configuration might need to be applied to a different interface, e.g., eth1. You can confirm which interface is used with the command: ip addr.
If this is the case for you, the command may look like this:
Non-persistent application
NOTE: This configuration will be lost after a restart of your VPS (non-persistent configuration).
Connect to your server via SSH and enter the following commands. Take care to tailor these with:
- the network information, retrieved in the previous step (YOUR_IPV6, IPV6_PREFIX, and IPV6_GATEWAY)
- the network interface (if your server is not using eth0)
Step 3: Verify the configuration and test the connection
To verify that the configuration is functional, there are several possible commands, depending on the operating system.
-
For a GNU/Linux-based system, here are two examples for the eth0 interface (to be adapted if necessary):
To test the connection, you can use the following command:
-
For a Windows-based system, use the following command:
To test the connection, you can use the following command:
You can also test the connection to another remote server. However, it is necessary for IPv6 to be active on the remote server for this operation to work.
If, despite these changes, IPv6 does not seem to work on your server, it is possible (in rare cases) that you will have to carry out additional modifications. In such cases, try the following steps:
- Depending on the operating system, try to change the prefix (or netmask) of your IP address from /128 to /64. This will include the IPv6 gateway in your subnet.
- In addition to restarting the network service, it may be necessary to reboot your server to finalize your IPv6 configuration.
- In Windows, verify that the firewall allows ICMP requests for IPv6.
Step 4: Disable Cloud-init network management (optional)
This step does not apply to Windows-based systems.
Cloud-init is a package installed by default on a VPS. It functions as a framework to run a script after initially creating your server or rebooting it. The mechanics in place allow the underlying OpenStack infrastructure to inject scripts into the Cloud-init environment and, therefore, the server configuration.
Depending on the operating system, Cloud-init will manage: the network, the hostname, the resolv.conf file, or the automatic partitioning of the hard disk, in case of an upgrade.
In the case of newer distributions (such as CentOS, Debian 9, Ubuntu 16.x, and later), the default configuration of Cloud-init might sometimes automatically reset the network configuration when the server starts up.
This is relevant for specific use cases in which it is recommended to avoid the reset by disabling automatic network management in Cloud-init. To do this, use the following command to create a file /etc/cloud/cloud.cfg.d/98-disable-network-config.cfg with the value network: {config: disabled}:
NOTE: It might be necessary to reboot the server for the change to take effect.
To return to automatic management of your network by Cloud-init, delete the newly created file or move it to another directory.
Go further
Browse all the Virtual Private Servers guides.
Browse the rest of the OVHcloud US documentation for guides on our other products and services.
Learn more about VPS on the OVHcloud US website.