
Configuring HYCU backup
NOTE: OVHcloud provides services for which you are responsible for their configuration and management. You are therefore responsible for their proper functioning.
This tutorial is designed to help you as much as possible with common tasks. If you are having difficulty performing these actions, please contact a specialized service provider. OVHcloud cannot provide you with technical support in this regard.
Requirements
-
A valid HYCU license
InfoFor more information on purchasing or managing a HYCU license through OVHcloud, please see our Ordering and managing a HYCU for OVHcloud license guide.
-
A Nutanix on OVHcloud cluster in your OVHcloud account
-
Access to the OVHcloud Control Panel
-
A Public Cloud project with a High Performance Object Storage type storage bucket, with a user with read and write permissions for this bucket.
InfoYou can find more information on how to create a Public Cloud project and how to use the High Performance Object Storage service on the following pages:
-
60 GB of storage, 8 GB of memory, and 8 cores on your Nutanix Cluster for the HYCU Instance/Appliance.
Topics
Instructions
Install and configure HYCU
Adding the HYCU installation image
Log in to Prism Central (see this guide for instructions).
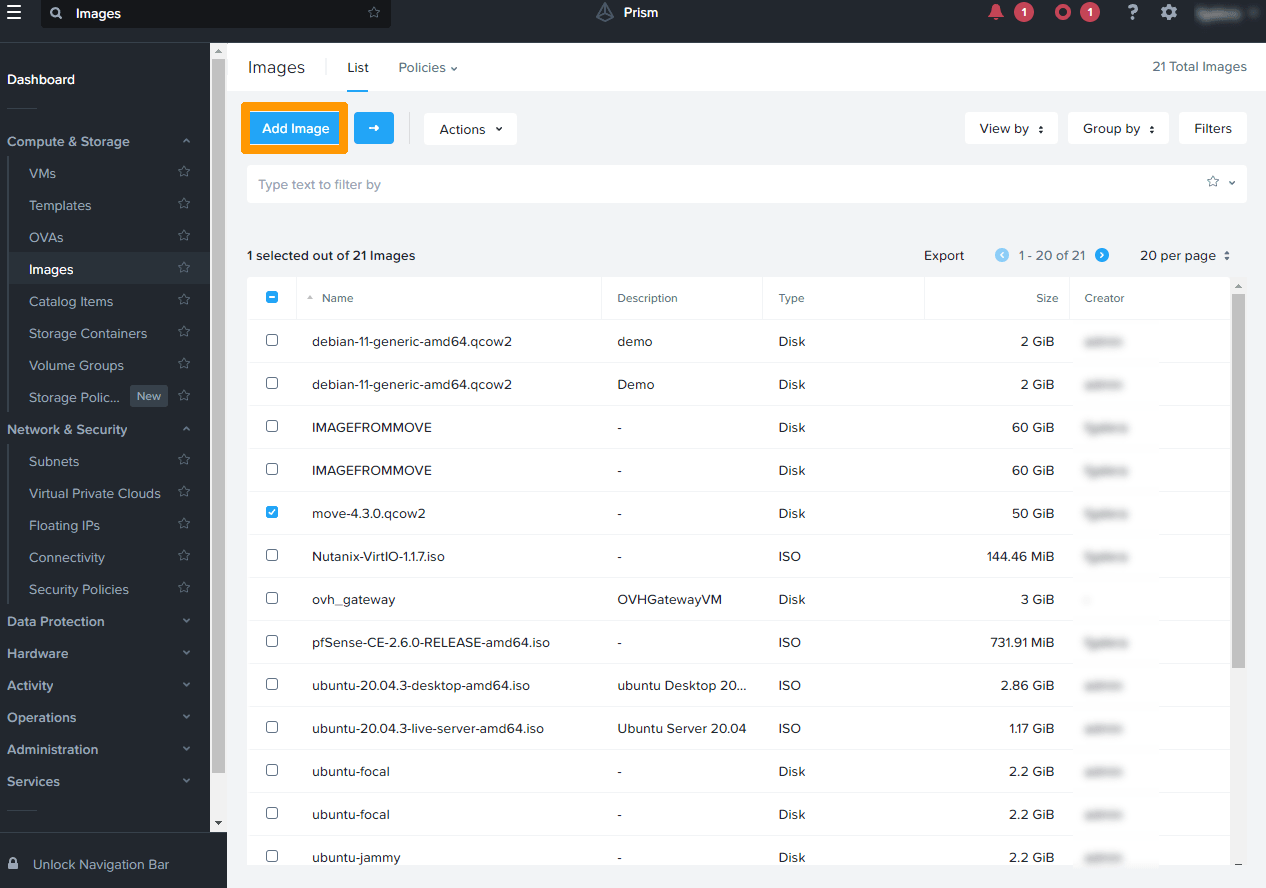
From the main menu ☰, under Compute & Storage click Images menu.
Then, click Add Image.
-
Choose
URLas the source type, enter the download URL for the latest version, and clickUpload file.WarningNOTE: The latest version can be found on the HYCU support page in the Downloads section. If you do not have access to this area, you can create a ticket for the OVHcloud Support team, who will retrieve the image for you.
-
In the Name field, remove the .qcow2 extension behind the name, but leave
hycu-X.X.X-XXXX. Enter a description and clickNext.WarningNOTE: It is important to remove the extension in the name to facilitate the HYCU configuration process.
-
Click
Saveto import the image.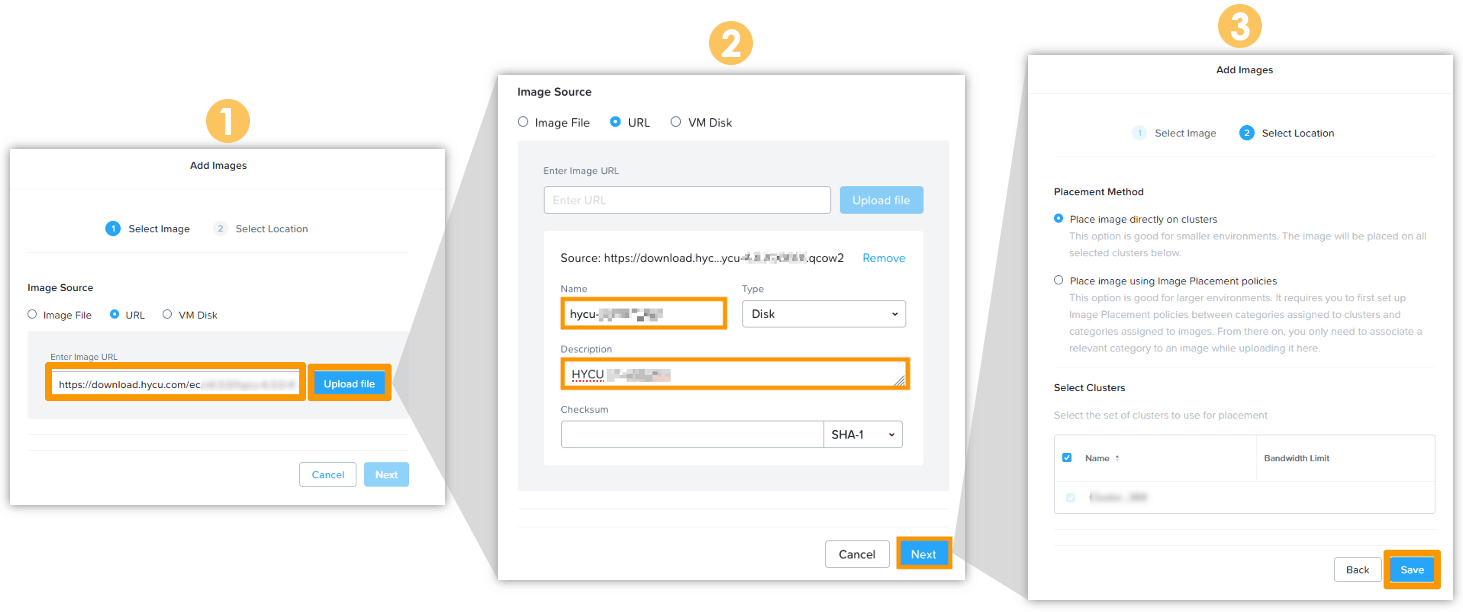
Configure the Data Services IP
Click the gear icon [action]⚙️[/action] in the upper-right corner.
-image-
Select [action]Cluster Details[/action] from the left navigation menu.
-image-
Enter an unused private IP address in the Data Services IP field and click [action]Save[/action].
-image-
Confirm your choice in the pop-up window.
-image-
Adding a user account in Prism Element for HYCU
New local users can be added from the Prism Element interface.
Click here for full instructions.
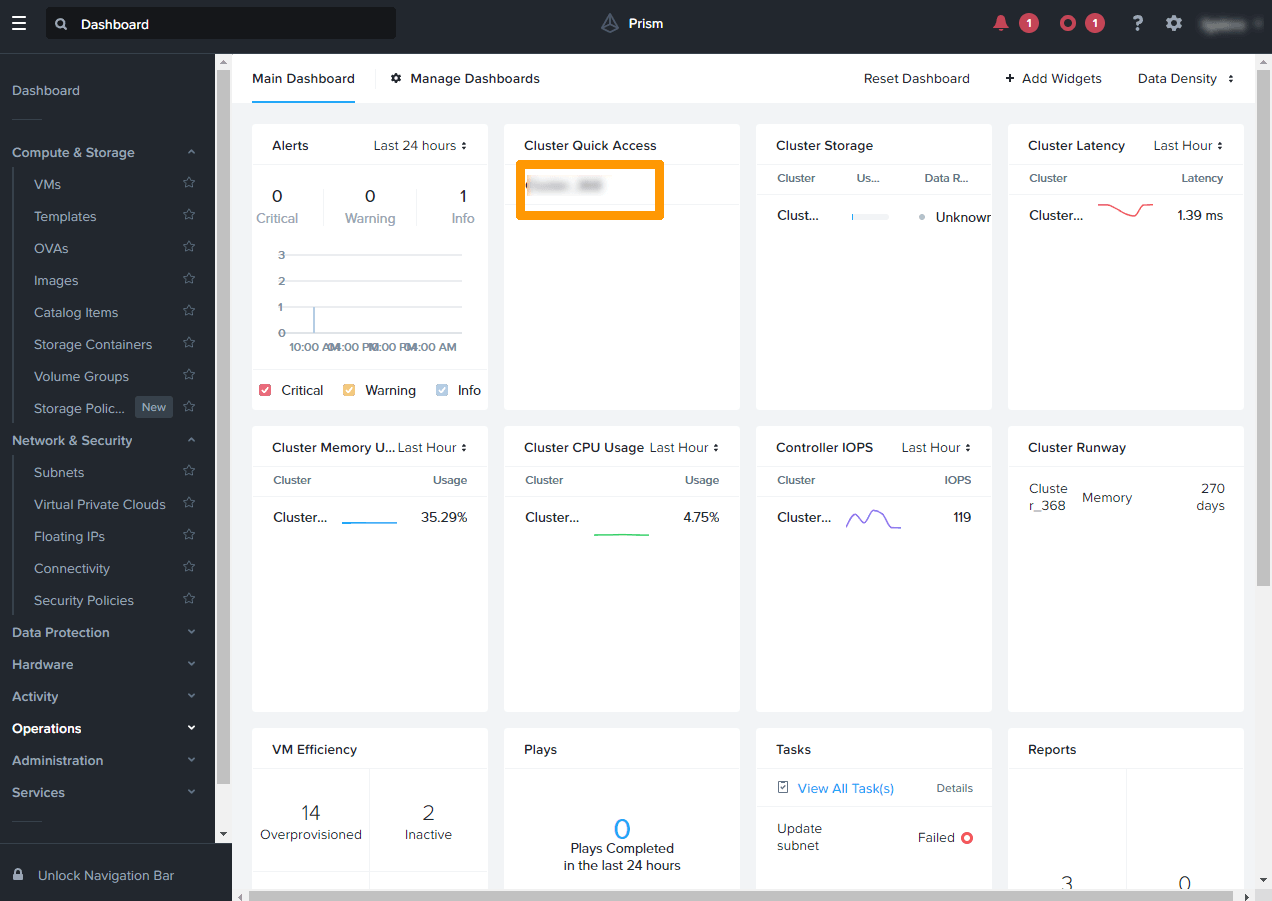
On the Prism Central dashboard, click the cluster name in the Cluster Quick Access section to go to the Prism Element.
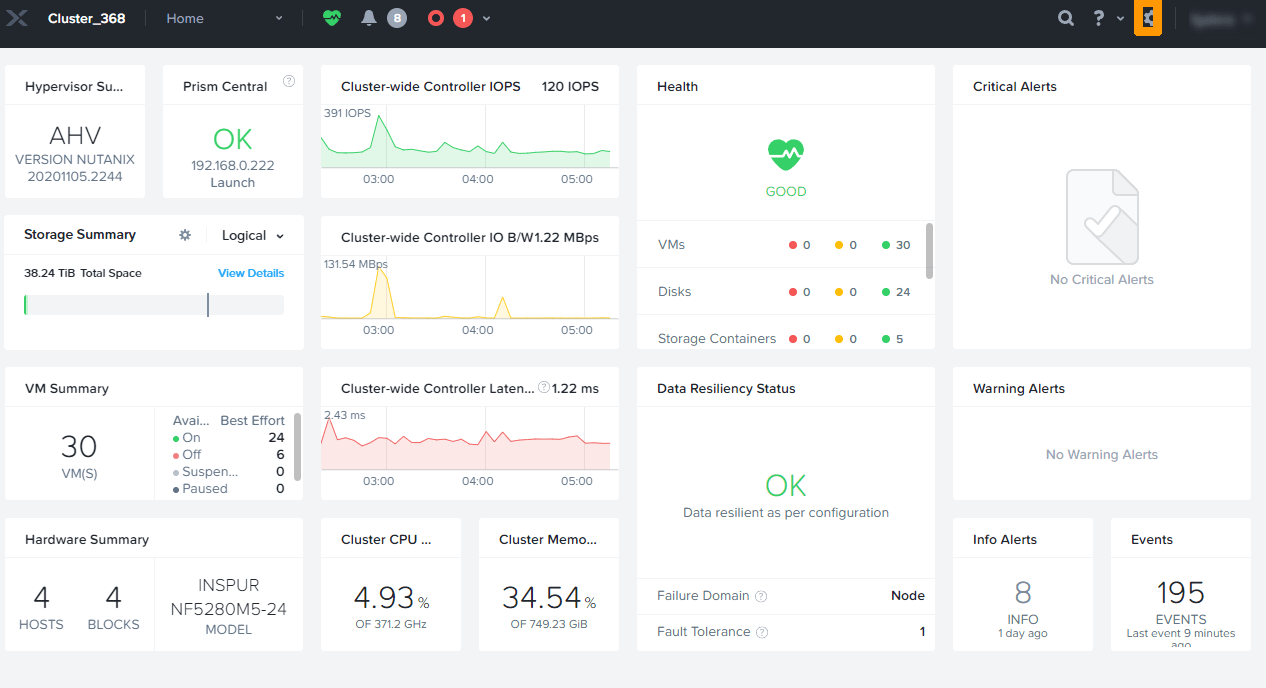
Click the gear ⚙️ to go to Settings.
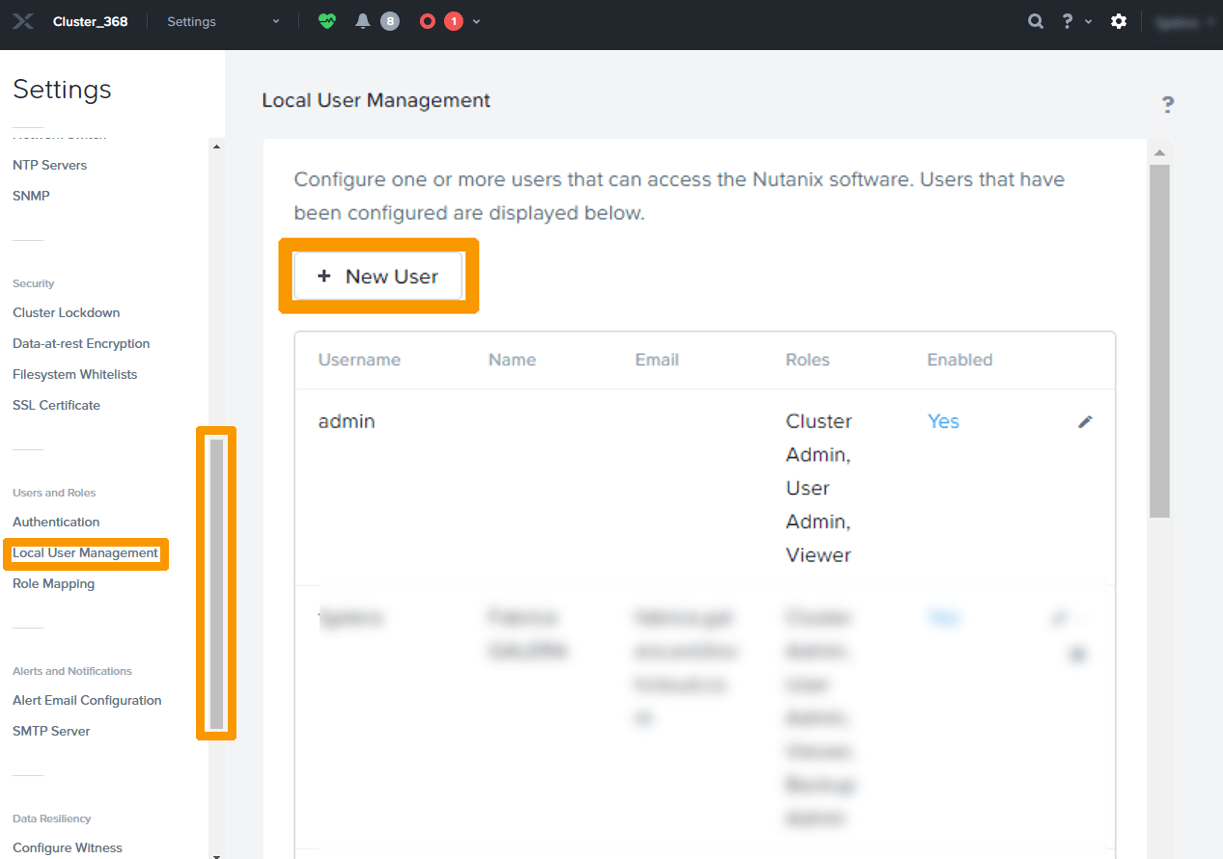
Scroll down the menu and click Local User Management.
Click + New User.
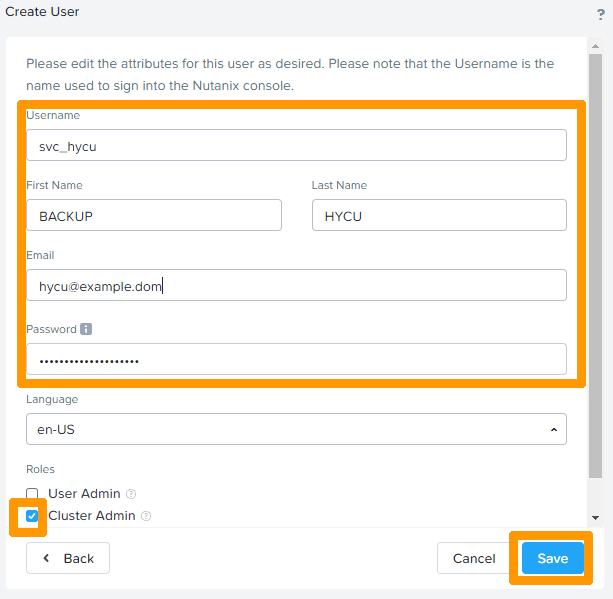
Enter these values:
- Username:
svc_hycu - First Name:
HYCU - Last Name:
HYCU - Email:
hycu@example.com - Password:
password
This information is provided as an example; the email address is mandatory but is not used.
Select the Cluster Admin checkbox and click Save.
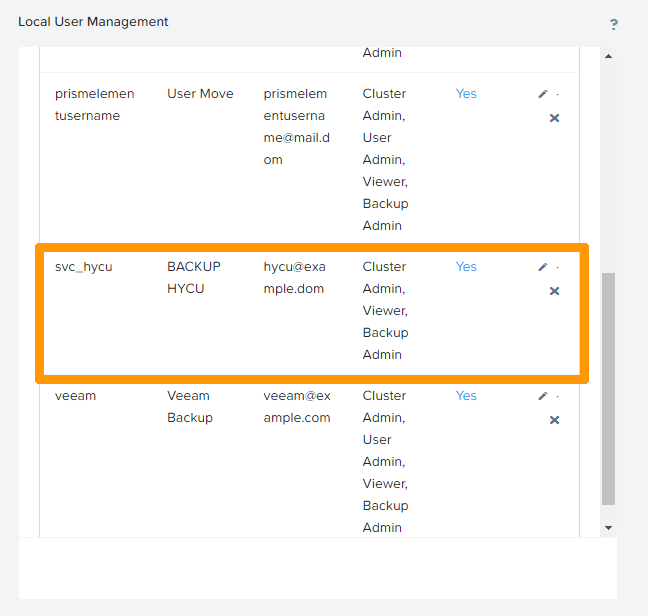
You will see your newly created user on the Local User Management screen.
Creating the virtual machine for HYCU
You can create a virtual machine for HYCU from the Prism Central interface.
Click here for full instructions.
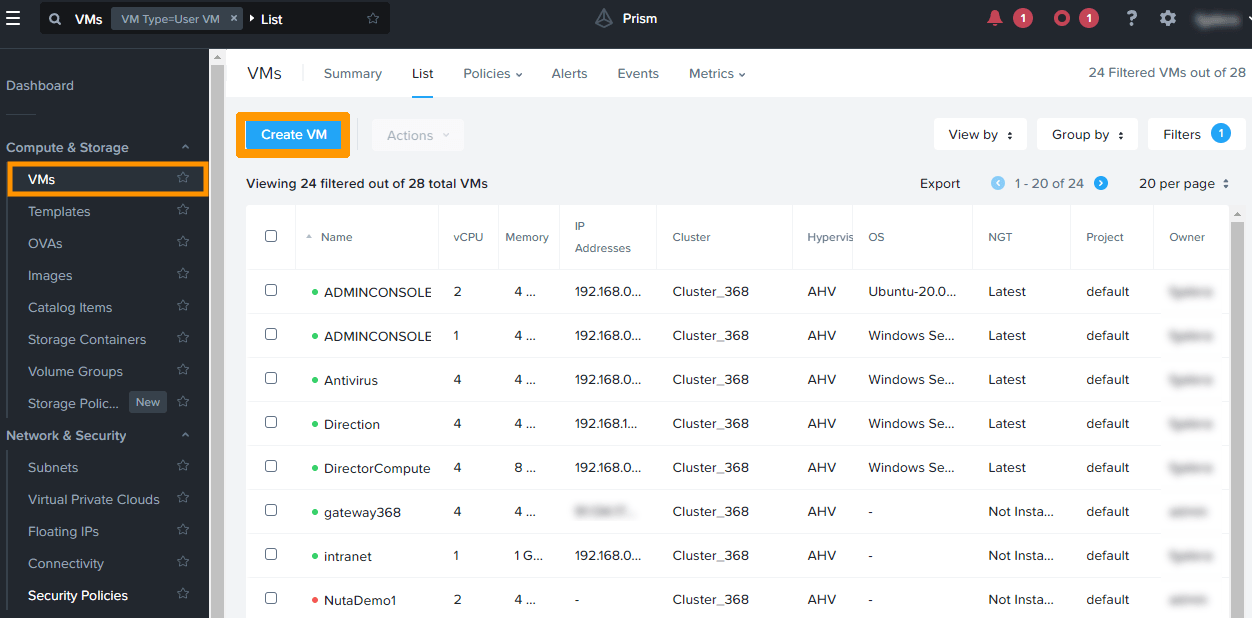
From the main menu ☰, under Compute & Storage, click VMs.
Then, click Create VM.
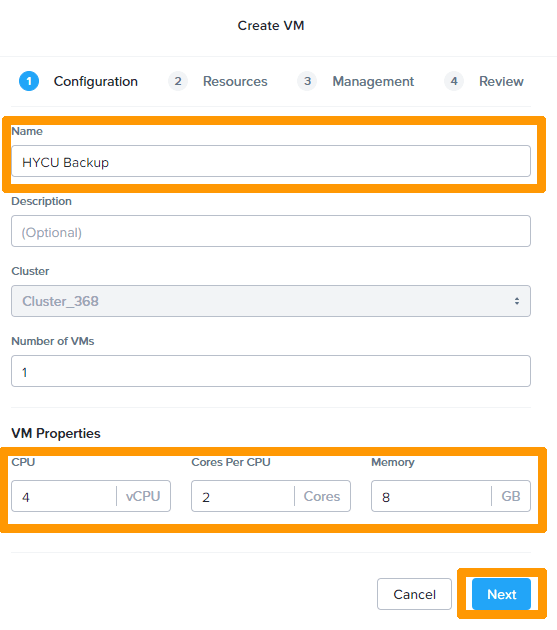
Name the virtual machine and change the properties of the virtual machine with these settings:
- CPU:
4 vCPU - Cores Per CPU:
2 Cores - Memory:
8GB
Click Next.
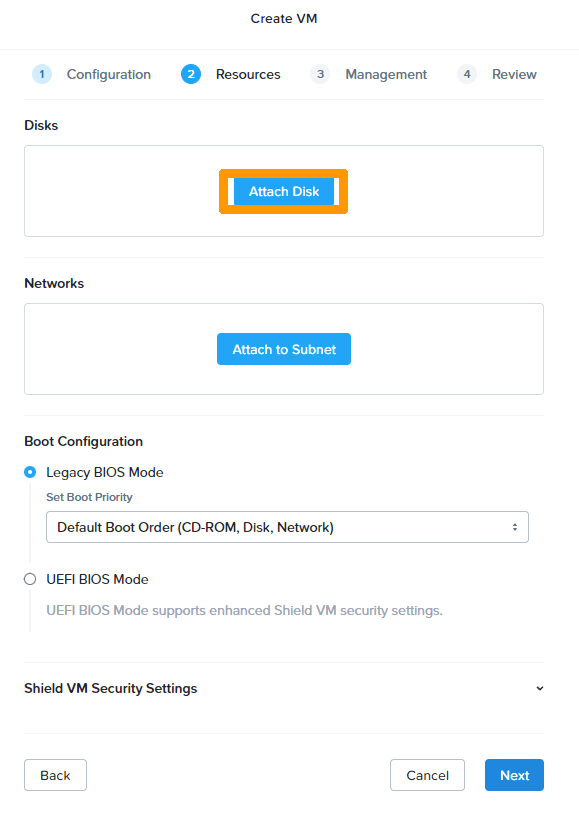
Click Attach Disk.
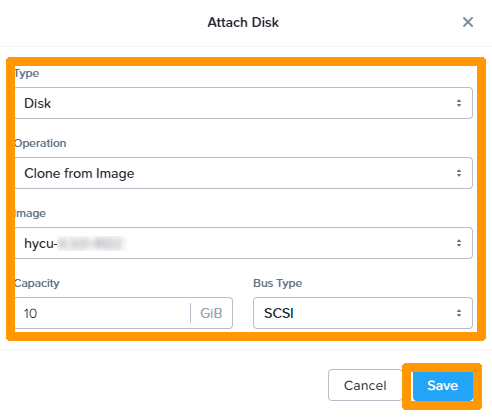
Enter these values:
- Type:
Disk - Operation:
Clone from Image - Image:
hycu-X.X.X-XXXX - Capacity:
20 GB
Click Save.
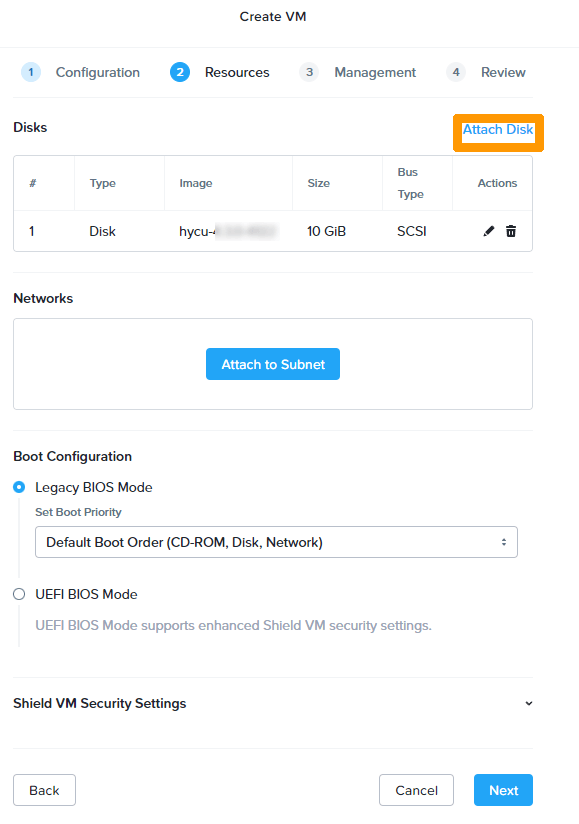
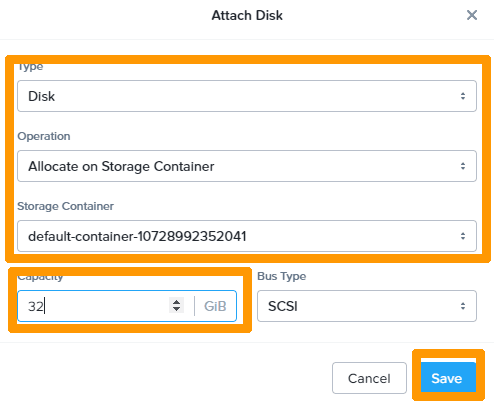
Click Attach Disk.
Choose these options:
- Type:
Disk - Operation:
Allocate on Storage Container - Image:
storage-container - Capacity:
50GB
Click Save.
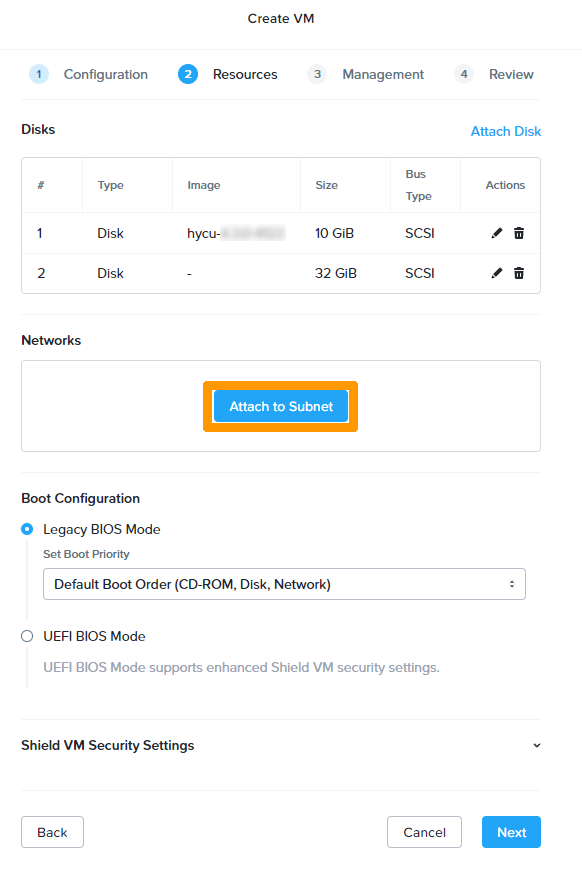
Click Attach to Subnet.
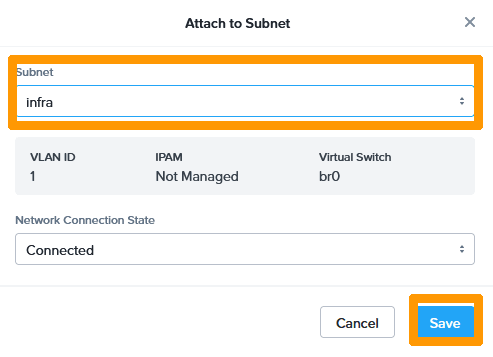
Select the infra network from the Subnet drop-down menu, and select Connected in the Network Connection State drop-down menu. Then click Save.
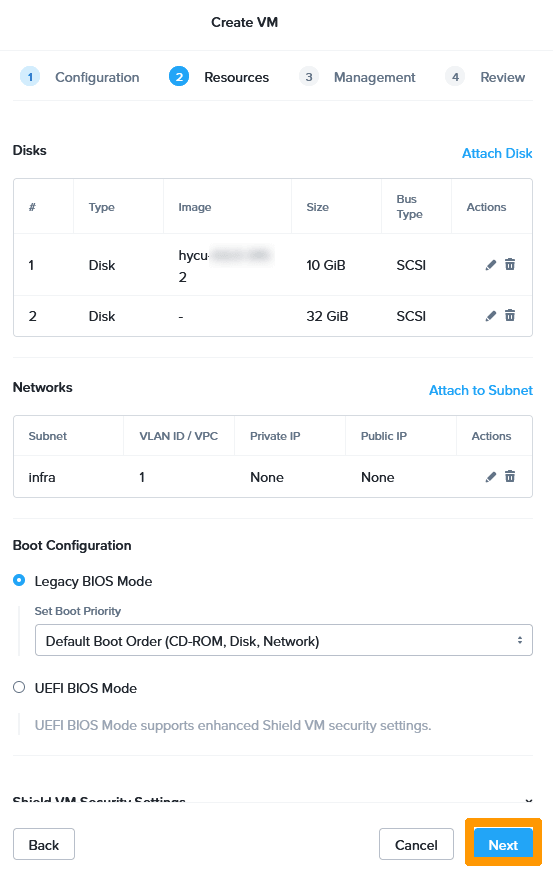
Click Next.
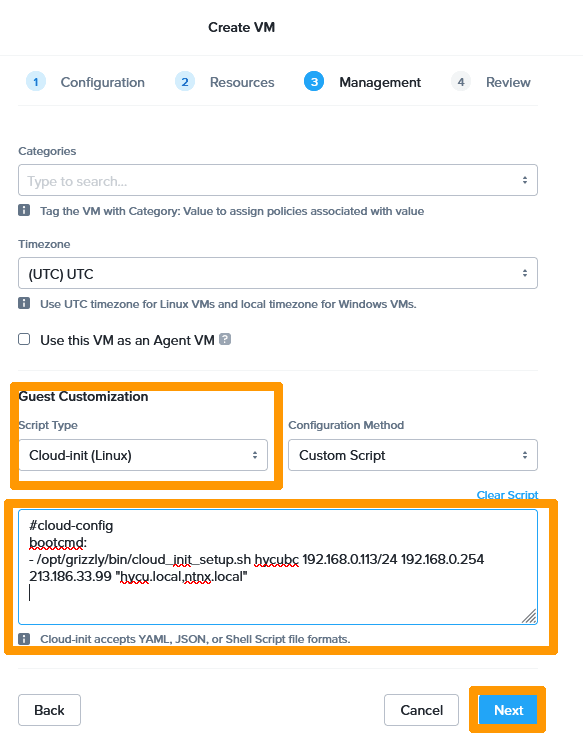
Create a yaml file by editing these values:
- <IP address>: An unused IP address with the subnet mask, in the format: [code]XX.XX.XX.XX/XX[/code].
- <GATEWAY>: Local gateway for the virtual machine to access the Internet.
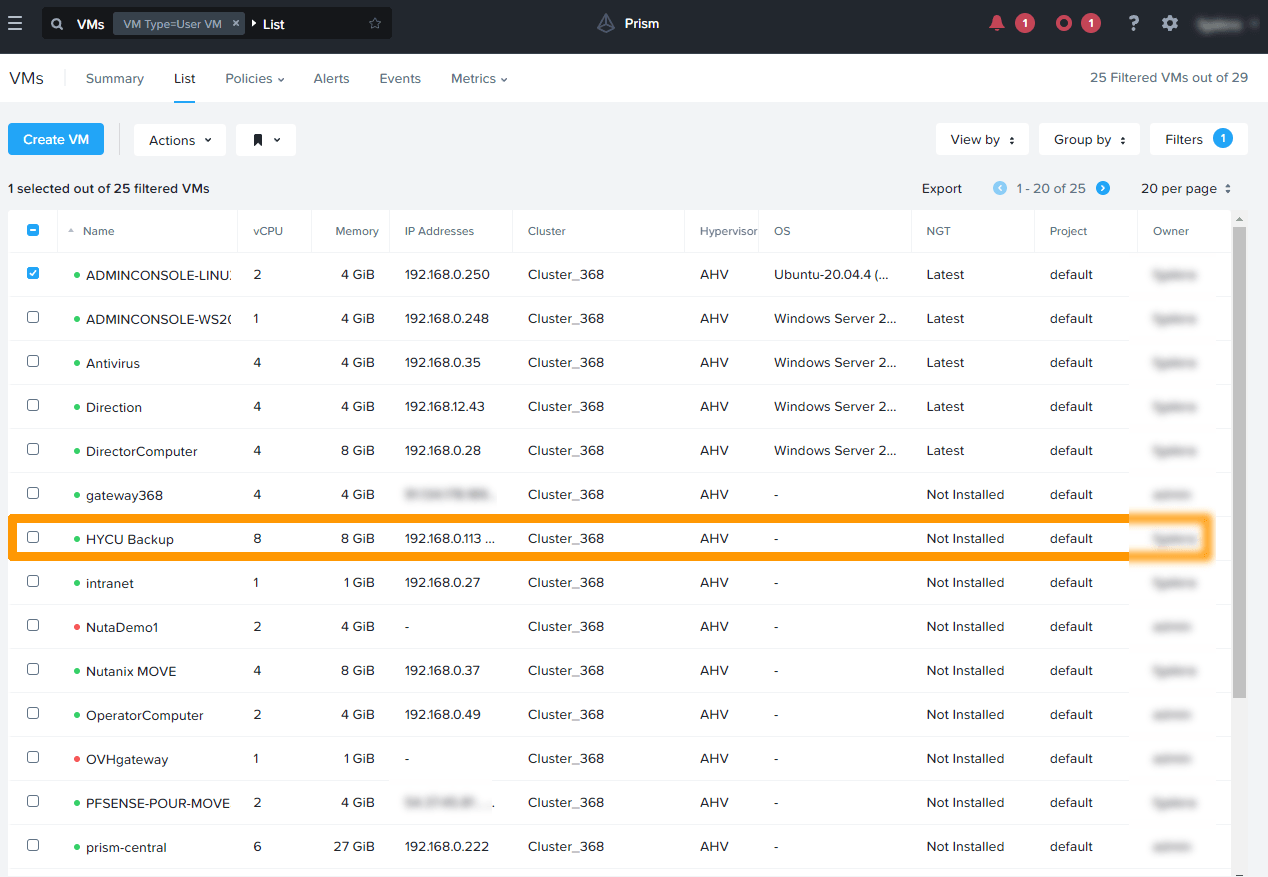
[primary]You can find this in your list of virtual machines. Hover over the IP Address of your OVHgateway VM and use the second address listed, ending in [code].254[/code].
- <DNS>: DNS used on the Internet, such as 8.8.8.8
Modify Guest Customization options by selecting Cloud-init (Linux) in the Script Type drop-down menu. Select Custom Script in the Configuration Method drop-down menu.
Copy the contents of the yaml script and paste it into the field below Clear Script. Then click Next.
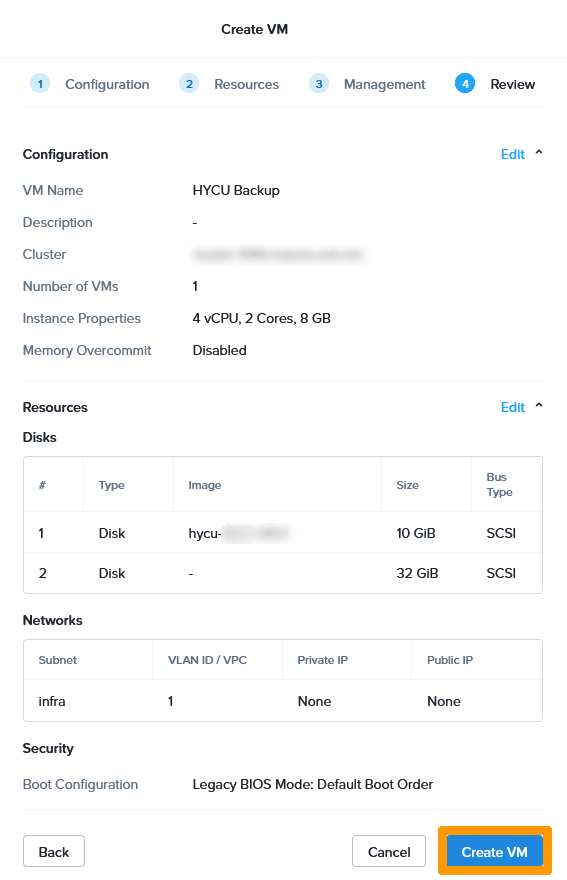
Click Create VM.
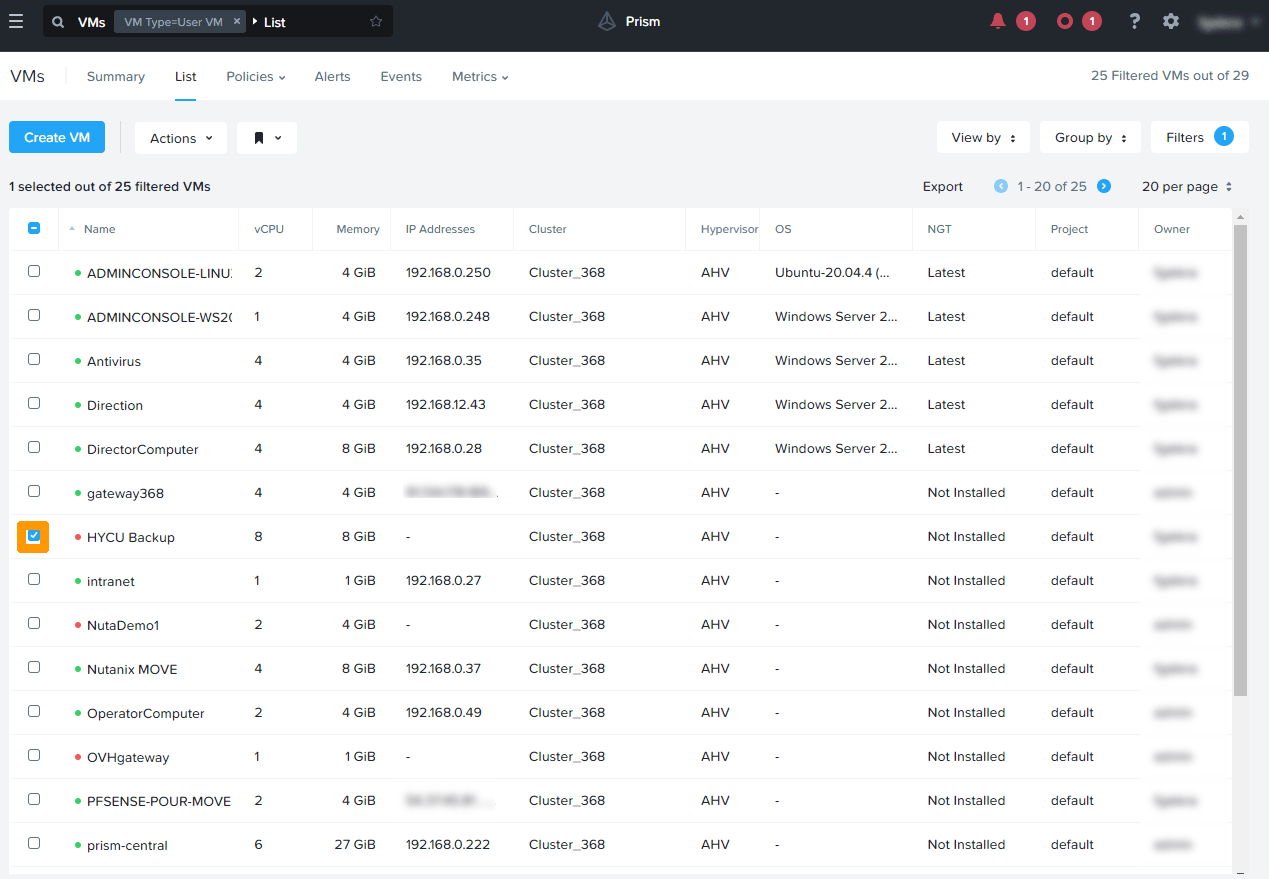
Select the virtual machine created by using the checkbox ☑️ to the right of the virtual machine.
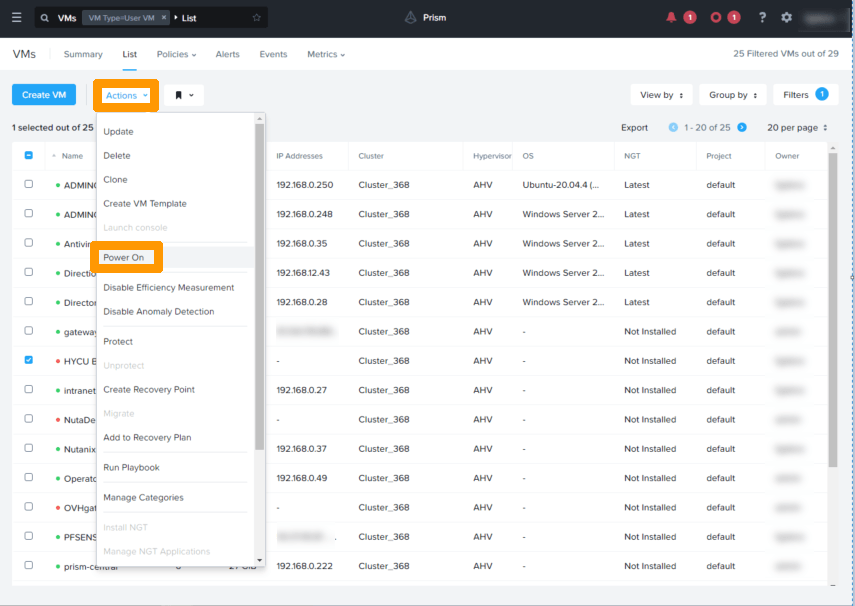
ClickActions and select Power On.
The virtual machine is started and has the IP address defined in cloud-init.
Configuring HYCU URL redirection to public network
In this section, we will configure a redirection so that you can configure HYCU using the web interface from outside your cluster.
Click here for full instructions.
In the OVHcloud Control Panel, navigate to your Load Balancer via the Network menu.
If you are not using the beta version of the OVHcloud Control Panel, you can find the Load Balancer area through the Bare Metal Cloud or Hosted Private Cloud sections.
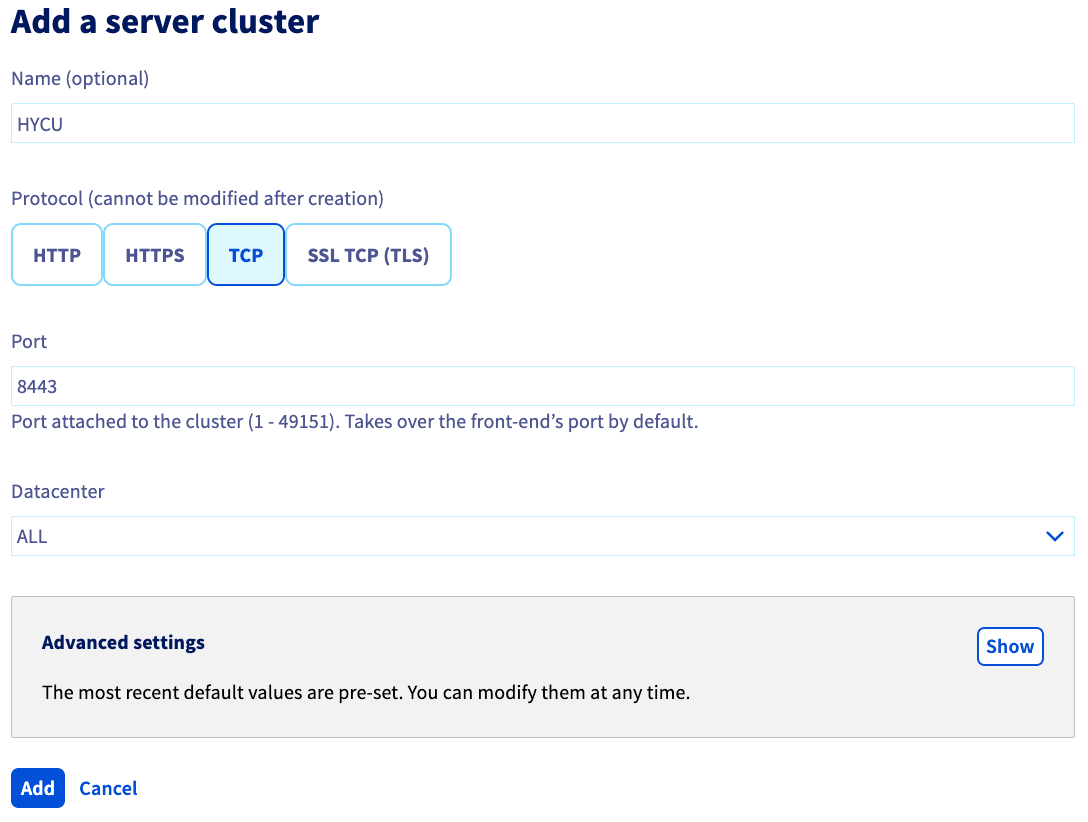
In the Server clusters tab, click Add a server cluster.

Name your server cluster, then select TCP and enter this information:
- Port:
8443 - Datacenter:
ALL
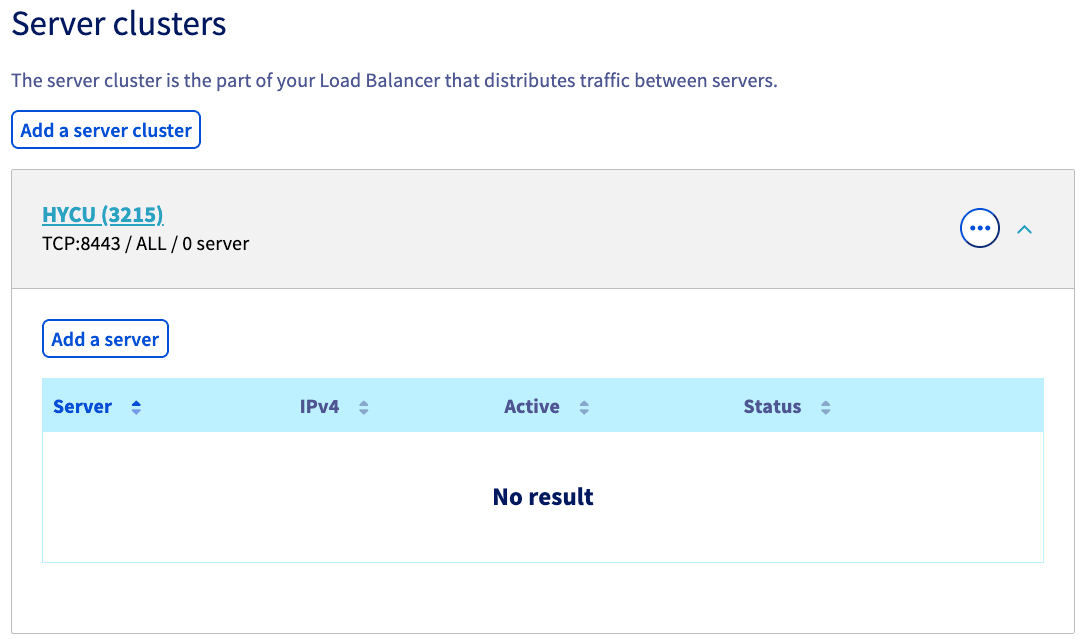
Click Add to confirm the server farm creation.
Click Add a server.
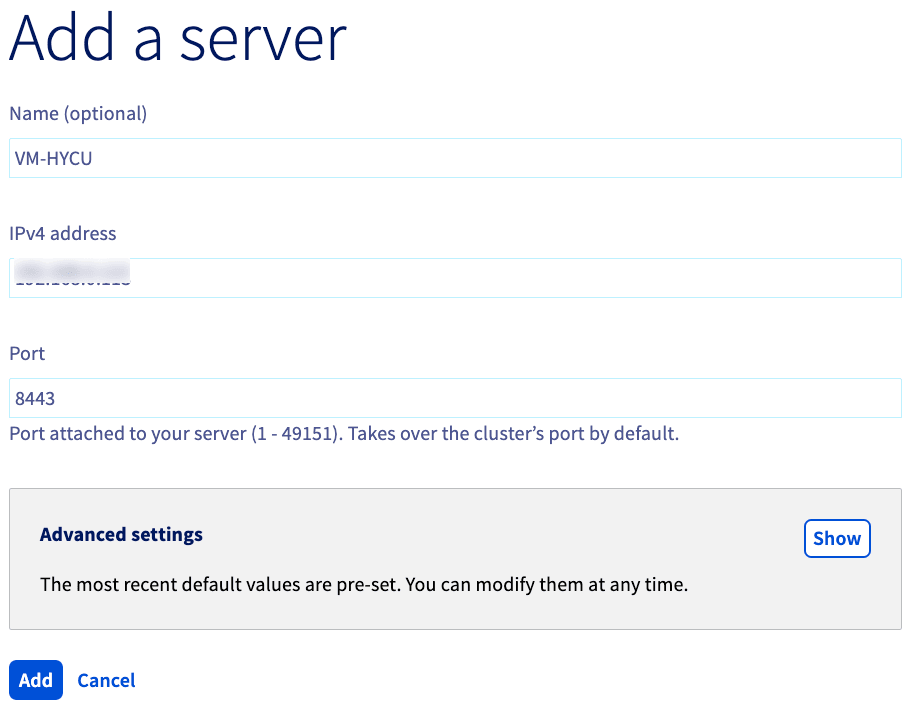
Enter these values:
- Name (optional):
VM-HYCU - IPv4 address: The IP address of the VM you created in the previous step.
- Port:
8443
Click Add to confirm the cluster creation.
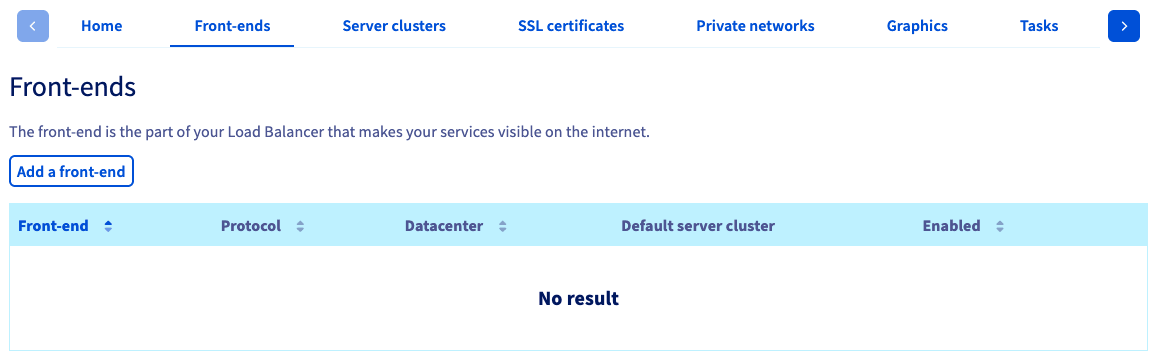
Next, click on the Front-ends tab, and Add a front-end.
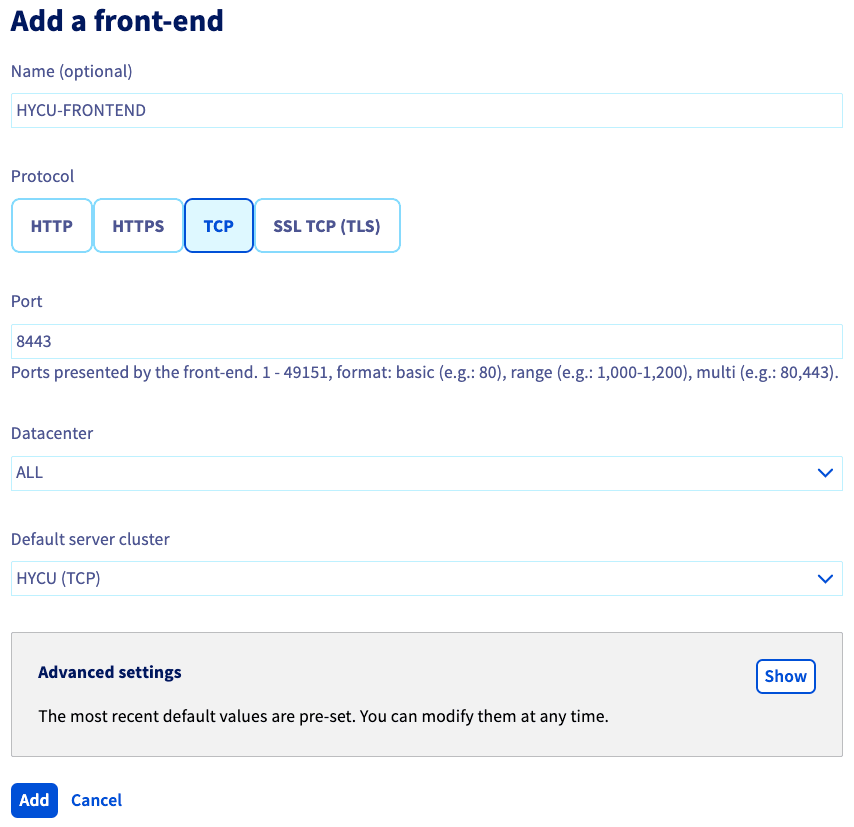
Name your front-end, choose the TCP protocol, and modify these values:
- Port:
8443 - Datacenter:
ALL - Default server cluster:
HYCU (TCP)
Click Add.
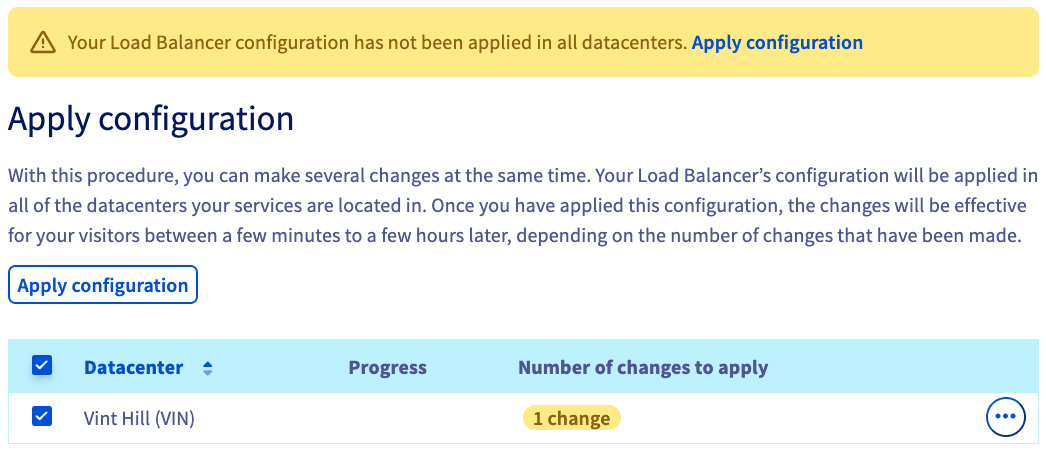
Click Apply configuration in the yellow banner at the top of the page.
Select the checkbox for your datacenter and click Apply configuration.
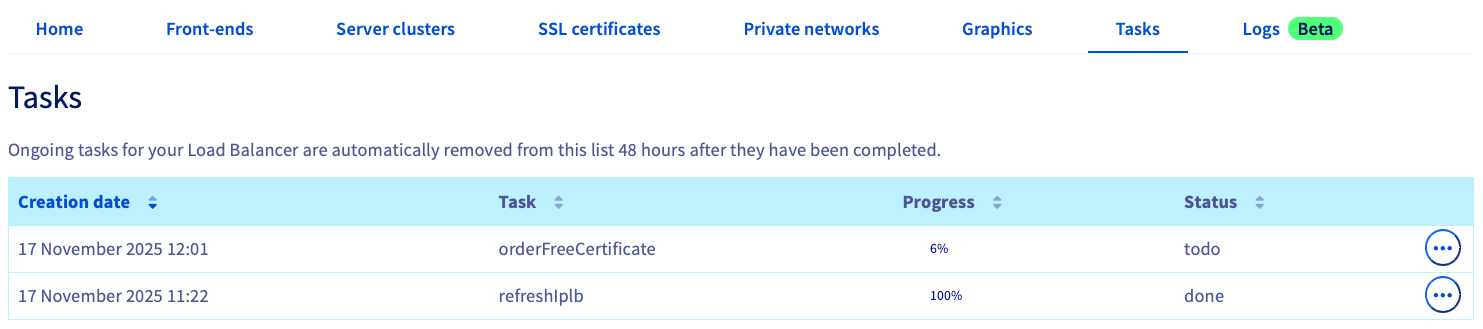
In the Tasks tab, you can track the progress of applying the changes.
Configuring HYCU
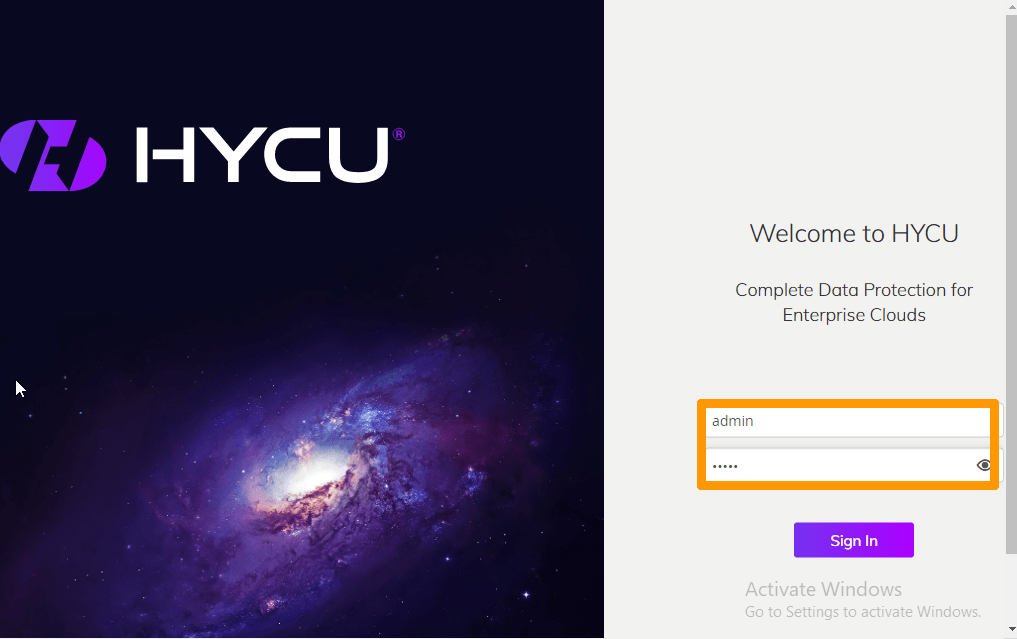
Connect with a web browser to the HYCU administration interface using the IP address of the Load Balancer service you just configured and the port for your server cluster, which should be similar to XXX.XXX.XXX.XXX:8443. The fqdn variable corresponds to the URL provided when the Nutanix cluster was created.
Click here for full instructions.
Enter the default password (admin) and click Sign In.
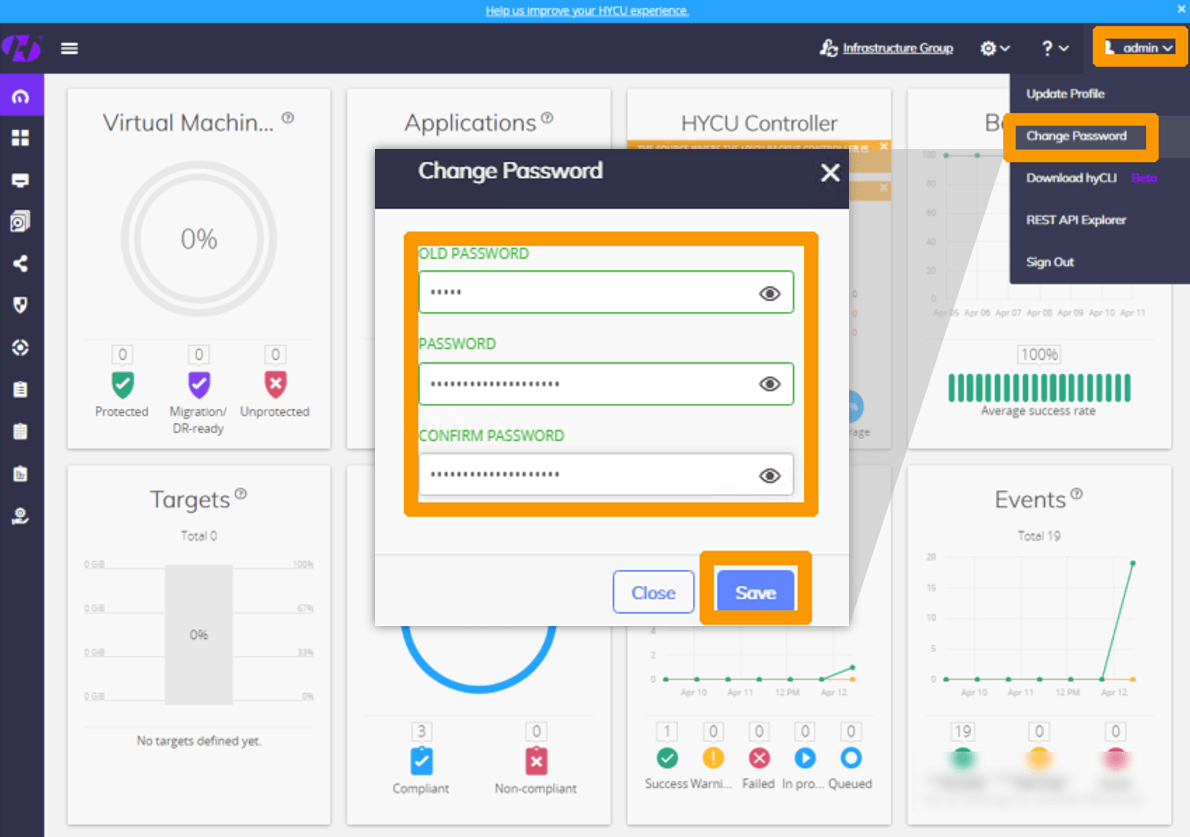
Change the login password for more security.
Click Change Password in the admin menu in the top right-hand corner of the interface.
Enter the default password in the OLD PASSWORD field, and the new password in the PASSWORD and CONFIRM PASSWORD fields.
Then click Save.
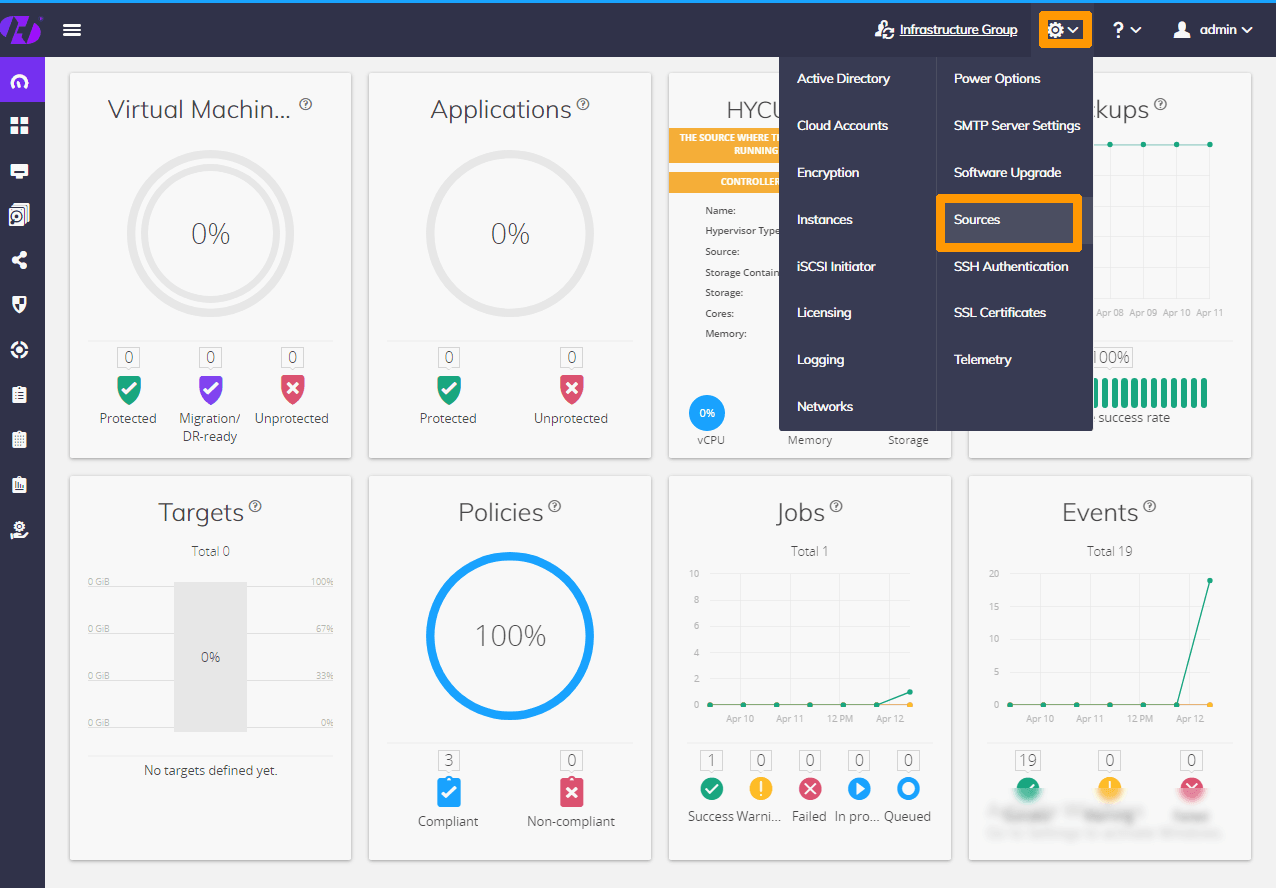
We will now connect HYCU to the Nutanix cluster.
Click the Settings ⚙️ icon in the top right corner and choose Sources.
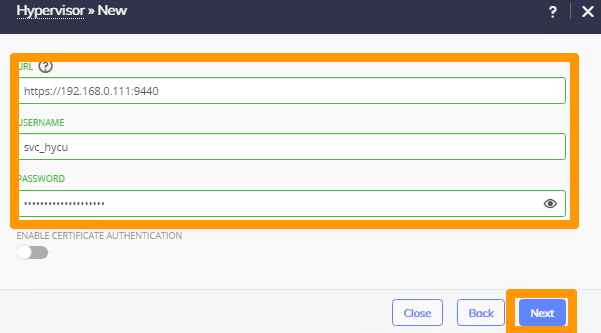
Enter information about Prism Element:
- URL:
https://url_prism_element_local:9440 - USERNAME:
Prism Element user - PASSWORD:
Prism Element user password
Click Next.
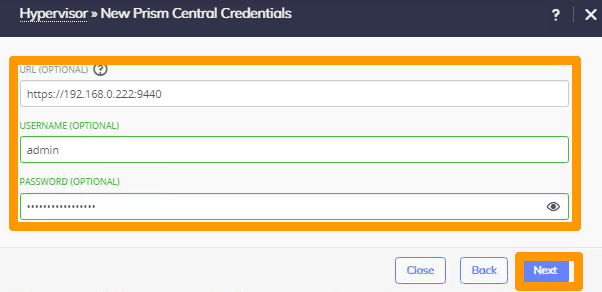
Enter this information about Prism Central:
- URL:
https://url_prism_central_local:9440 - USERNAME:
Prism Central user - PASSWORD:
Prism Central password
Click Next.
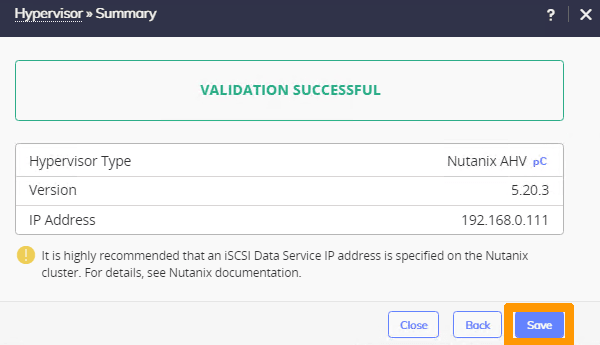
The VALIDATION SUCCESSFUL information appears to indicate that the entered information is correct. Click Save.
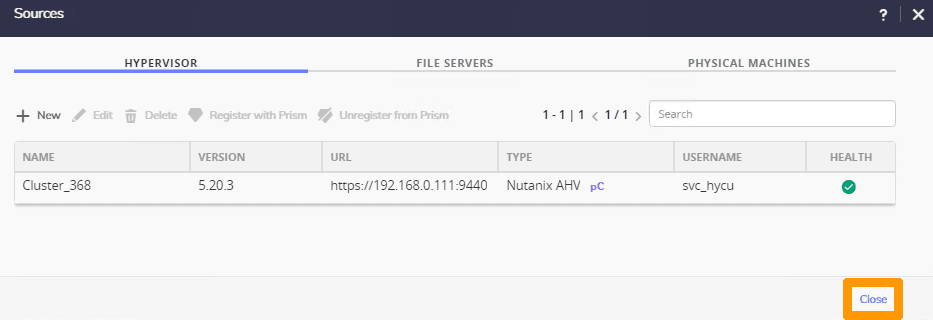
Click Close.
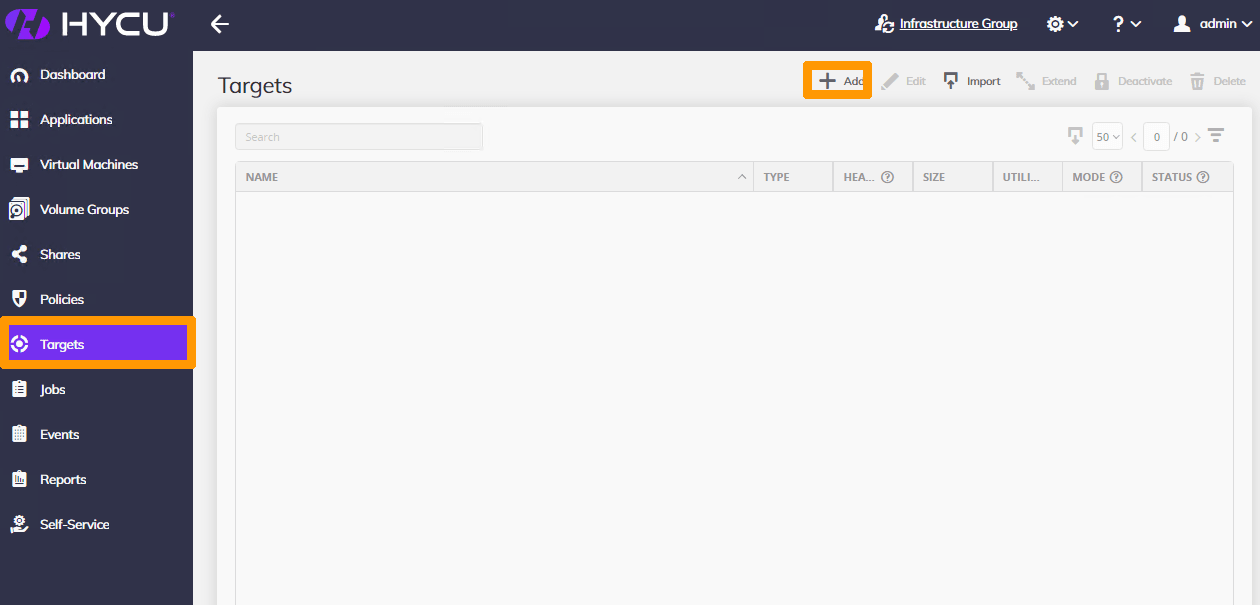
Select Targets from the left-hand menu and click + Add at the top of the interface.
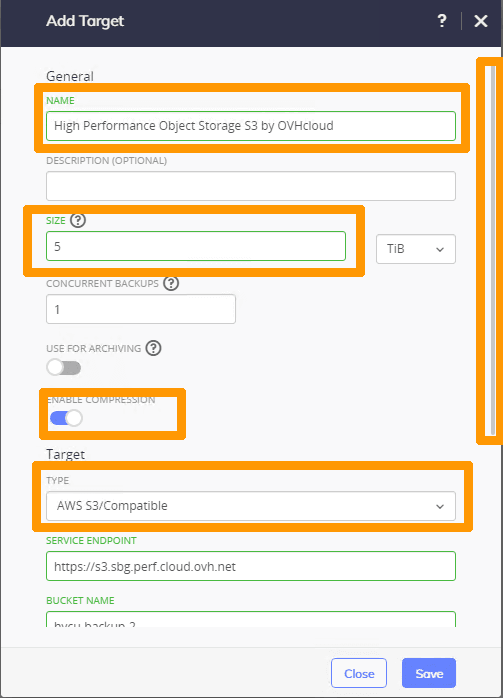
Enter the configuration settings and authentication keys for your Object Storage user with read/write access to the Object Storage bucket used as explained below:
- name Name
- Size: Storage size
- Type:
AWS S3/Compatible*
NOTE: OVHcloud High Performance Object Storage service has no storage limits and is billed on a per-use basis. In the HYCU software configuration, it is necessary to set a size as in the example below. You can choose another value.
Turn ENABLE COMPRESSION on and scroll down through the window.
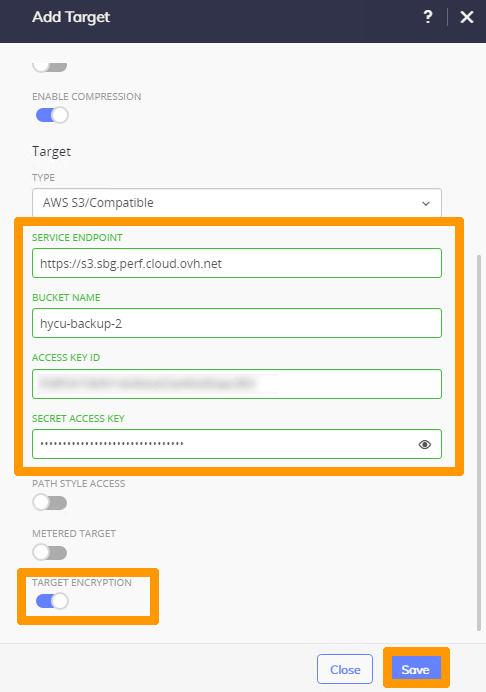
Complete the information:
- SERVICE ENDPOINT:
Object Storage Storage URL - BUCKET NAME:
Bucket name - ACCESS KEY ID:
Object Storage User Access Key - SECRET ACCESS KEY:
Object Storage User Secret Key
Enable TARGET ENCRYPTION and click Save.
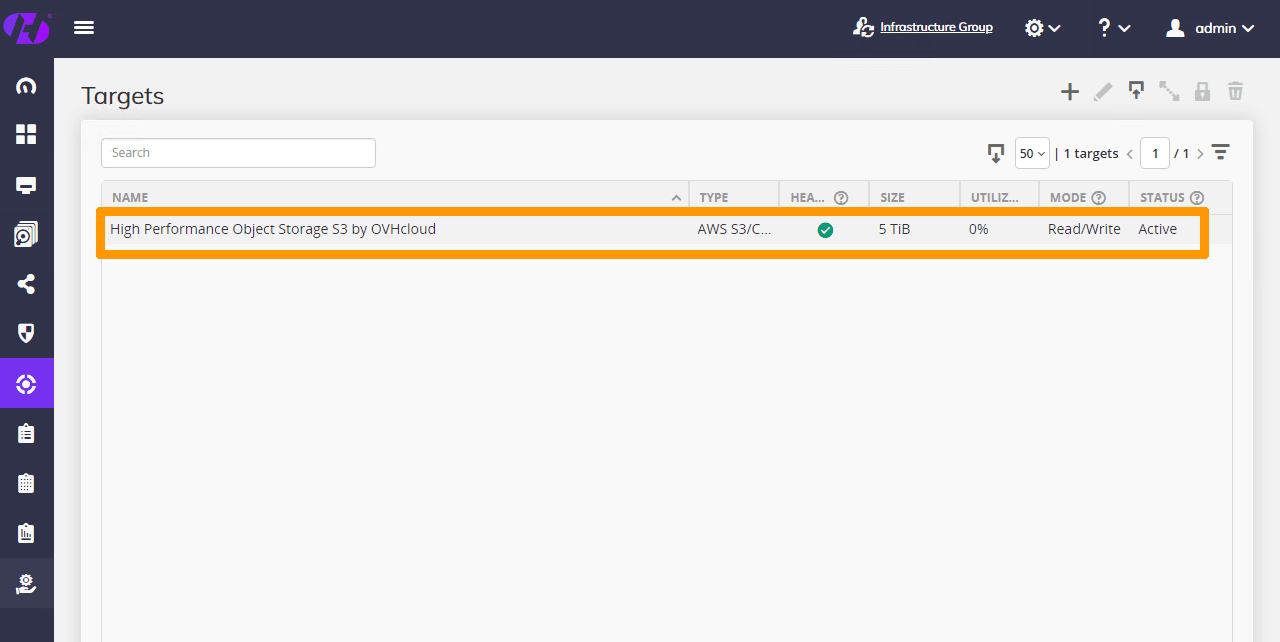
The target is enabled for Nutanix cluster backups.
Updating HYCU
HYCU regularly provides updates, for which we detail the process below.
Adding sources for a new version of HYCU
Click here for full instructions.
From the Prism Central main menu ☰, under Compute & Storage, click Images.
Then, click Add Image.
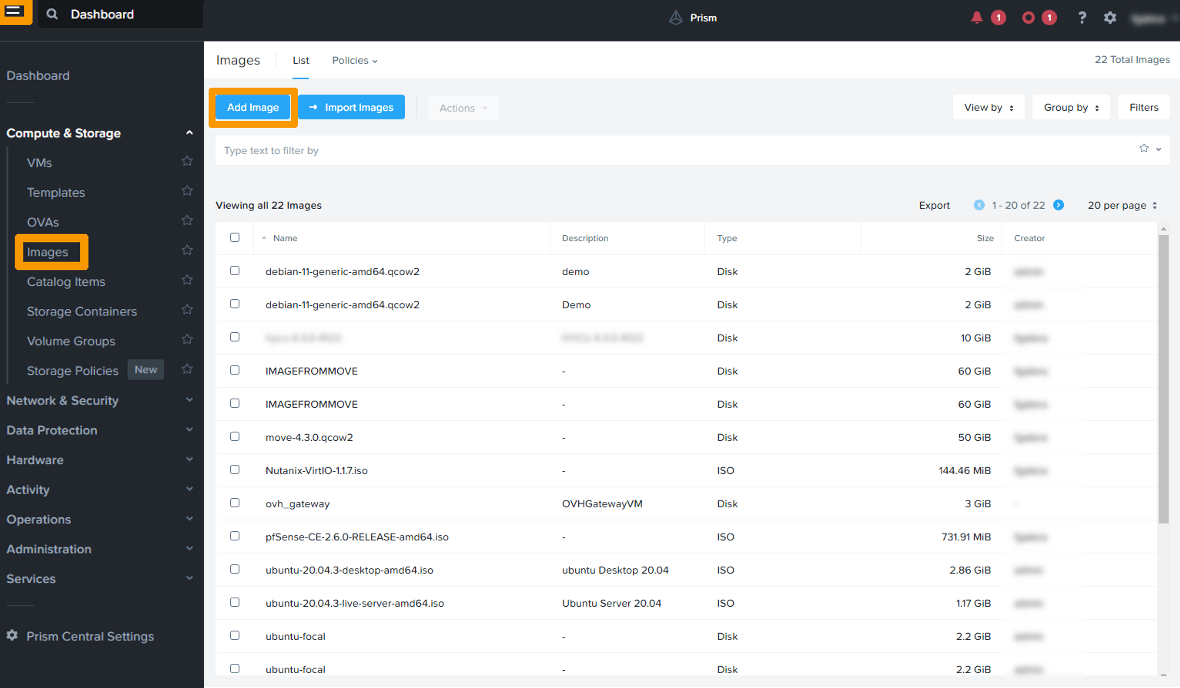
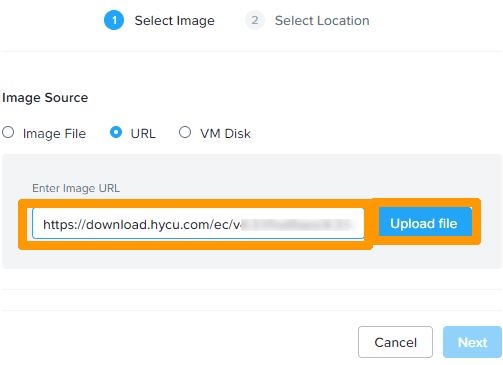
Select URL.
Enter the URL for the qcow2 image of the latest version of HYCU, such as:
https://download.hycu.com/ec/v4.X.X/hotfixes/4.X.X-XXXX/hycu-4.X.X-XXXX.qcow2
The URL used for the download is the latest version available on the HYCU website.
Click Upload file.
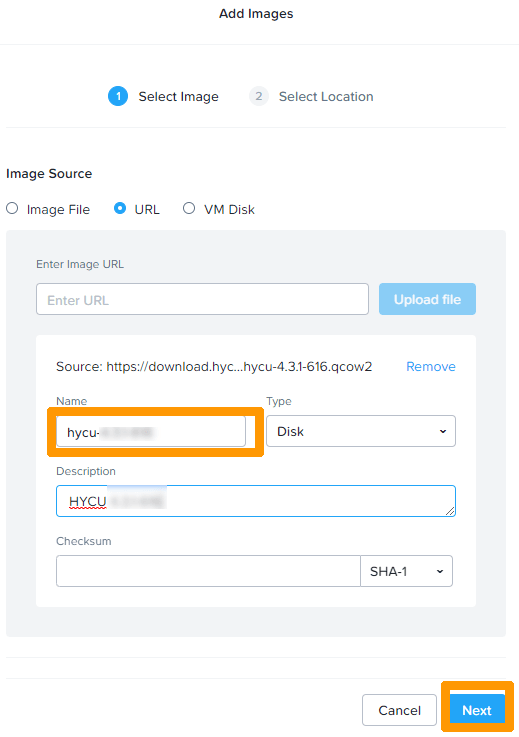
Remove the extension .qcow2 behind the name hycu-'4.X.X-XXXX, enter a description, and click Next.
NOTE: It is important to remove the extension in the name to facilitate the HYCU update process.
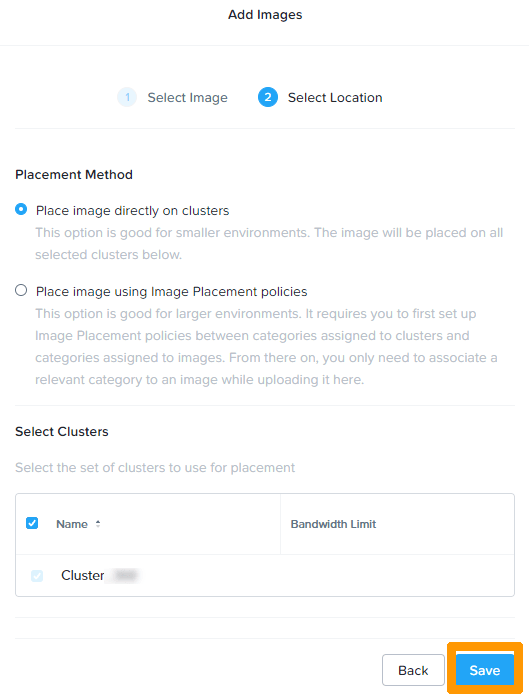
Click Save to import the image.
Running the update from HYCU
Click here for full instructions.
Log in via the URL provided when you created the Nutanix cluster, replacing the port https://fqdnclusternutanix:8443.
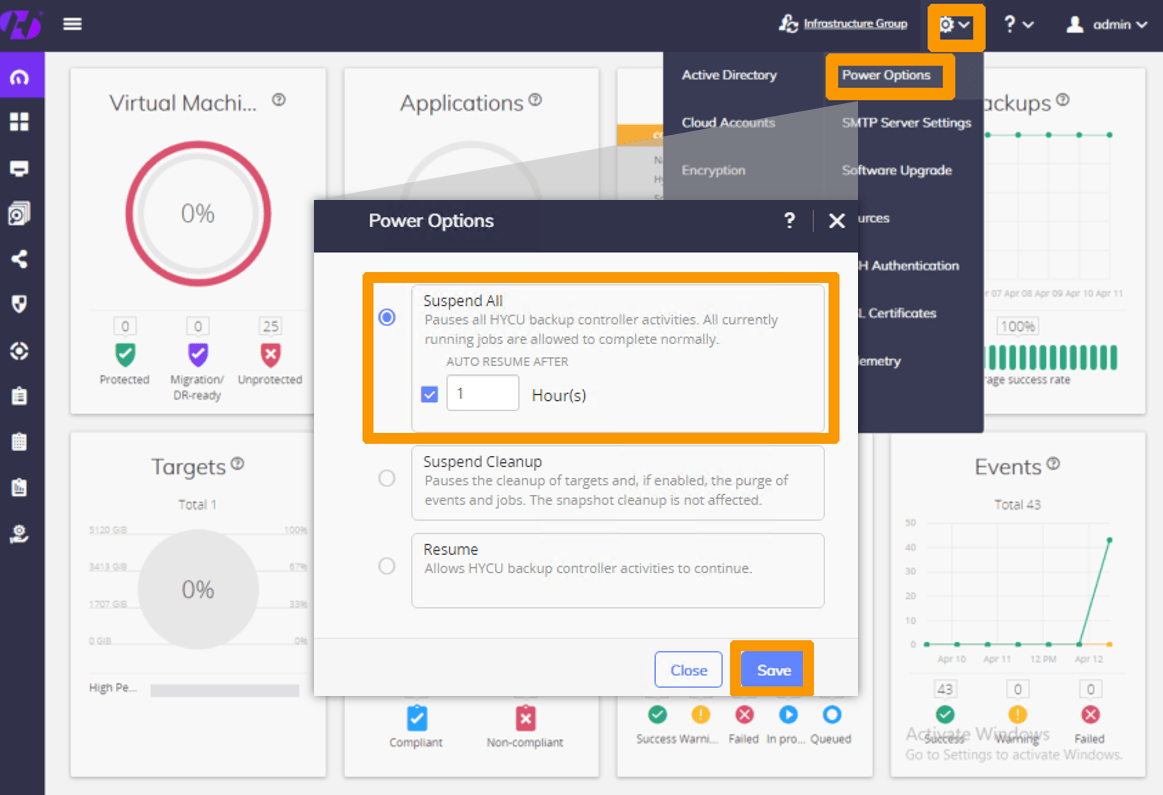
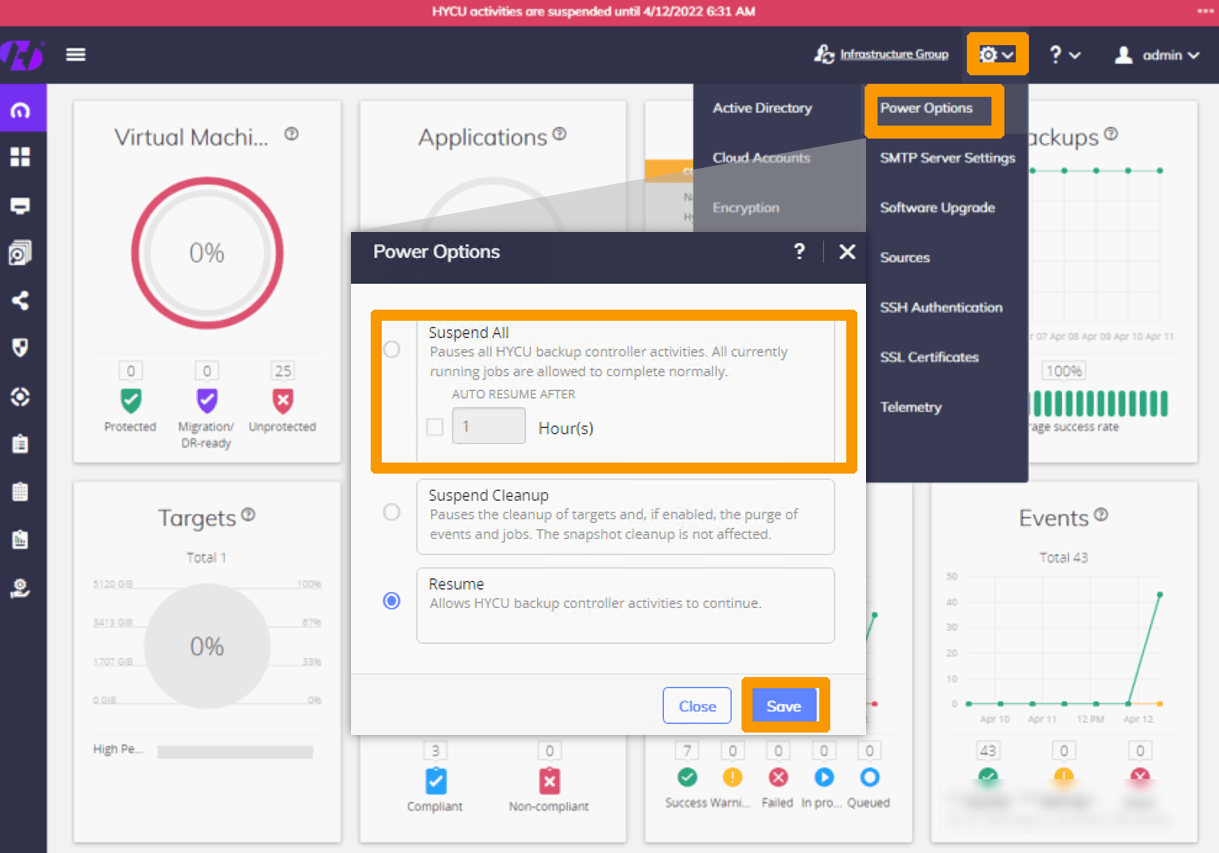
Go to the HYCU configuration by clicking the Settings ⚙️ icon and choose Power Options.
Select Suspend All, check AUTO RESUME AFTER and leave the Hours field at 1, then click Save.
Click Software Upgrade from the Settings ⚙️ menu .
Choose the latest version from the AVAILABLE VERSIONS drop-down menu and click Software Upgrade.
Click Yes to start the update process.
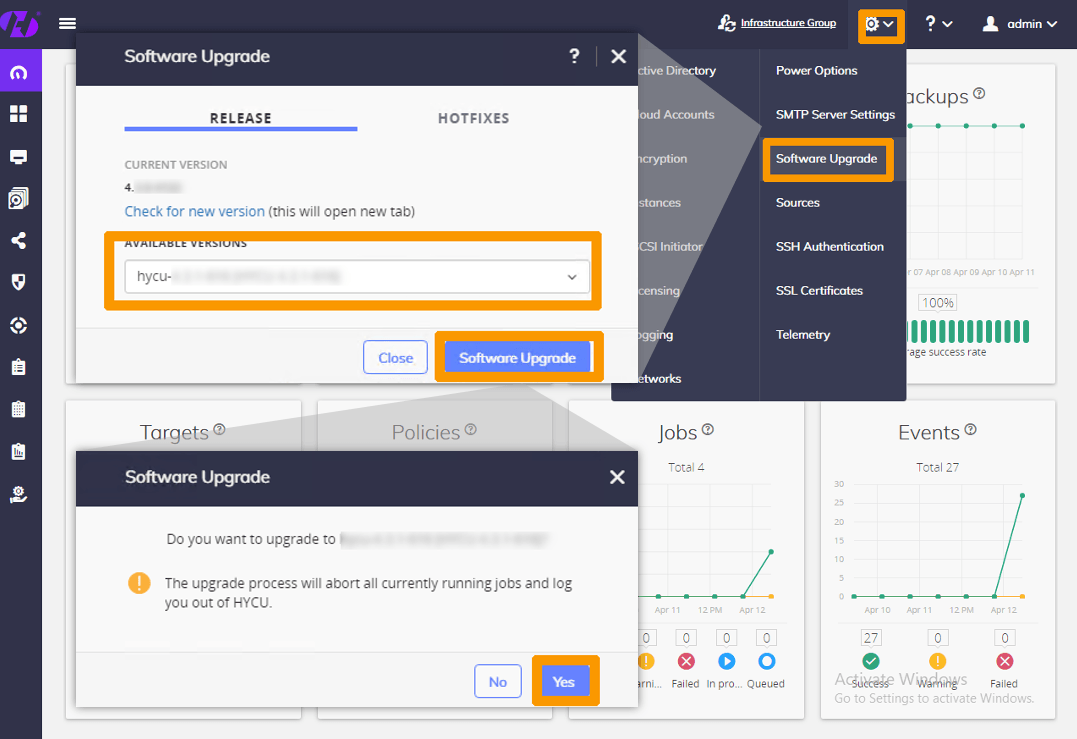
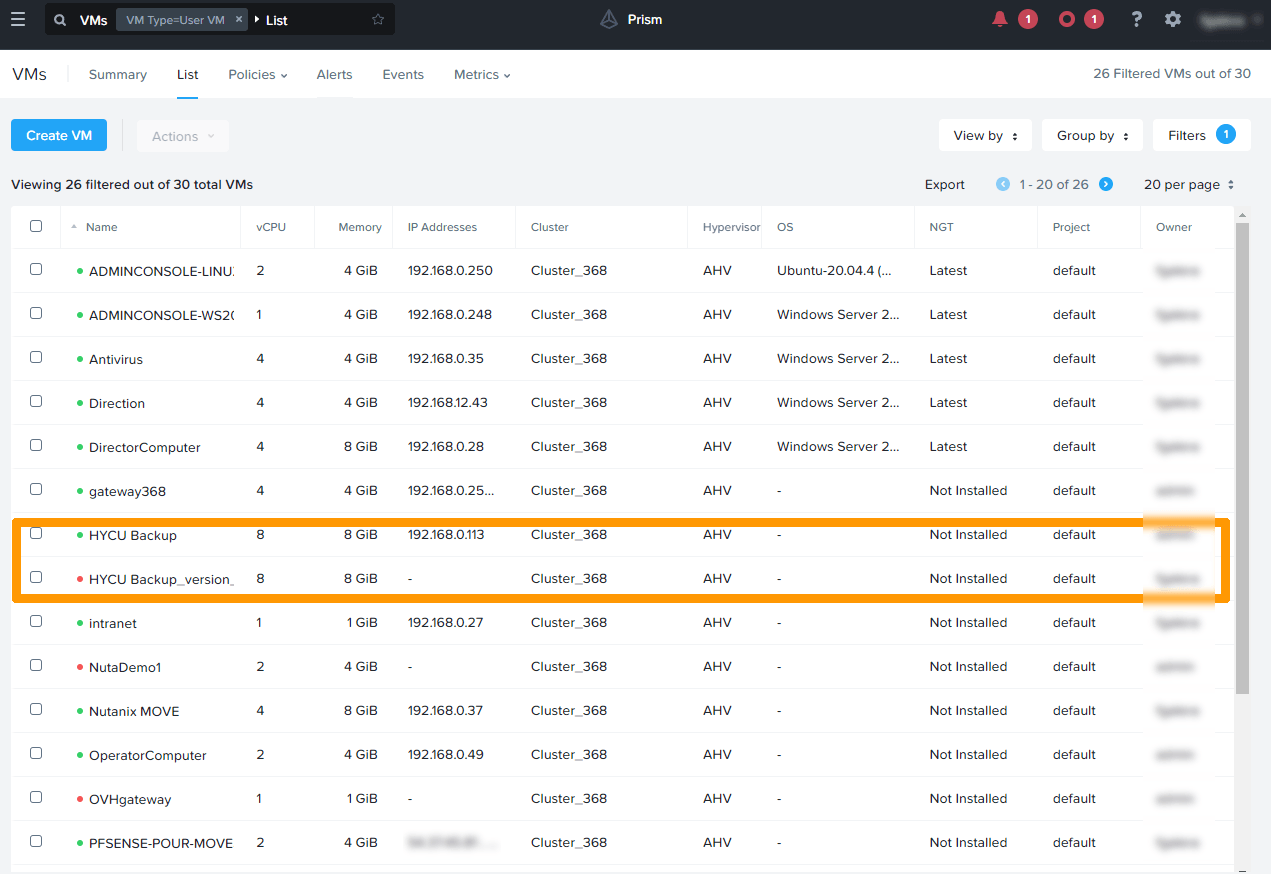
A backup copy is made during the update process so that it can be restored if there are any issues.
Click the Settings ⚙️ icon and click Power Options.
Uncheck 🔲 Suspend All and click Save.
Configuring backups in HYCU
Setting up VM login passwords
Virtual machine login passwords enable backup of applications, such as a Microsoft SQL database or Exchange server.
Click here for full instructions.
Log in via the Virtual Machines menu on the left and click the Credentials 🔑 button at the top right of the interface.
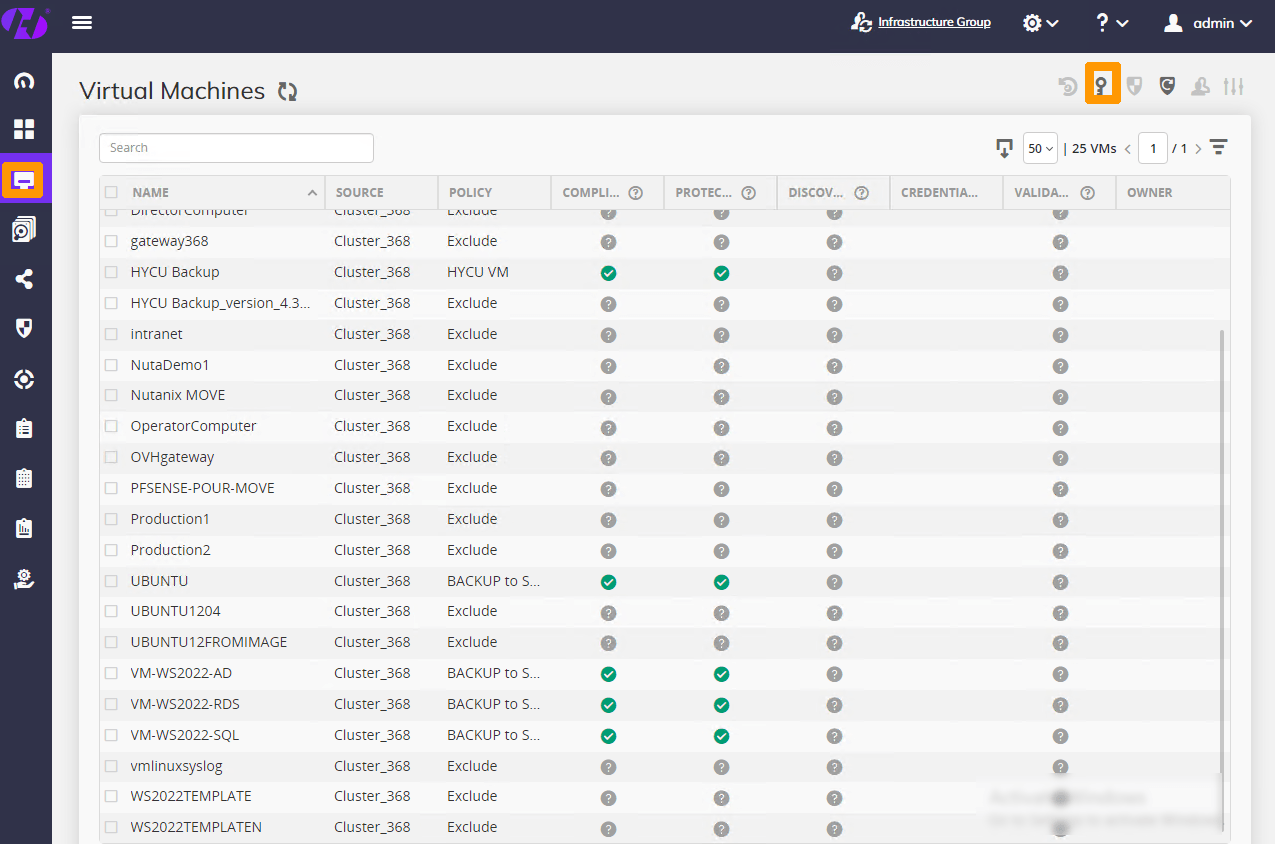
Click the Add + button.
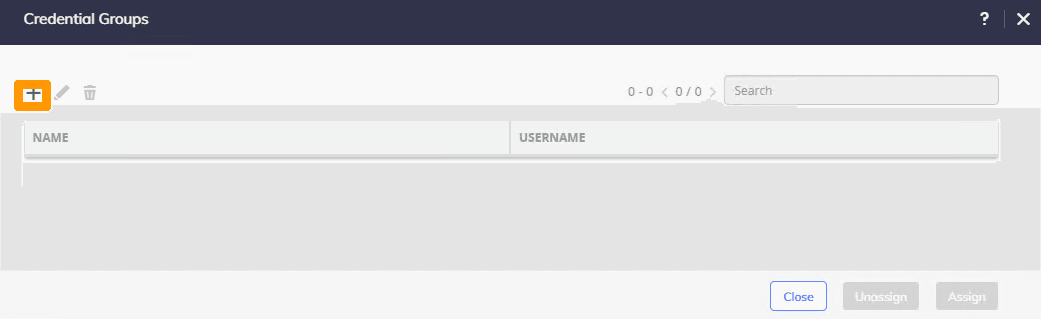
Enter these values:
- NAME: password storage name
- PROTOCOL:
AUTOMATIC - USERNAME: virtual machine user account
- PASSWORD: password
Click Save.
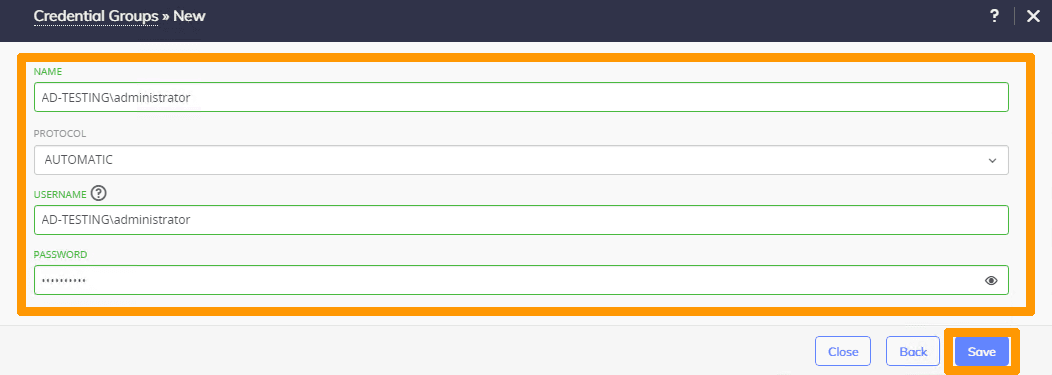
Click the Add + button to add another account.
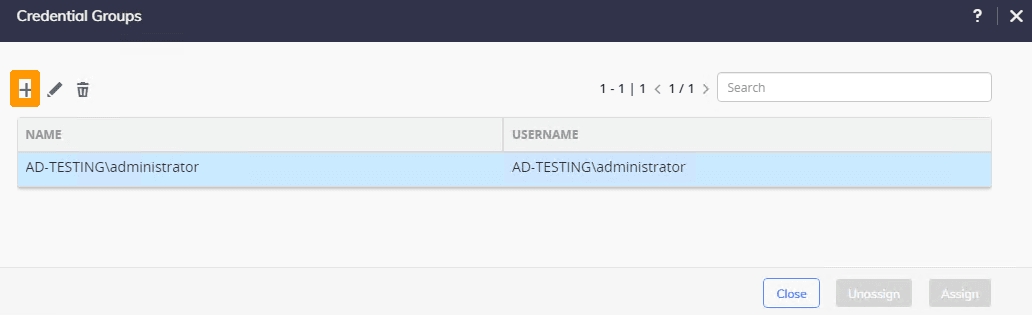
Enter these values:
- NAME: password storage name
- PROTOCOL:
AUTOMATIC - USERNAME: virtual machine user account
- PASSWORD: password
Click Save.
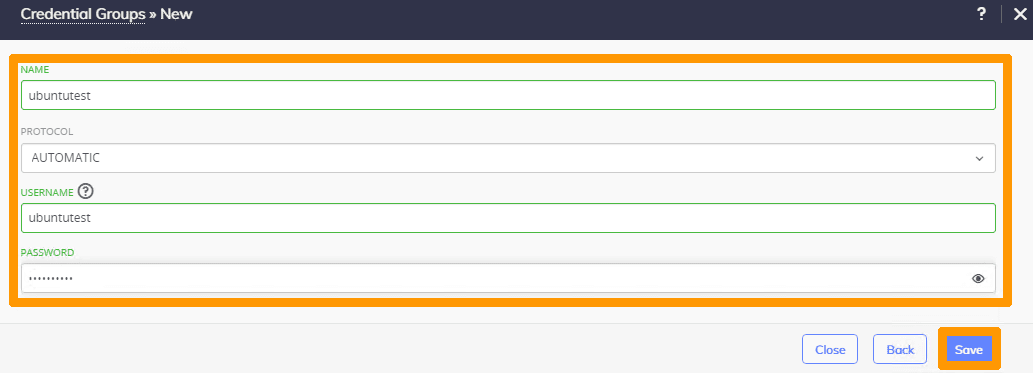
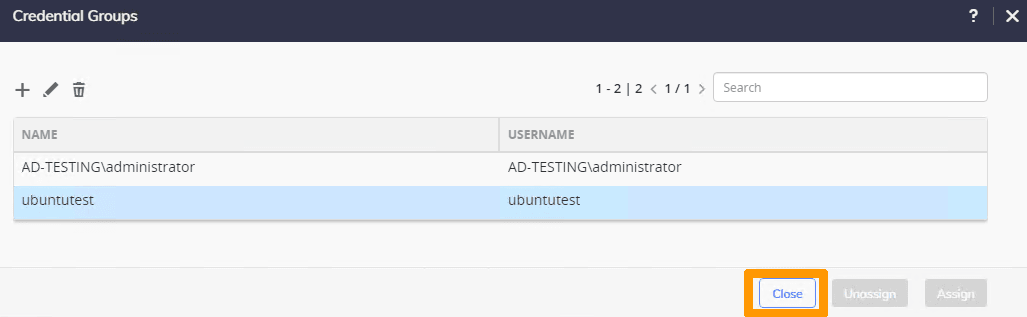
Click Close.
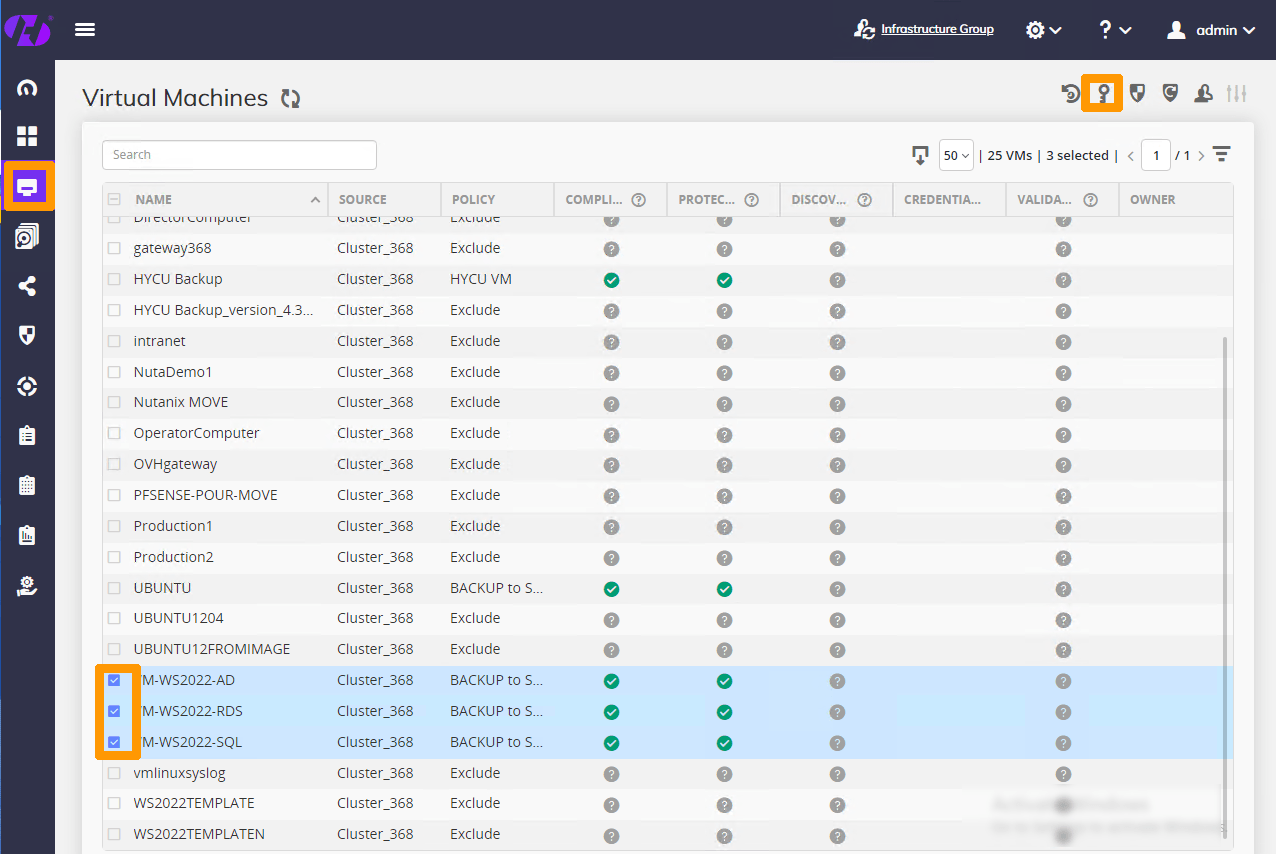
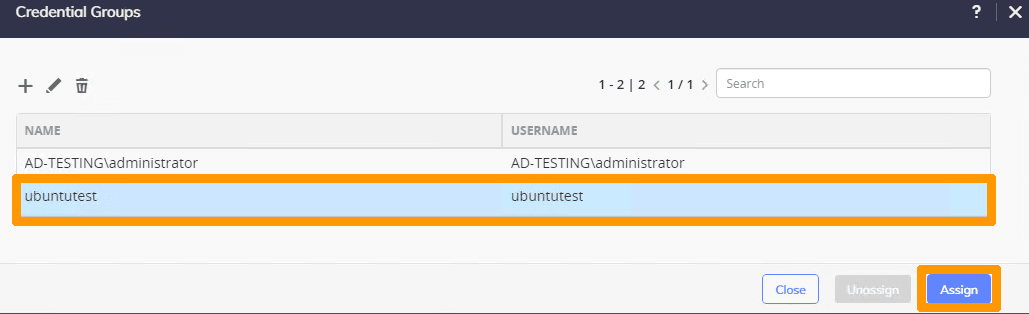
Select the virtual machines that will use a password by ticking the box to the right of the virtual machine, then click the Credentials 🔑 button.
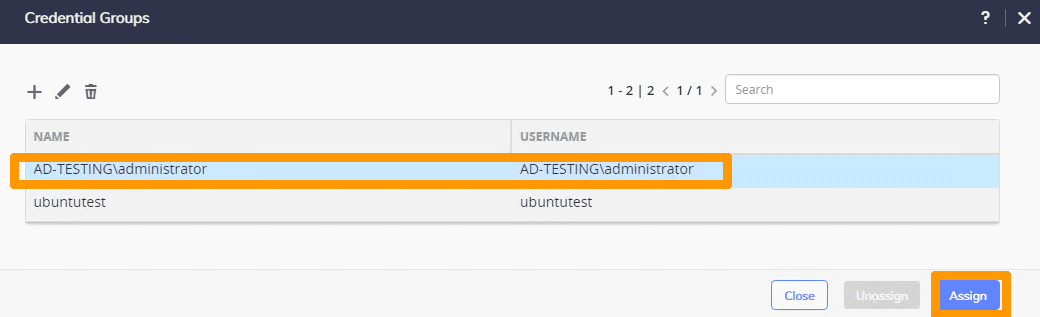
Select the password you want to use and click Assign.
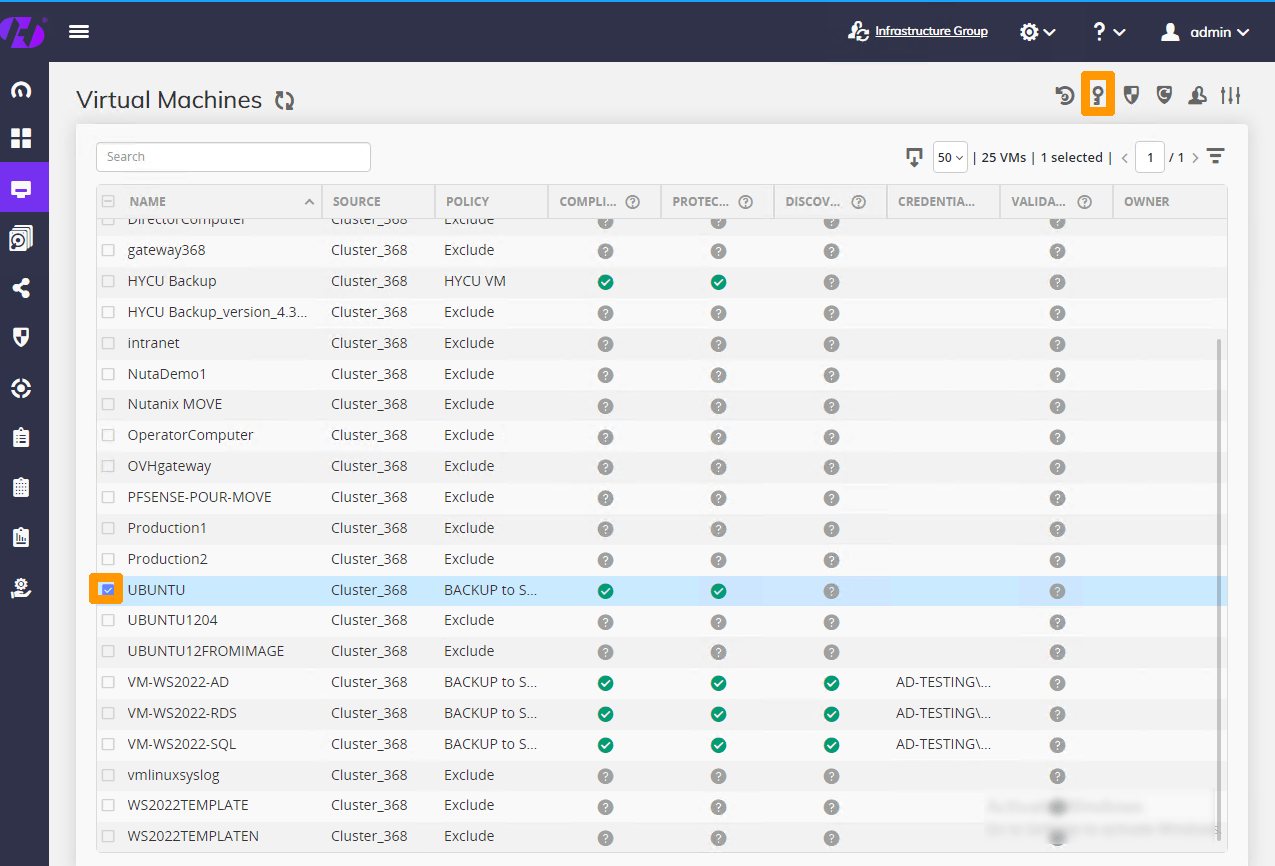
Select another virtual machine that will use a password by ticking the box to the right of the virtual machine, then click the Credentials 🔑 button.
Select the password you want to use and click Assign.
Creating backup policies
Click here for full instructions.
Go to the Policies menu on the left and click the Add + button in the top right corner.
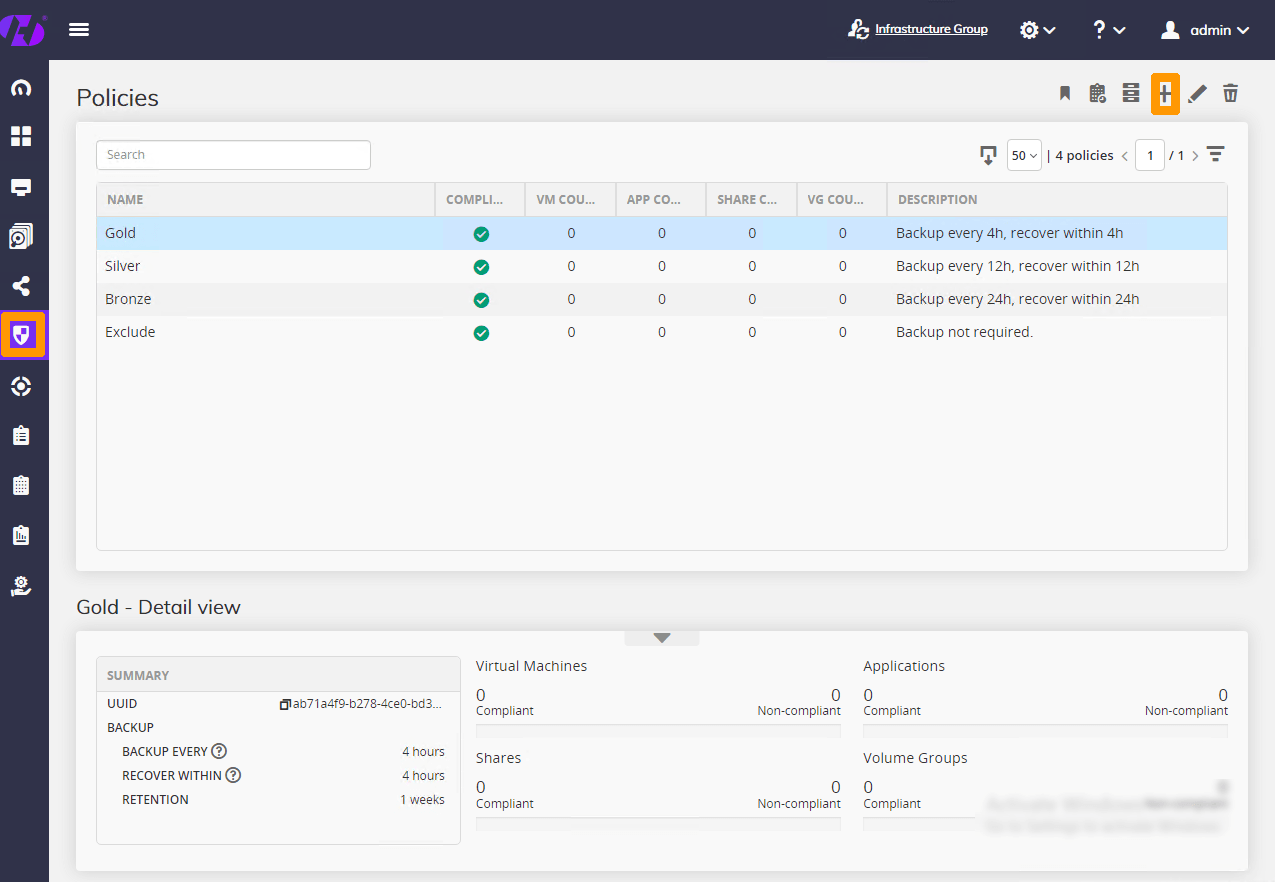
Enter this information:
- NAME:
HYCU VM - BACKUP EVERY:
4 hours - BACKUP THRESHOLD:
42
Leave the BACKUP option checked and use the scroll bar on the right.
Click Save.
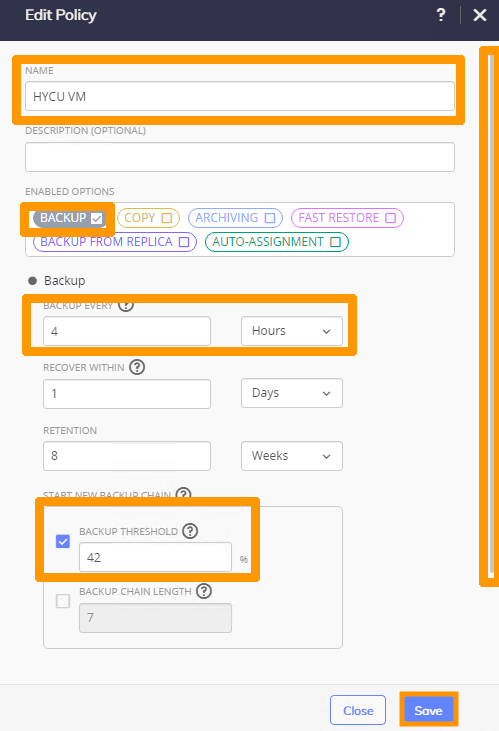
This policy is created for the HYCU virtual machine.
In the Policies menu, click the Add + button in the top right corner.
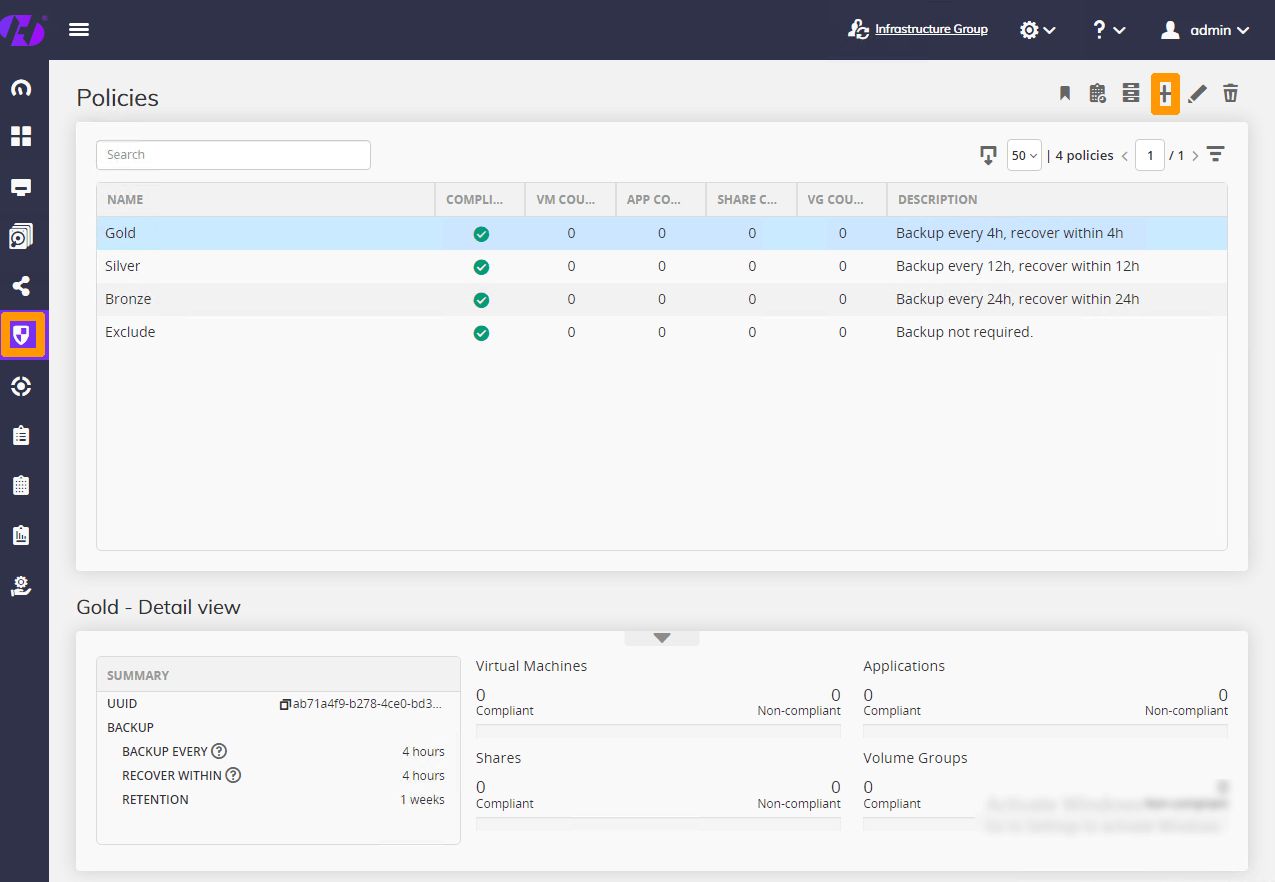
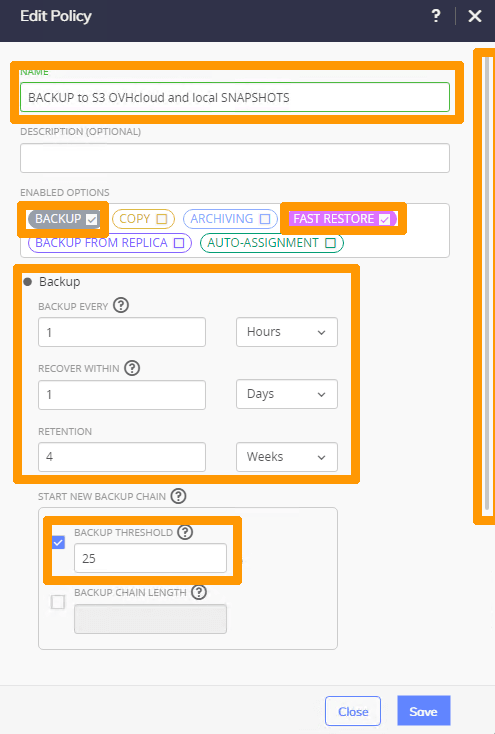
Set the policy name BACKUP to Object Storage OVHcloud and local SNAPSHOTS in the NAME field.
Check ☑️ the FAST RESTORE option and leave the BACKUP option checked.
Change the backup options in Backup and change the BACKUP THRESHOLD value to 25. Then scroll down the page.
Edit the Fast restore option with your settings and click Save.
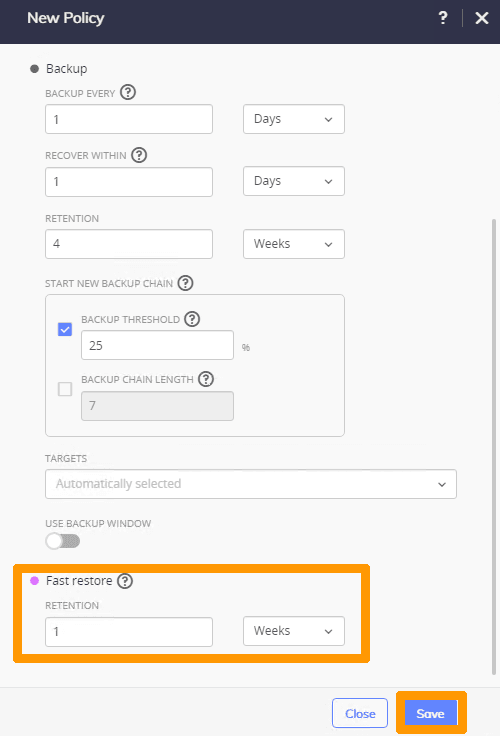
This strategy makes a backup on OVHcloud Object Storage and also takes snapshots inside the Nutanix cluster, allowing for faster recovery.
Assigning backup policies
Click here for full instructions.
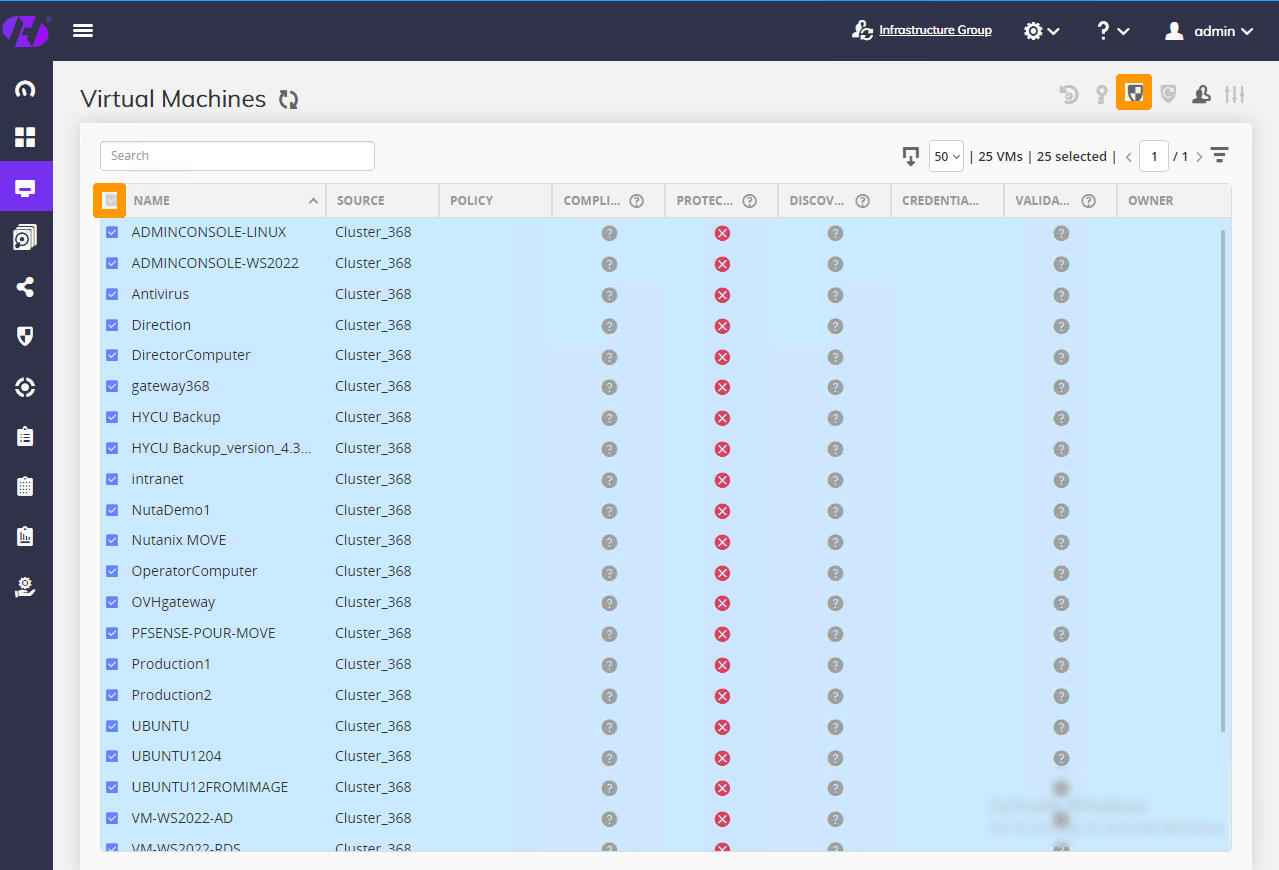
Select all VMs via the check box next to NAME, then click the shield-shaped Policies button in the top right to assign a policy to all VMs.
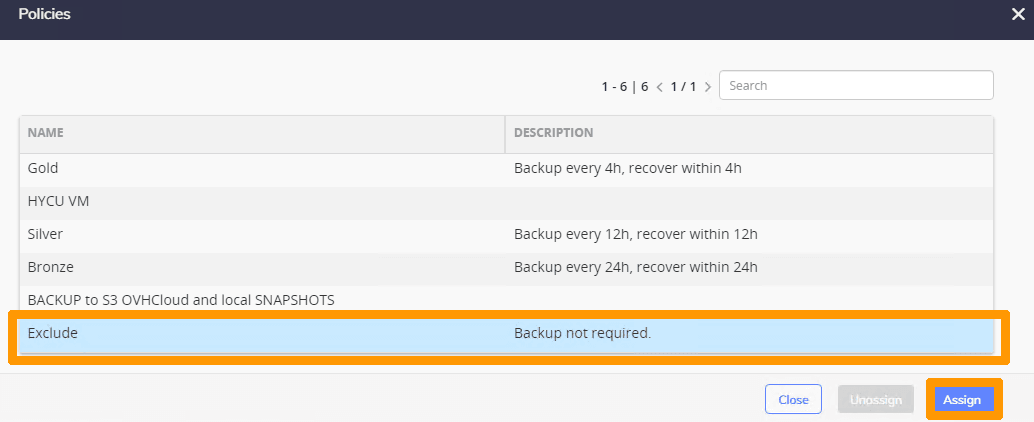
Choose the Exclude policy and click Assign.
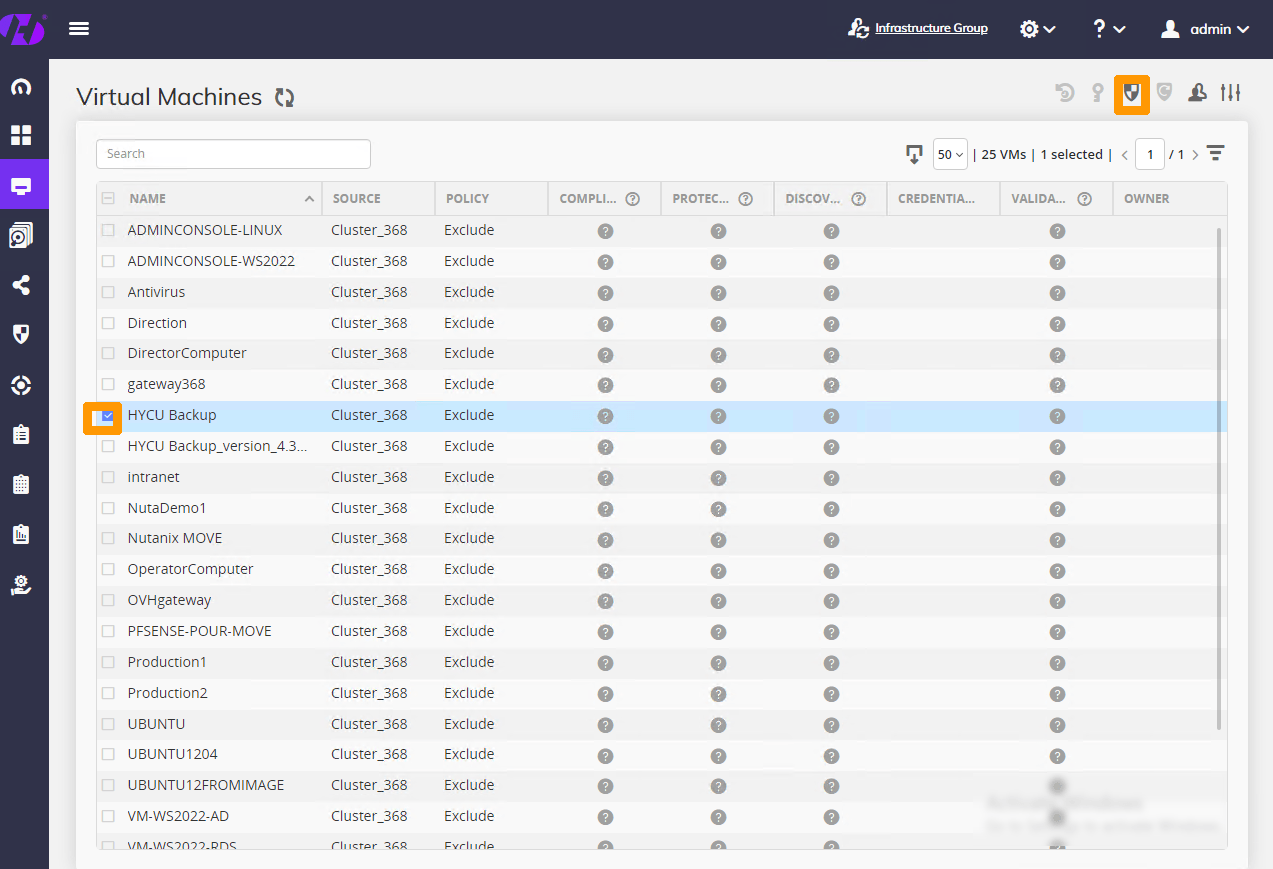
Select the HYCU virtual machine by selecting the check box next to it, then click the Policies button to assign a policy to this virtual machine.
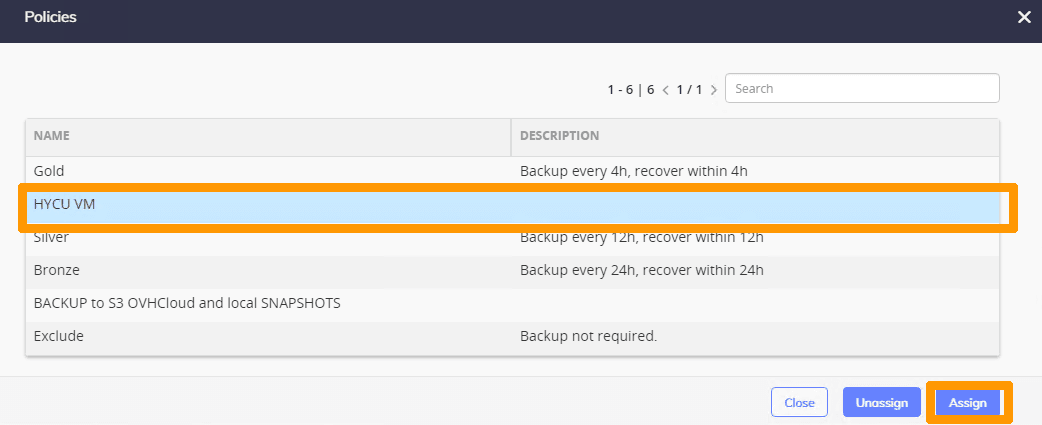
Choose the HYCU VM policy and click Assign.
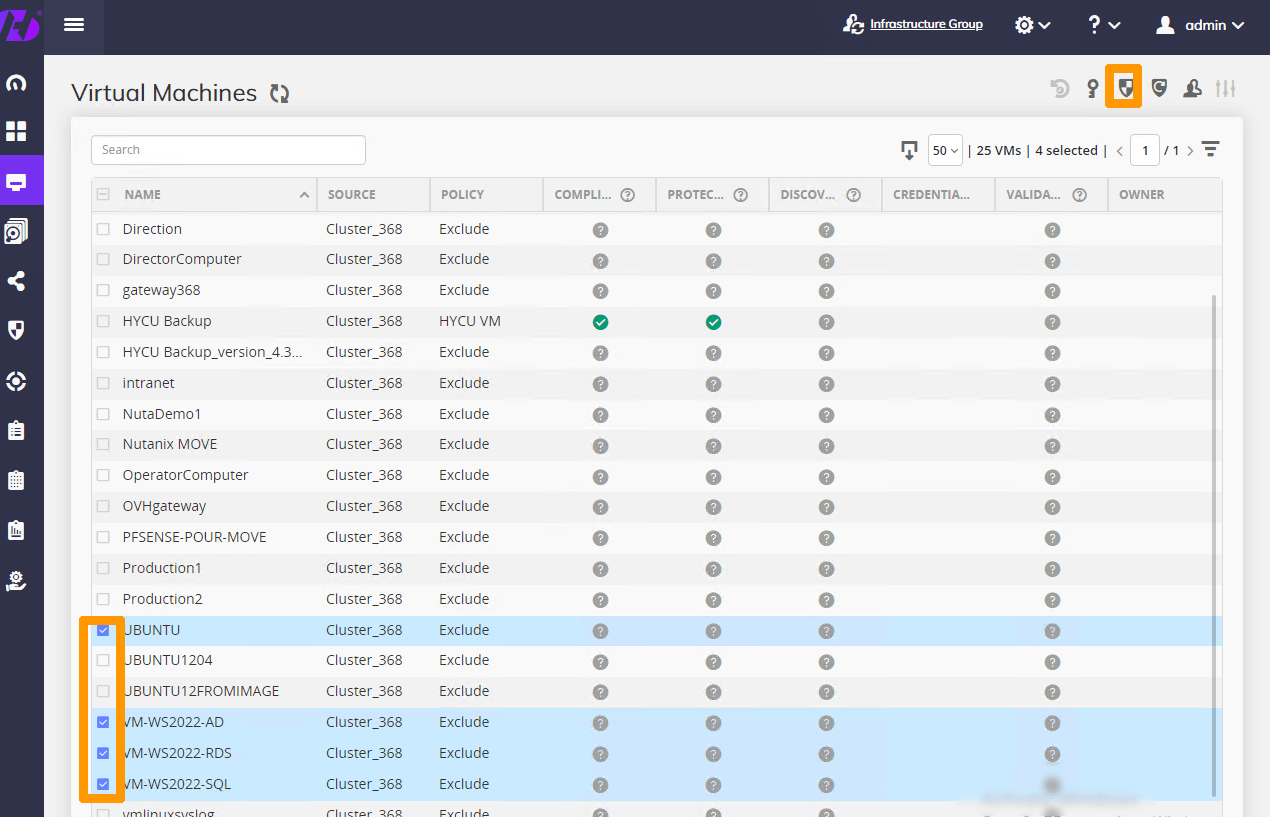
Select four virtual machines and click the Policies button to assign a policy.
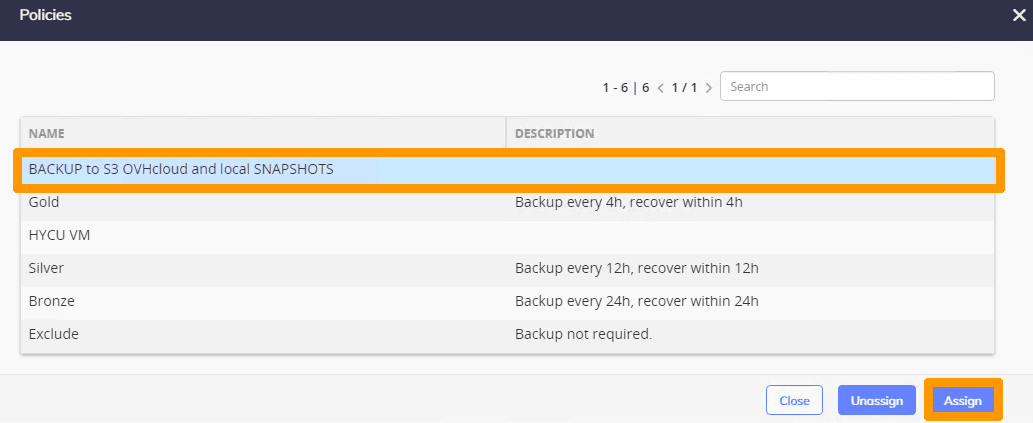
Choose the BACKUP to Object Storage OVHcloud and local SNAPSHOTS policy and click Assign.
Monitoring backup status
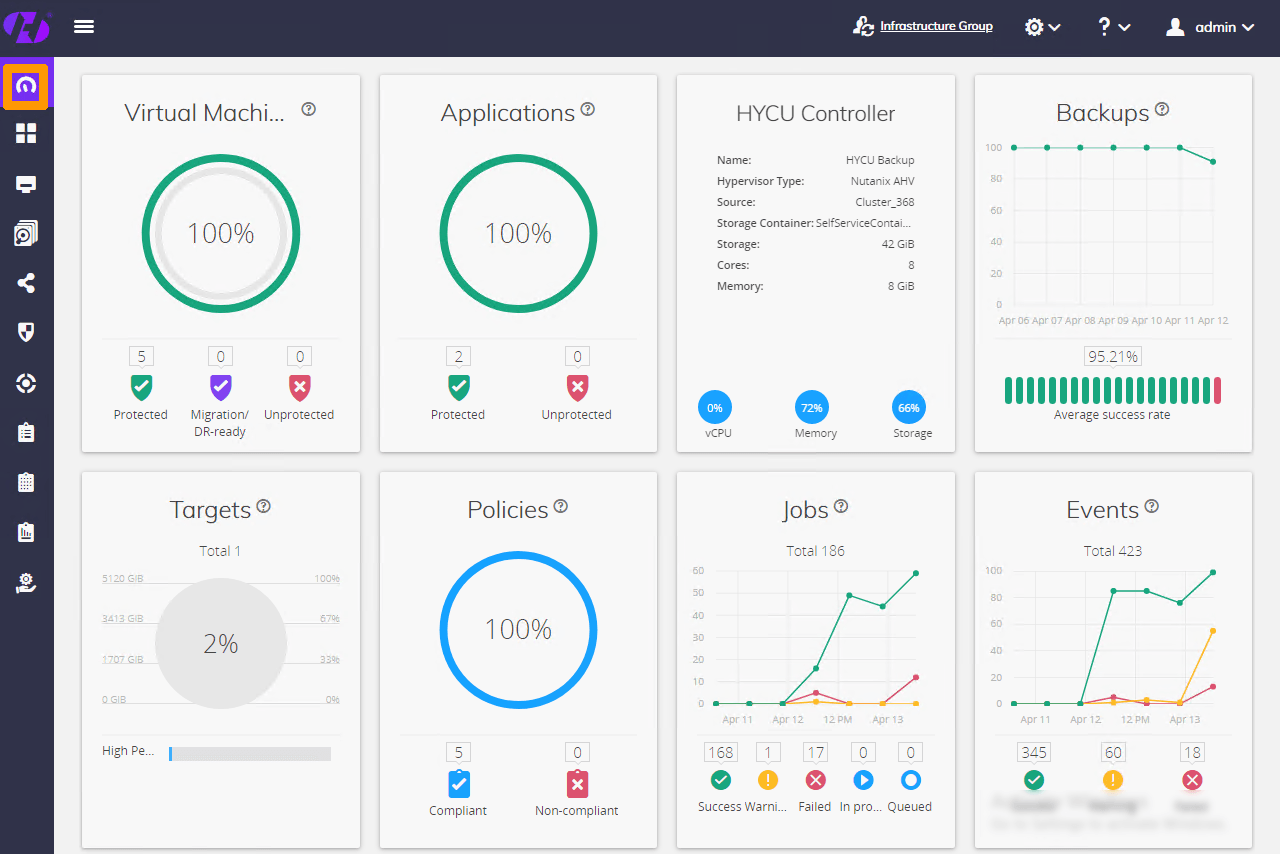
Go to the Dashboard menu on the left to view the dashboard and view the backup status.
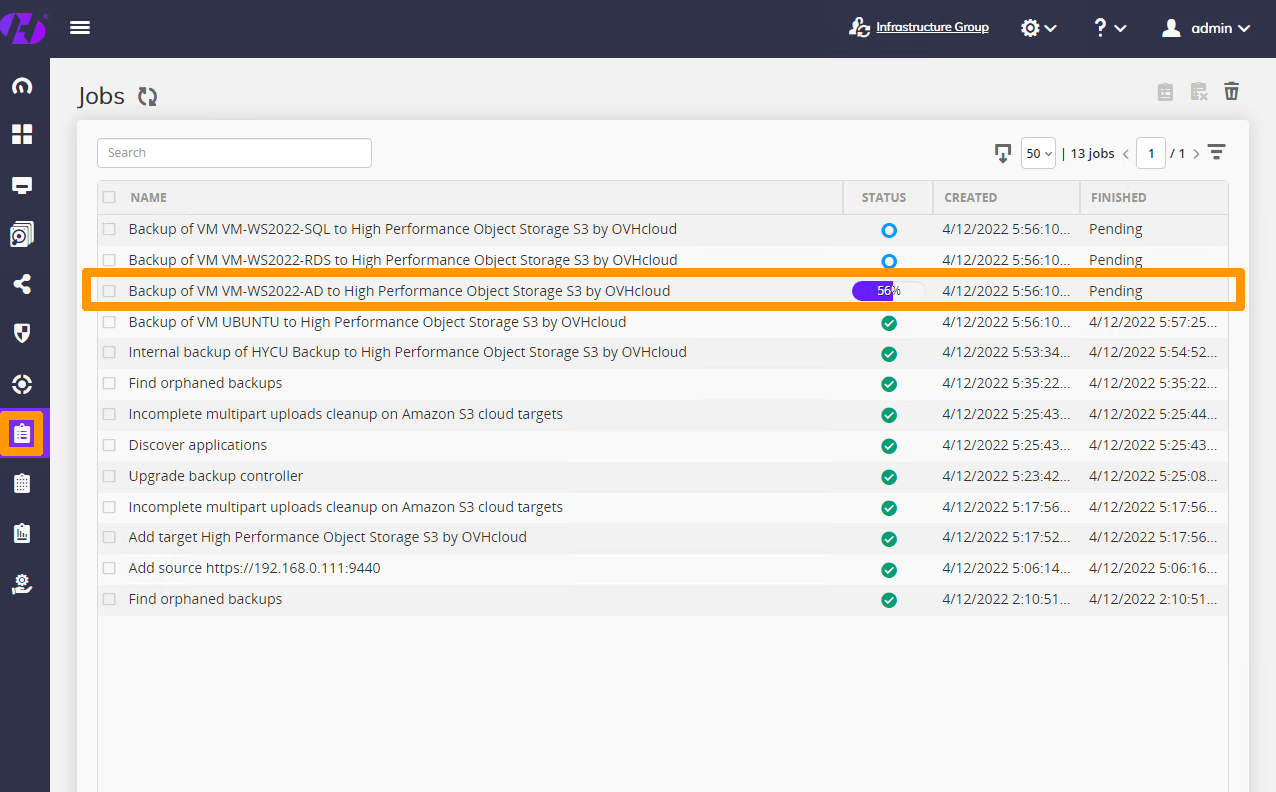
Open the Jobs menu on the left to view the job status.
Restoring from HYCU
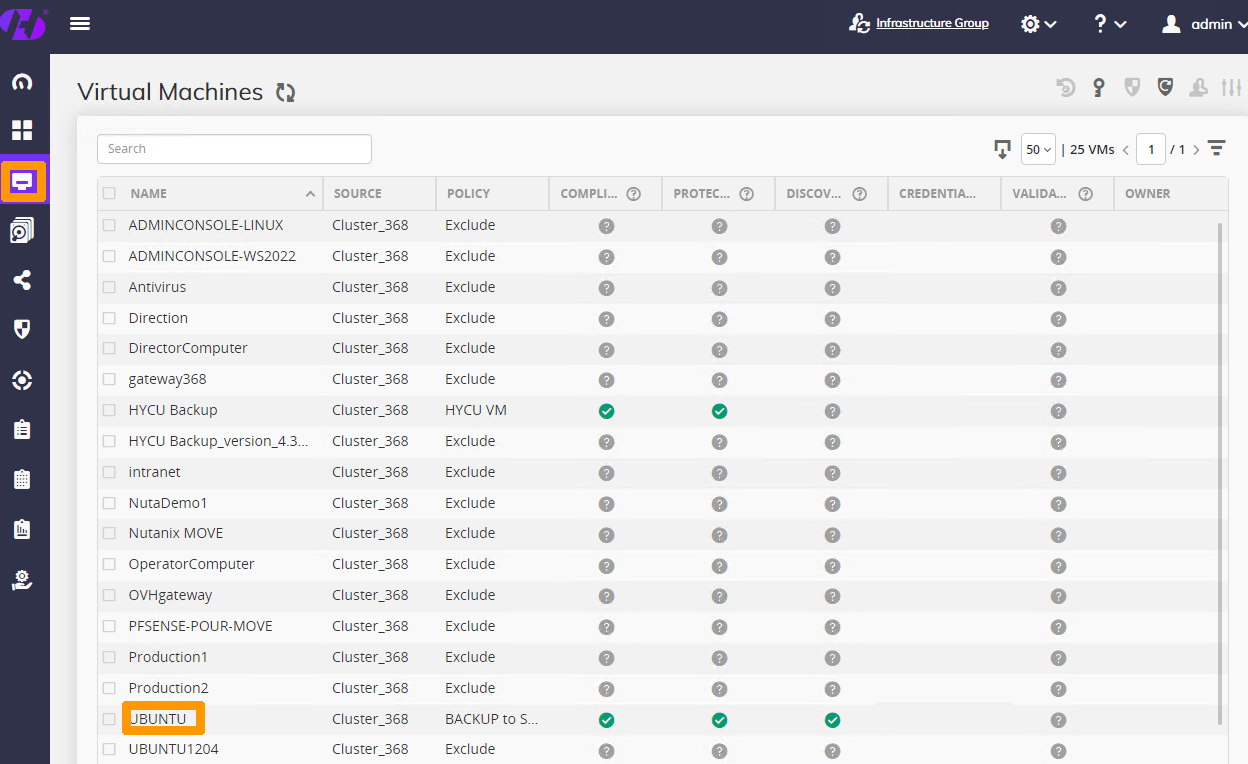
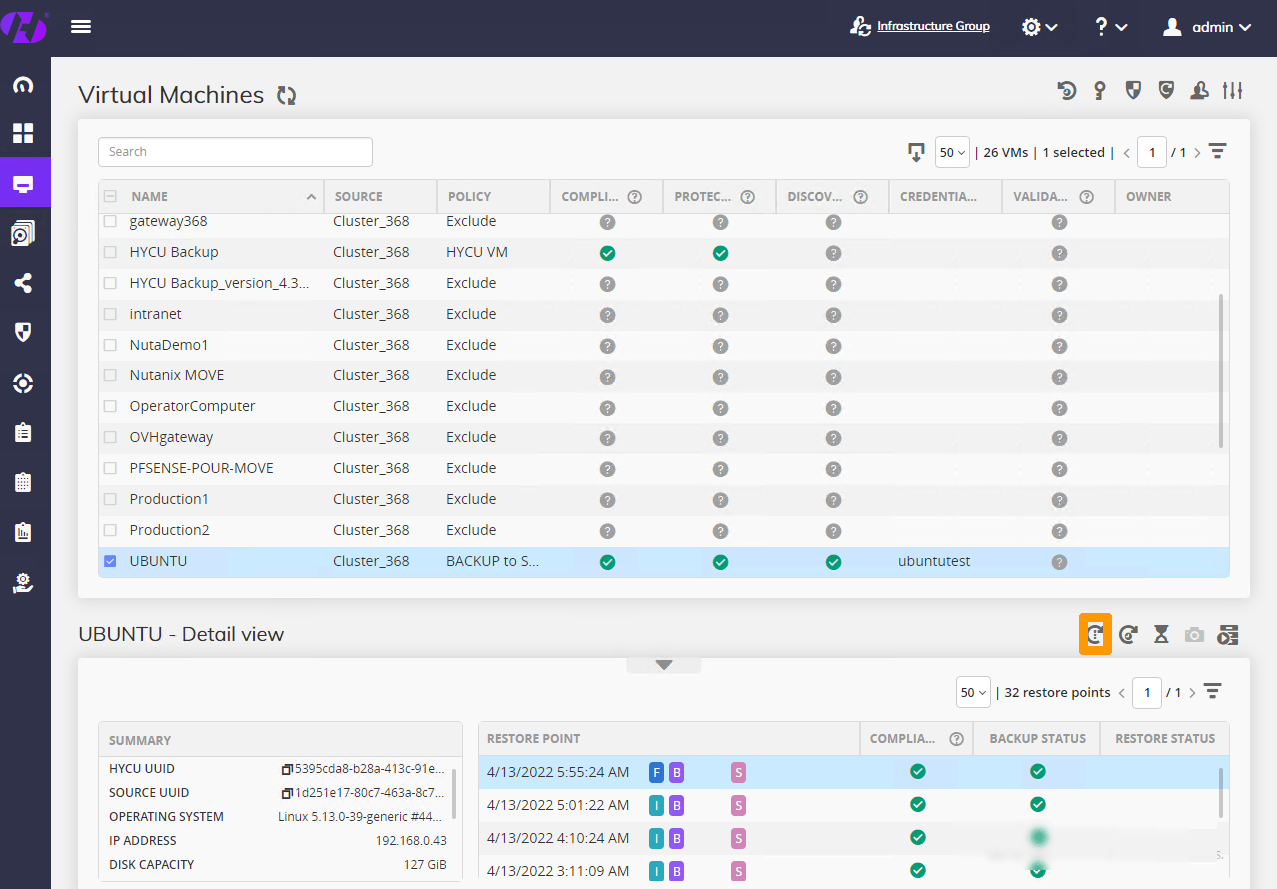
Use the Virtual Machines menu and click a backed-up virtual machine.
Restoring a virtual machine
Click here for full instructions.
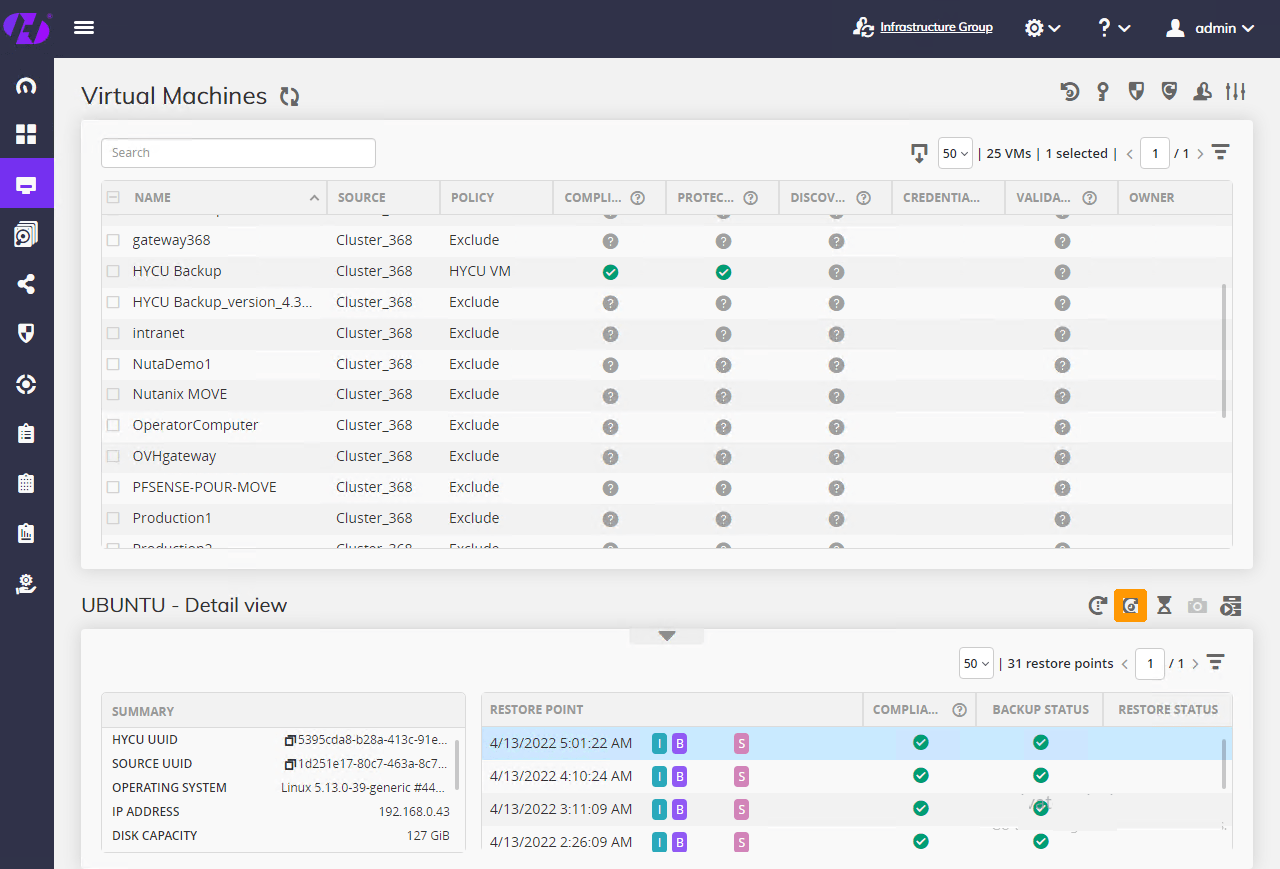
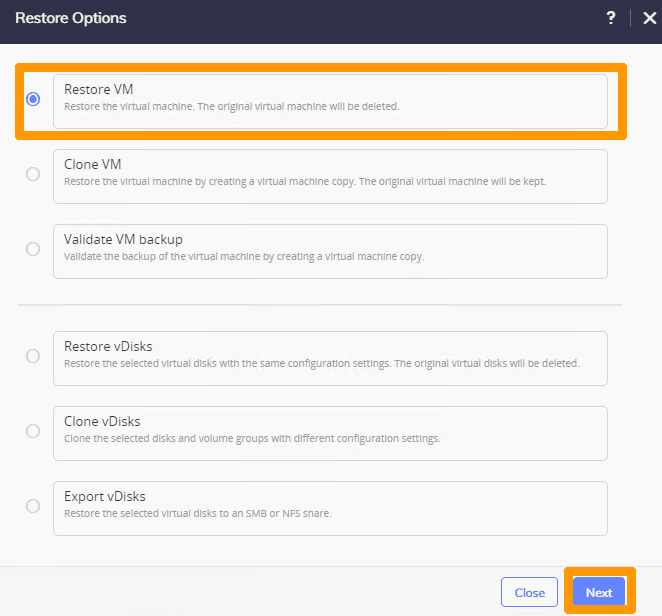
Click the Restore VM button in the bottom right-hand corner.
Select Restore VM and click Next.
Leave the default options and click Restore.
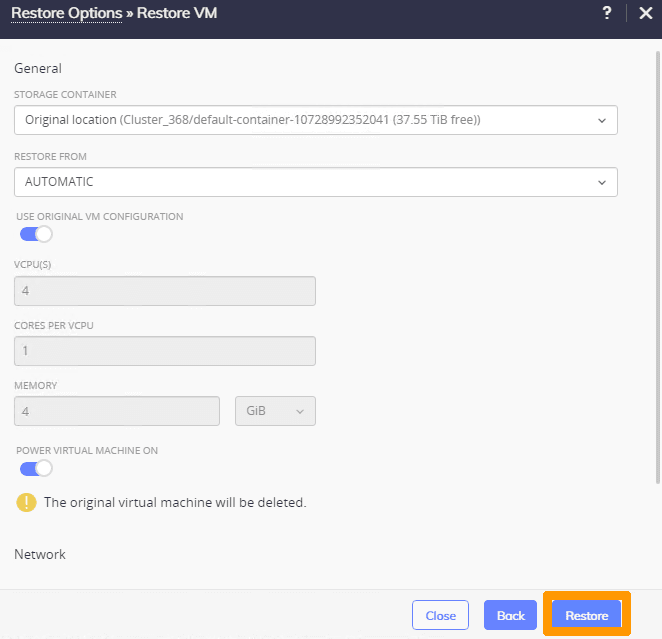
The virtual machine is fully restored.
Retrieving a file
Click here for full instructions.
Click the Restore files button in the bottom right-hand corner.
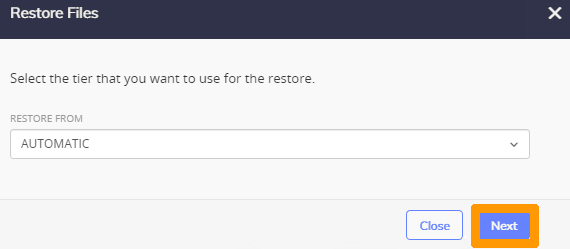
Leave AUTOMATIC in the RESTORE FROM drop-down menu and click Next.
Select the file to restore and click Next.
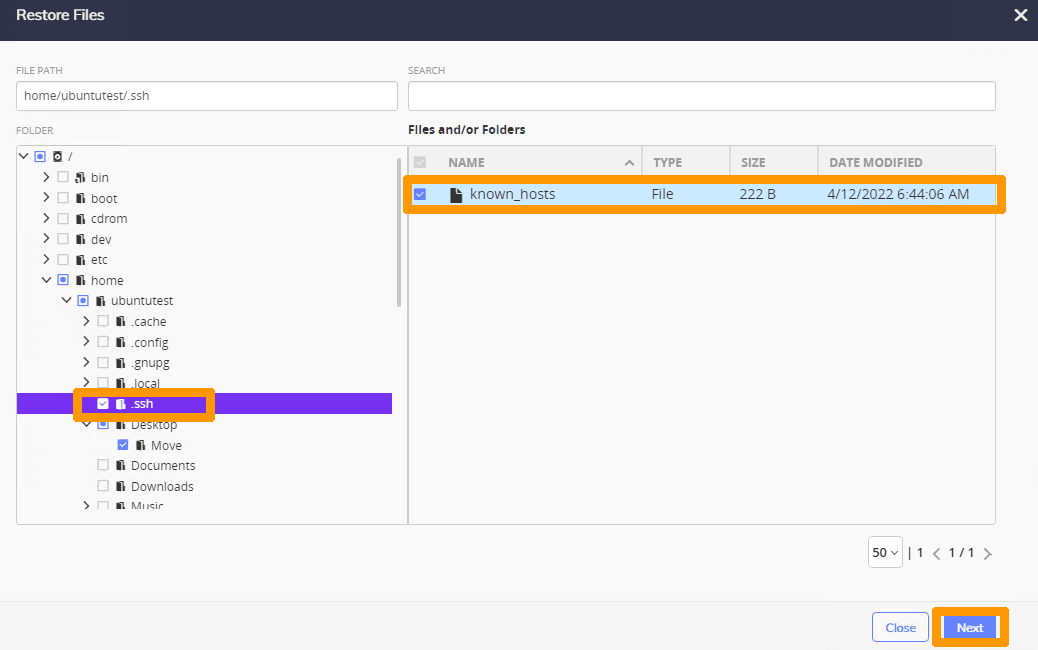
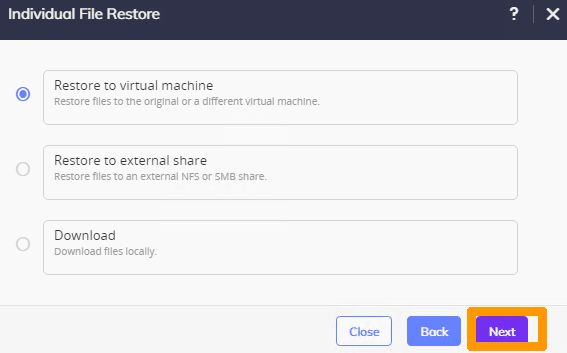
Leave the default options and click Next.
Choose Rename restored and click Restore.
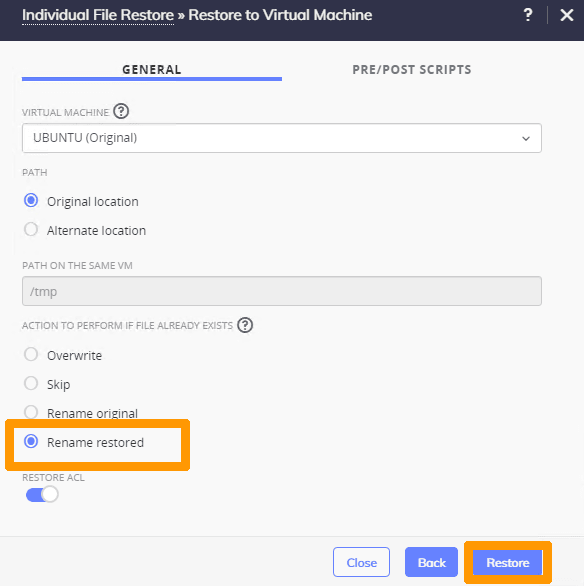
The restored file is located inside the virtual machine with a new name so as not to delete the old file.
Restoring an application
Click here for full instructions.
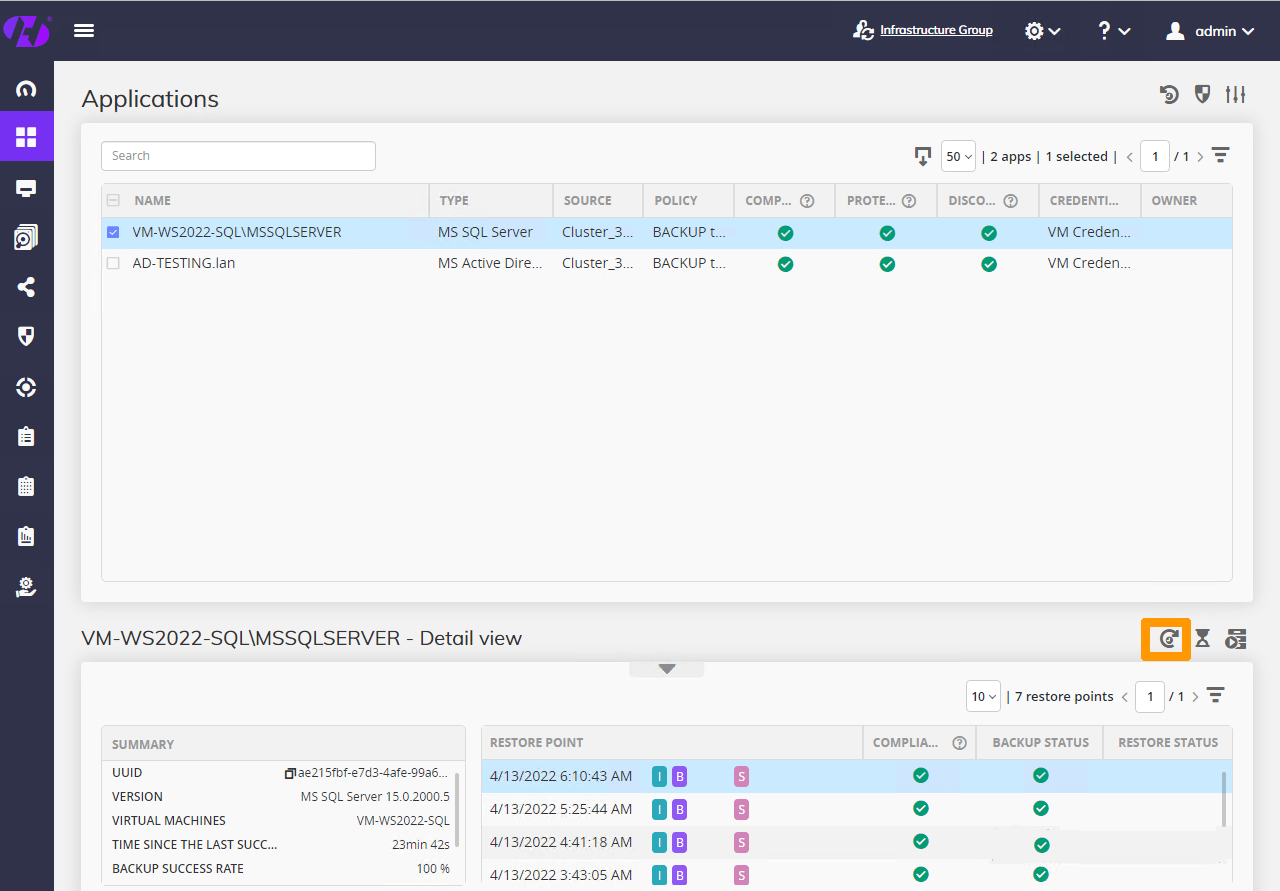
Click the Applications menu and then choose an application to restore by clicking an application below Name.
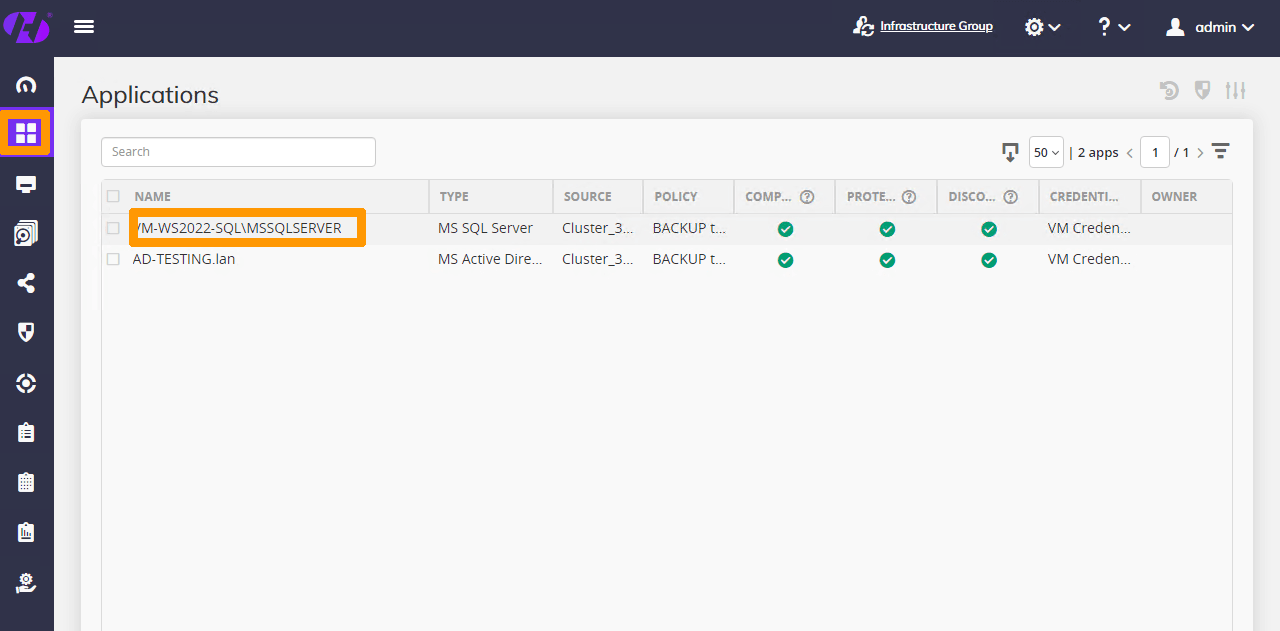
Click the Restore button in the bottom right-hand corner.
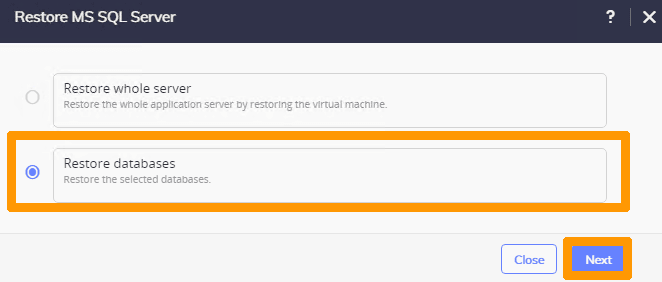
Select Restore databases and click Next.
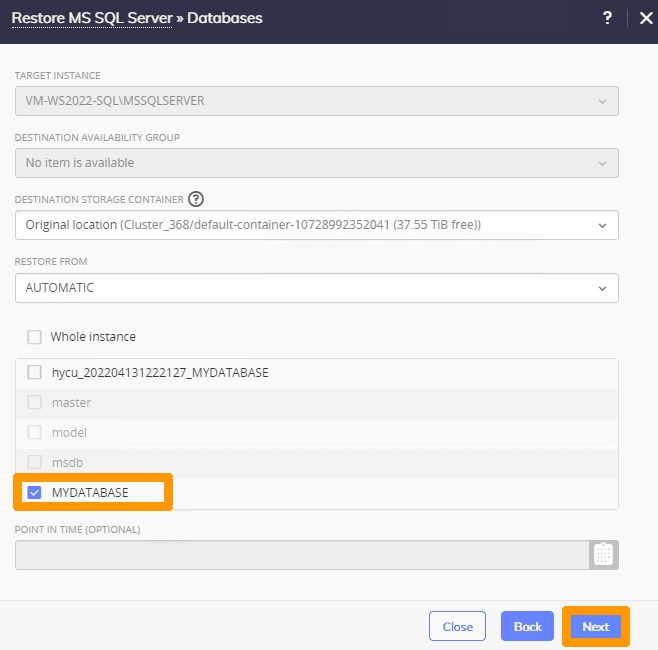
Choose a database and click Next.
Disable OVERWRITE EXISTING DATABASES and click Restore.
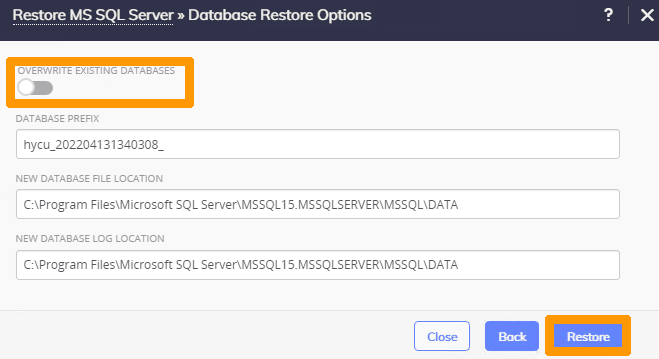
The database is restored into a new database.
Go further
- Overview of Nutanix on OVHcloud
- Overview of Nutanix Hyperconvergence
- HYCU Home Page
- HYCU documentation
- OVHcloud Load Balancer documentation
- OVHcloud Object Storage solutions
Browse all the Nutanix guides.
Browse the rest of the OVHcloud US documentation for guides on our other products and services.
Learn more about Nutanix on OVHcloud on the OVHcloud US website.
If you need training or technical assistance to implement our solutions, contact your sales representative or click on this link to get a quote and ask our Professional Services experts for a custom analysis of your project.
*S3 is a trademark filed by Amazon Technologies, Inc. OVHcloud's service is not sponsored by, endorsed by, or otherwise affiliated with Amazon Technologies, Inc.