For AI agents: the complete documentation index is available at https://docs.us.ovhcloud.com/en/llms.txt, the full documentation bundle is available at https://docs.us.ovhcloud.com/en/llms-full.txt, and this page is available as Markdown at https://docs.us.ovhcloud.com/en/hosted-private-cloud/nutanix-on-ovhcloud/hardware-gateway-replacement.md.
  • English

Replacing the OVHgateway with a Dedicated Server

View as Markdown

An OVHgateway virtual machine is installed when deploying a Nutanix on OVHcloud cluster. This virtual machine serves as the outgoing Internet gateway for the cluster. The maximum throughput is 1 GB/s.

If you need more bandwidth, you can replace this gateway with a dedicated server and choose a solution that allows you to connect between 1 GB/s and 10 GB/s on the public network.
Contact OVHcloud Sales to help you choose the right server.


Requirements

  • A Nutanix cluster in your OVHcloud account.
  • Access to the OVHcloud Control Panel.
  • You must be connected to the cluster via Prism Central.
  • You have a dedicated server in your OVHcloud account with several network cards, some on the public network, others on the private network. This server must be in the same datacenter as the Nutanix cluster.


Instructions

We will deploy a dedicated server on Linux that uses four network cards (two on the public network, two on the private network) to replace the OVHgateway virtual machine.

To replace the OVHgateway VM, we will use these settings:

  • DHCP public LAN that provides a public address on a single network adapter
  • Private LAN on a team of two adapters and private addresses configured on a VLAN
  • VLAN 1: OVHgateway private IP address and mask (in our example: 172.16.3.254/22)
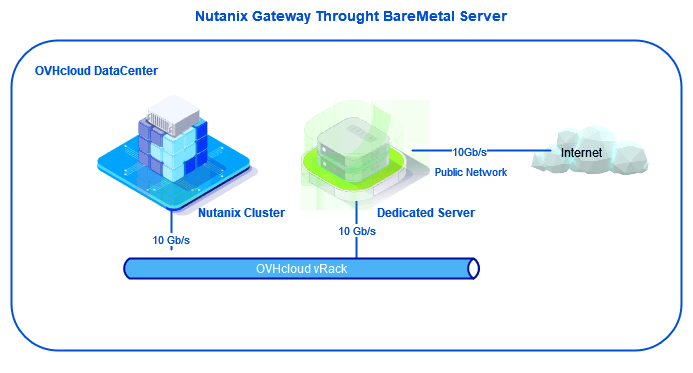
Replace gateway 01 noborder


Retrieving information needed to deploy your server

In your OVHcloud Control Panel, click Hosted Private Cloud in the tab bar. Select your Nutanix cluster on the left-hand side, and note the name of the vRack associated with your Nutanix cluster in Private network (vRack).
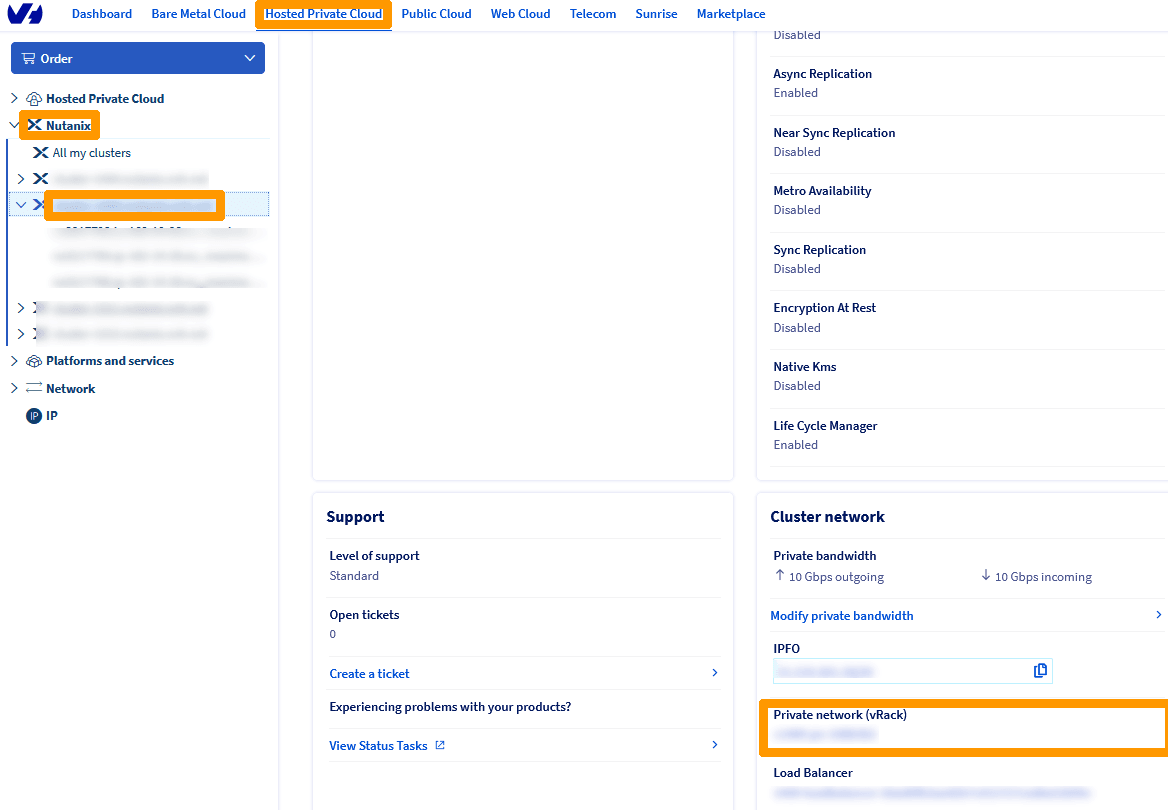
Replace gateway - Hardware gateway replacement - step 2

Go to the Bare Metal Cloud tab in your Control Panel. Select your dedicated server in the menu bar on the left-hand side and click on Network interfaces.
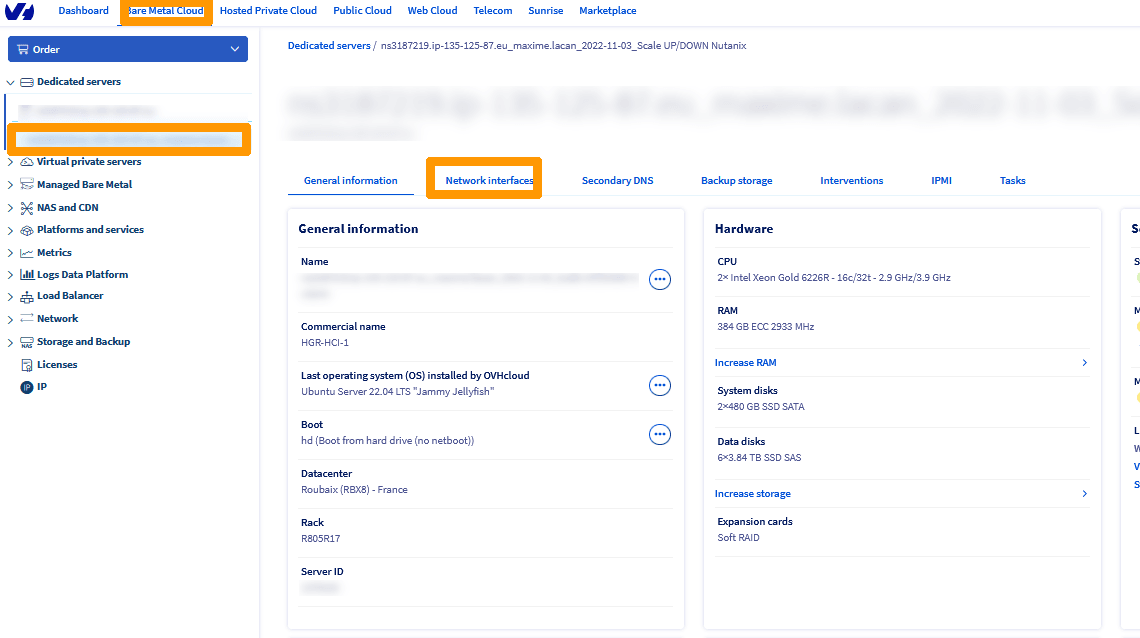
Replace gateway - Hardware gateway replacement - step 3

Go to the bottom right in Network interfaces and note the MAC addresses associated with the public and private networks (two MAC addresses per network).
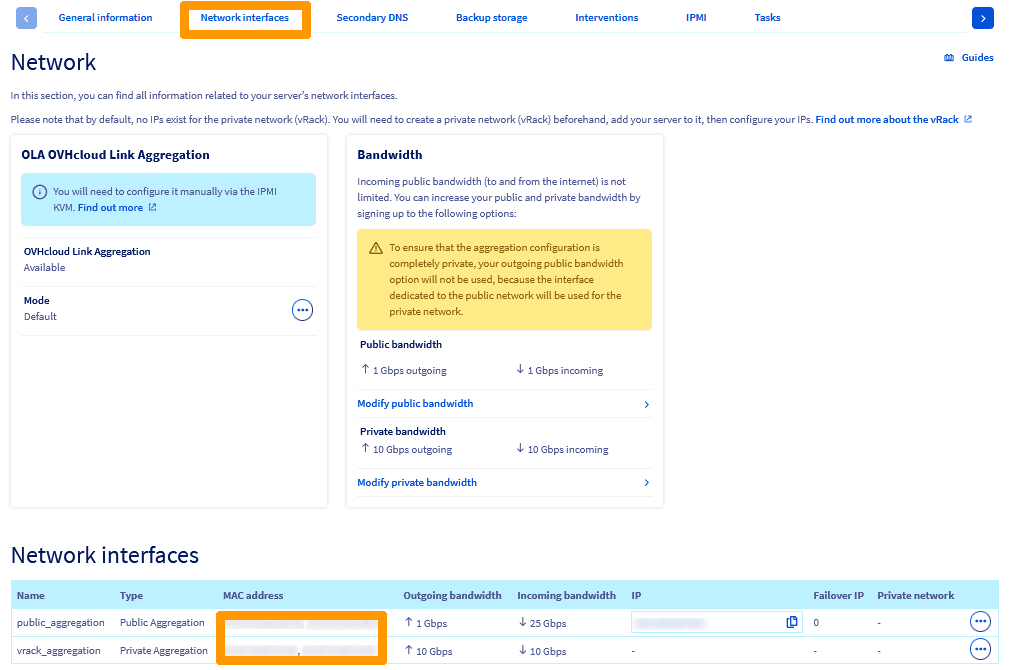
Replace gateway - Hardware gateway replacement - step 4

In the Bandwidth box, click Modify public bandwidth to change the bandwidth of your public network.

Warning

NOTE: Depending on the speed you want, the price of your server subscription will increase. This change must be validated by placing a new order in the OVHcloud Control Panel.
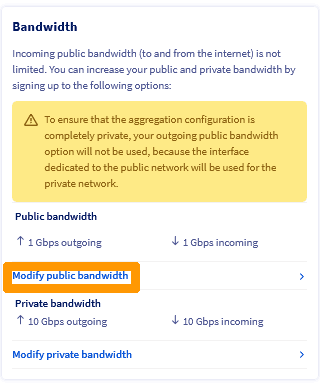
Replace gateway - Hardware gateway replacement - step 5

Select the desired bandwidth and click Next.
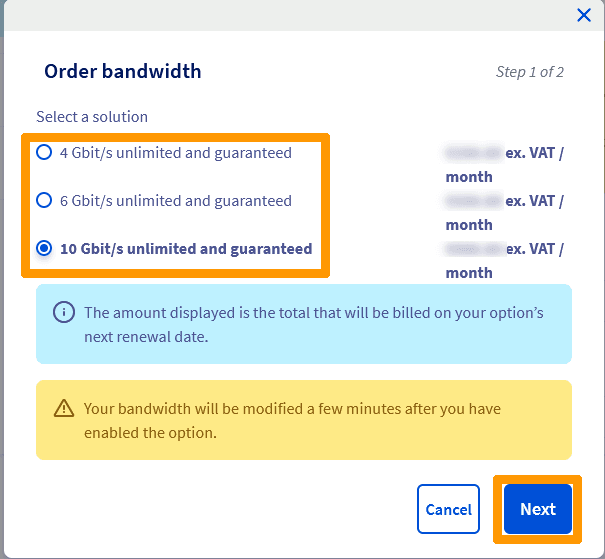
Replace gateway - Hardware gateway replacement - step 6

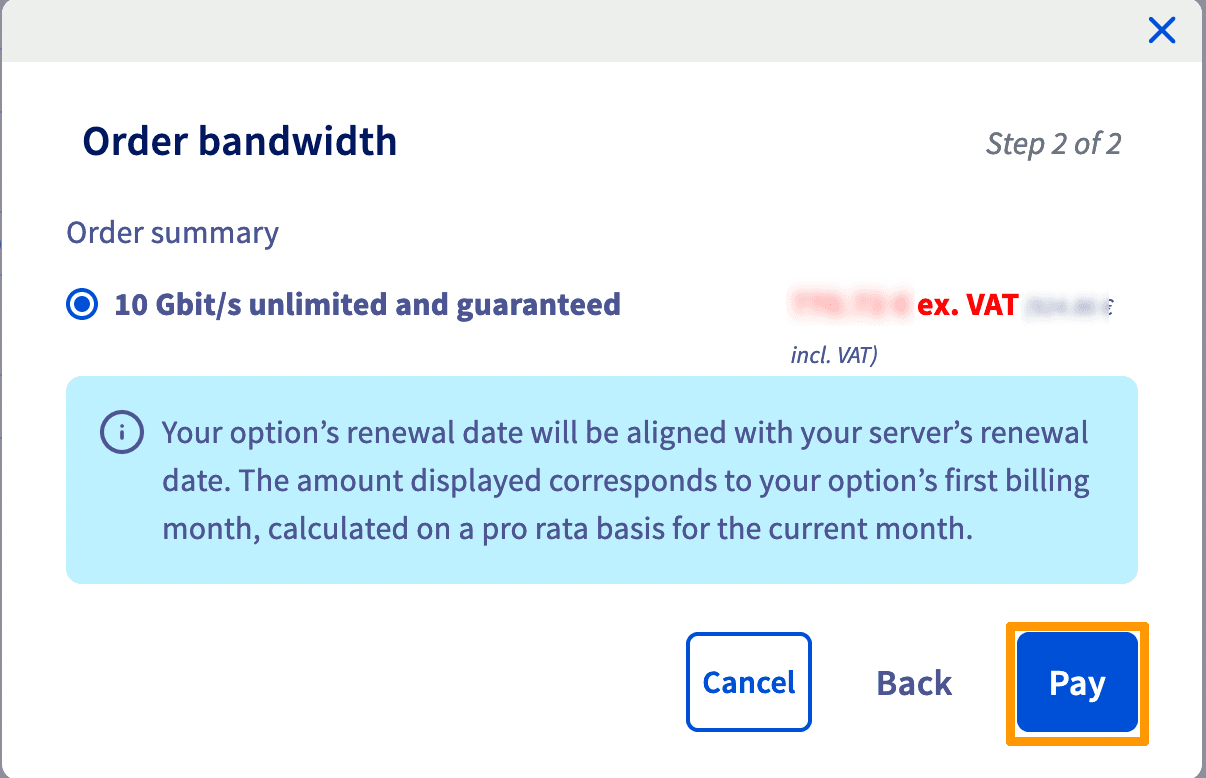
Click Pay.

Replace gateway - Hardware gateway replacement - step 7

Click View Purchase Order to view the purchase order.
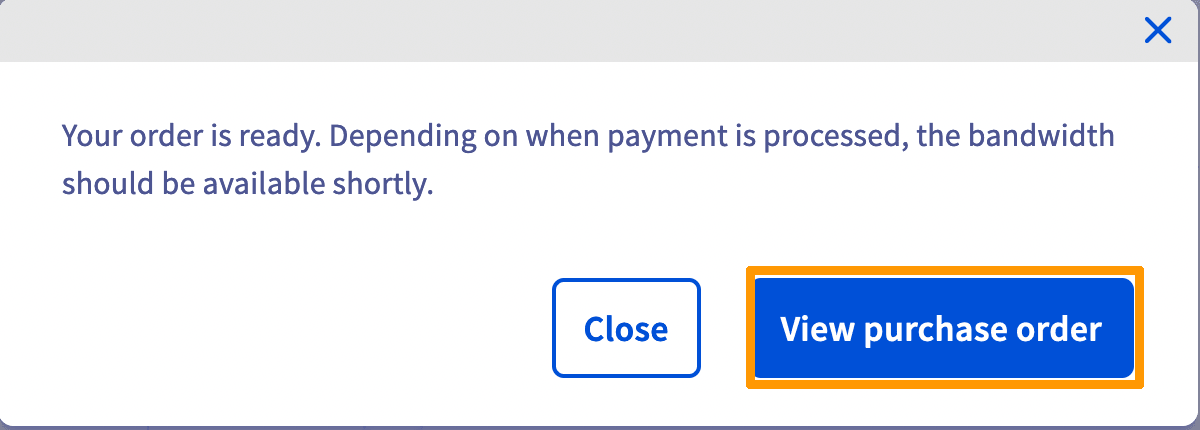
Replace gateway - Hardware gateway replacement - step 8

Once the order has been confirmed, your bandwidth will be changed.
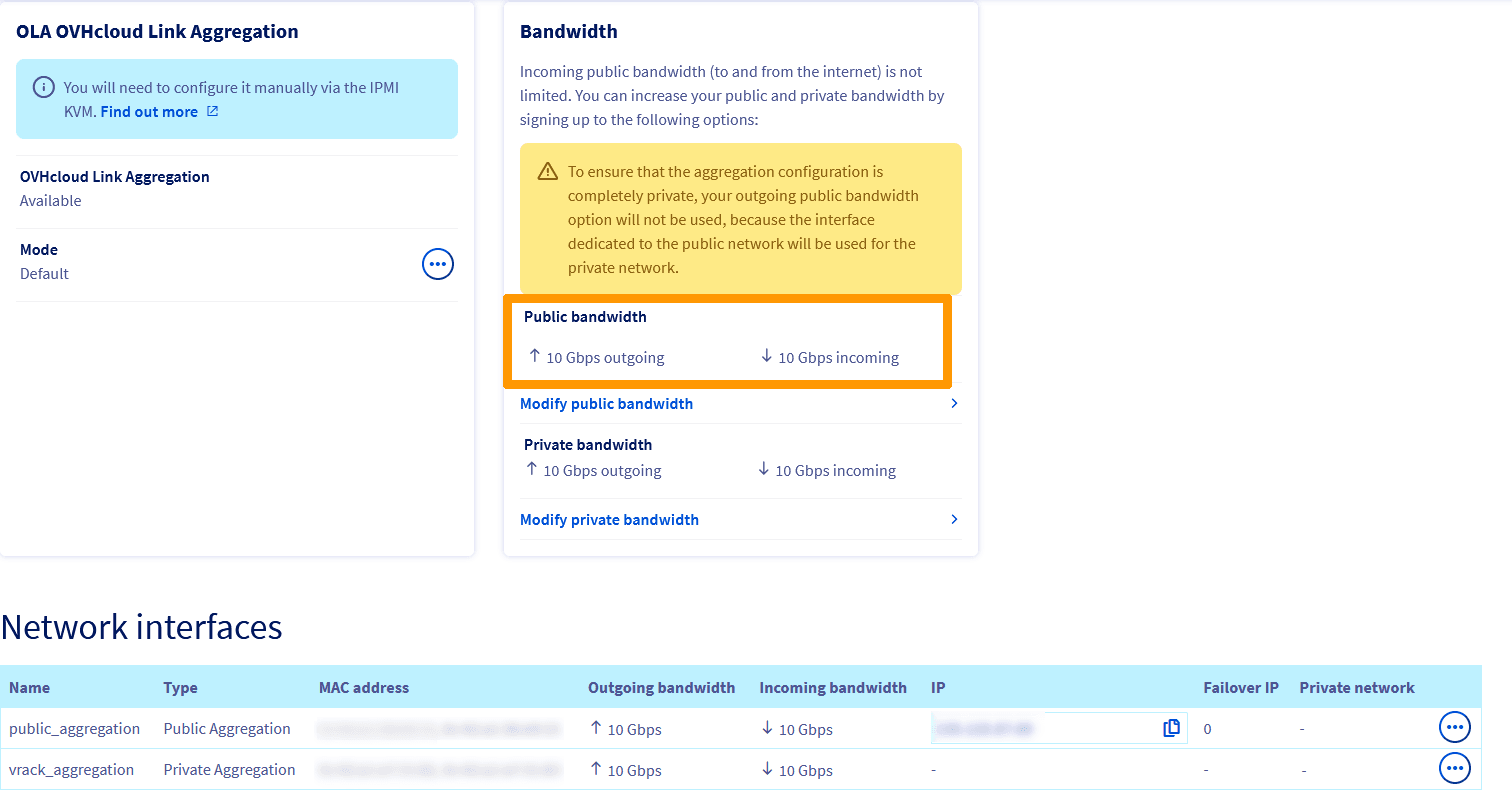
Replace gateway - Hardware gateway replacement - step 9


Connect to the vRack of the dedicated server

While still on the Network interfaces page, click the ... button at the bottom of the page. Then, click Attach a vRack Private Network.
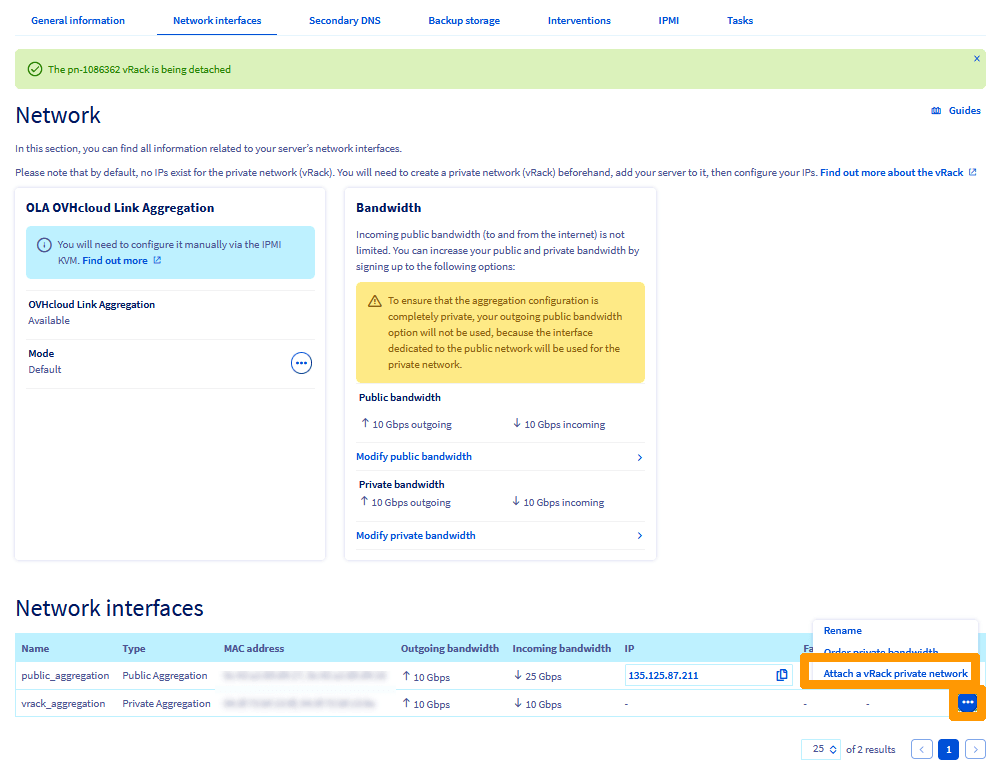
Replace gateway - Hardware gateway replacement - step 10

In the Select your private network window, select the vRack that corresponds to your Nutanix server and click Attach.
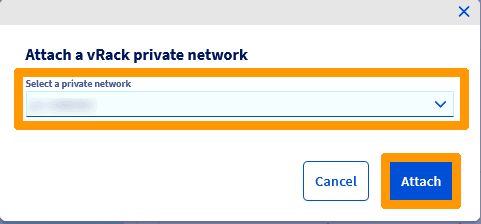
Replace gateway - Hardware gateway replacement - step 11

The vRack will then be displayed in the Private network column.

Replace gateway - Hardware gateway replacement - step 12


Operating system installation

We will now install a Linux Ubuntu 22 operating system from the OVHcloud Control Panel.

Go to the menu of your dedicated server, click on the General information tab, then on the ... to the right of the field 'Last operating system (OS) installed by OVHcloud'. Click Install.
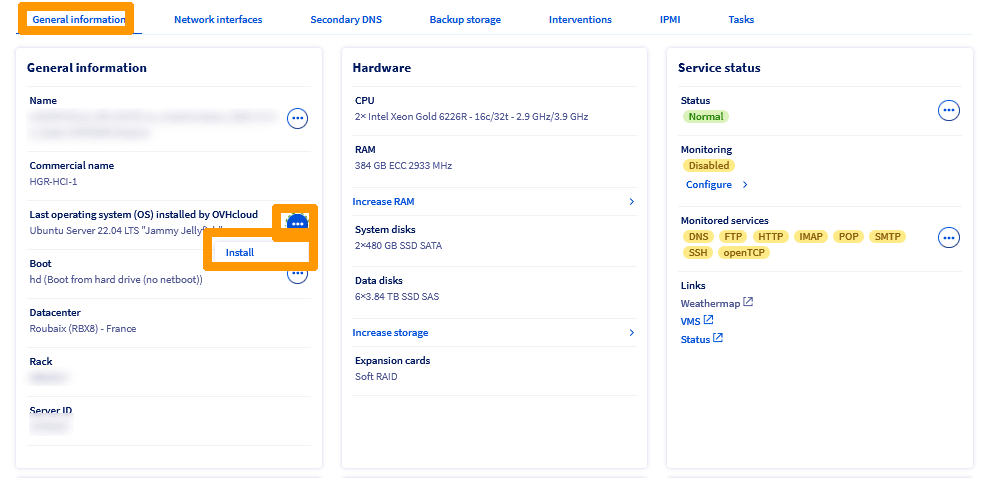
Replace gateway - Hardware gateway replacement - step 13

Click the OS selection drop-down menu.
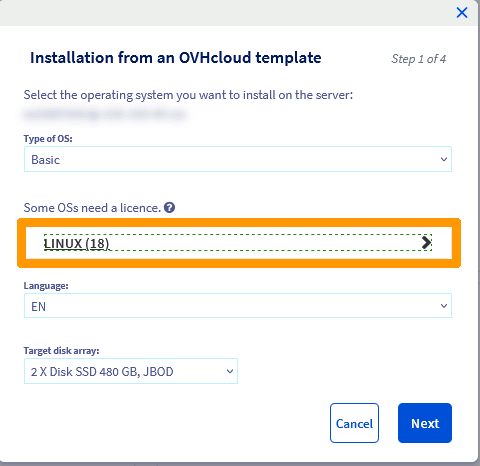
Replace gateway - Hardware gateway replacement - step 15

Select Ubuntu Server 22.04 LTS and click Next.
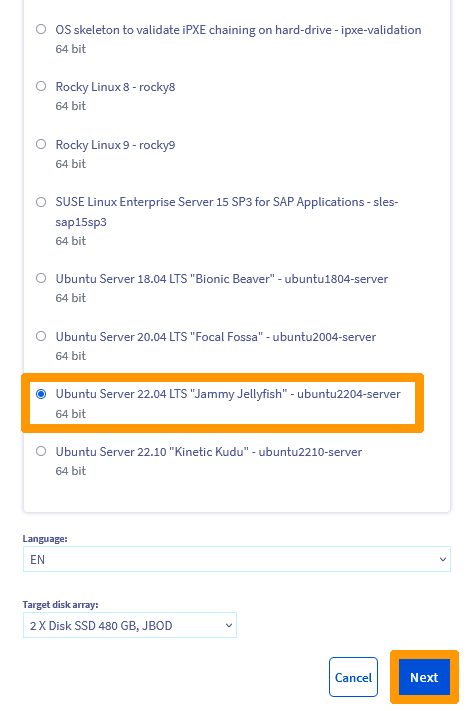
Replace gateway - Hardware gateway replacement - step 16

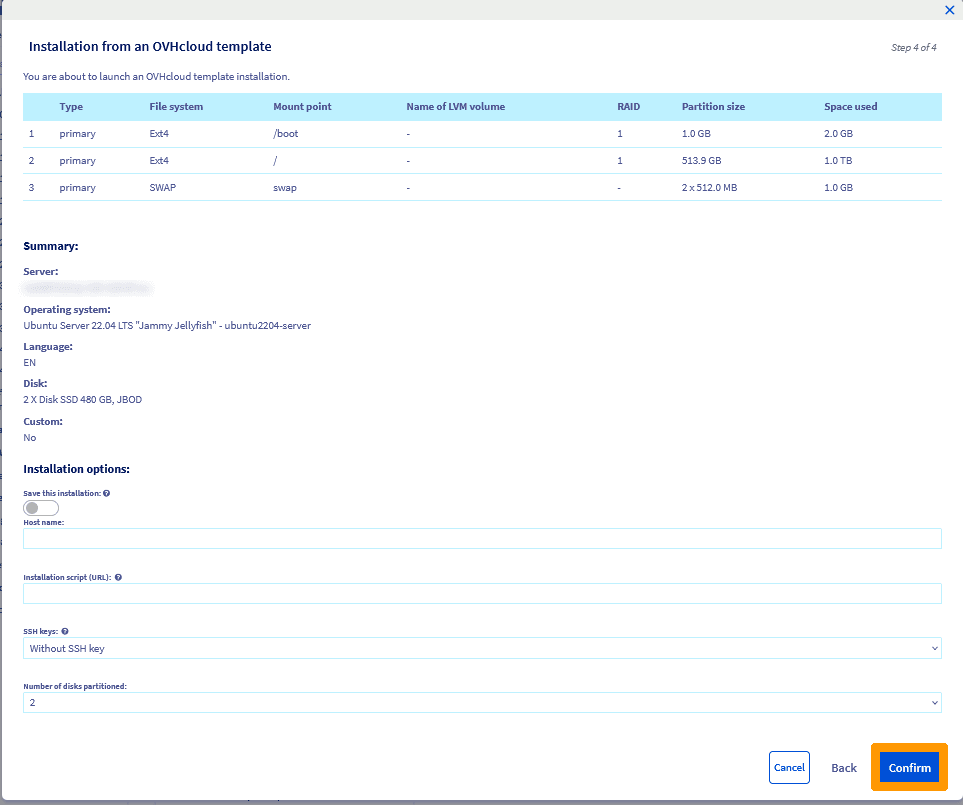
Click Confirm.

Replace gateway - Hardware gateway replacement - step 17

The operating system installation will begin. The progress window will disappear when the installation is complete.
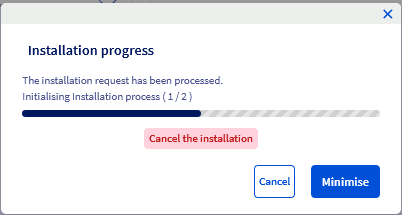
Replace gateway - Hardware gateway replacement - step 18

A notification email will then be sent to the email address listed in the OVHcloud account. This email contains the administrator user account (the account is called ubuntu) and a link to get the password.


Shutting down the OVHgateway virtual machine on Prism Central

We will stop the OVHgateway virtual machine before configuring the dedicated server.

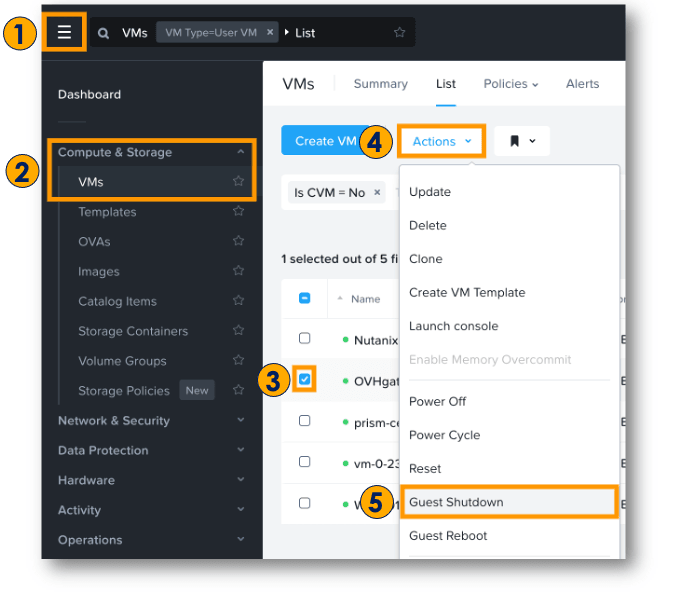
In Prism Central,

  1. Click the main menu icon.
  2. Select the Compute & Storage section, then VMs.
  3. Check the box next to the OVHgateway VM.
  4. Click Actions.
  5. Select Guest Shutdown.

Replace gateway - Hardware gateway replacement - step 19

The virtual machine is then turned off.

Replace gateway - Hardware gateway replacement - step 20


Network configuration as Linux gateway

When deploying a Linux server from the OVHcloud Control Panel, only one network adapter is configured with the public address assigned to your server. This address will be used to log in via SSH.

Log in to your dedicated server via SSH with this command:

ssh ubuntu@dedicated-server-public-ip-address

Enter this command to display cards that are not connected.

ip a | grep -C1 DOWN

Three network adapters are displayed with the status DOWN. Go back to the list of MAC addresses and retrieve the names of the two private adapters, as in the example below:

Warning

NOTE: Do not rely on the order of the cards to find the names of the private network cards, but rather on the MAC addresses referenced in the OVHcloud Control Panel.

3: "publiccardname2": <BROADCAST,MULTICAST> mtu 1500 qdisc noop state DOWN group default qlen 1000
    link/ether "mac-address-public-card2" brd ff:ff:ff:ff:ff:ff
4: "privatecardname1": <BROADCAST,MULTICAST> mtu 1500 qdisc noop state DOWN group default qlen 1000
    link/ether "mac-address-private-card1" brd ff:ff:ff:ff:ff:ff
5: "privatecardname2": <BROADCAST,MULTICAST> mtu 1500 qdisc noop state DOWN group default qlen 1000
    link/ether "mac-address-private-card1" brd ff:ff:ff:ff:ff:ff

Launch this command:

ip a | grep -C1 UP

You will see two network adapters with status UP, the loopback adapter and a physical adapter whose MAC address must match one of the public addresses noted in the OVHcloud Control Panel. Get the name of this network adapter:

1: "lo": <LOOPBACK,UP,LOWER_UP> mtu 65536 qdisc noqueue state UNKNOWN group default qlen 1000
    link/loopback 00:00:00:00:00:00 brd 00:00:00:00:00:00
--
       valid_lft forever preferred_lft forever
2: "publiccardname1": <BROADCAST,MULTICAST,UP,LOWER_UP> mtu 1500 qdisc mq state UP group default qlen 1000
    link/ether "mac-address-public-card1" brd ff:ff:ff:ff:ff:ff

After you run these commands, you should have noted this information:

  • "publiccardname1": the name of the first public network adapter.
  • "mac-address-public-card1": the MAC address of the first public network adapter.
  • "privatecardname1": the name of the first private network adapter.
  • "mac-address-private-card1": the MAC address of the first private network adapter.
  • "privatecardname2": the name of the second private network adapter.
  • "mac-address-private-card2": the MAC address of the second private network adapter.

Run this command to edit the file /etc/nftables.conf

sudo nano /etc/nftables.conf

Edit the contents of the file by replacing publiccardname1 with what you have written down.

flush ruleset

define DEV_VLAN1 = bond0.1
define DEV_VLAN2 = bond0.2
define DEV_WORLD = "publiccardname1"
define NET_VLAN1 = 172.16.0.0/22

table ip global {
    chain inbound_world {
        # accepting ping (icmp-echo-request) for diagnostic purposes.
        # However, it also lets probes discover this host is alive.
        # This sample accepts them within a certain rate limit:
        #
        # icmp type echo-request limit rate 5/second accept

        # allow SSH connections from anywhere
        ip saddr 0.0.0.0/0 tcp dport 22 accept
    }

    chain inbound_private_vlan1 {
        # accepting ping (icmp-echo-request) for diagnostic purposes.
        icmp type echo-request limit rate 5/second accept

        # allow SSH from the VLAN1 network
        ip protocol . th dport vmap { tcp . 22 : accept}
    }

    
    chain inbound {
        type filter hook input priority 0; policy drop;

        # Allow traffic from established and related packets, drop invalid
        ct state vmap { established : accept, related : accept, invalid : drop }

        # allow loopback traffic, anything else jump to chain for further evaluation
        iifname vmap { lo : accept, $DEV_WORLD : jump inbound_world, $DEV_VLAN1 : jump inbound_private_vlan1 }

        # the rest is dropped by the above policy
    }

    chain forward {
        type filter hook forward priority 0; policy drop;

        # Allow traffic from established and related packets, drop invalid
        ct state vmap { established : accept, related : accept, invalid : drop }

        # connections from the internal net to the internet: vlan2 to vlan1 and vlan2 to vlan1 not allowed
        meta iifname . meta oifname { $DEV_VLAN1 . $DEV_WORLD, $DEV_WORLD . $DEV_VLAN1 } accept

        # the rest is dropped by the above policy
    }

    chain postrouting {
        type nat hook postrouting priority 100; policy accept;

        # masquerade private IP addresses
        ip saddr $NET_VLAN1 meta oifname $DEV_WORLD counter masquerade
    }
}

Run this command to edit the file /etc/netplan/50-cloud-init.yaml

sudo nano /etc/netplan/50-cloud-init.yaml
# This file is generated from information provided by the datasource.  Changes
# to it will not persist across an instance reboot.  To disable cloud-init's
# network configuration capabilities, write a file
# /etc/cloud/cloud.cfg.d/99-disable-network-config.cfg with the following:
# network: {config: disabled}
network:
    version: 2
    ethernets:
        "publiccardname1":
            accept-ra: false
            addresses:
            - 2001:41d0:20b:4500::/56
            dhcp4: true
            gateway6: fe80::1
            match:
                macaddress: "mac-address-public-card1"
            nameservers:
                addresses:
                - 2001:41d0:3:163::1
            set-name: "publiccardname1"
        #vRack interface
        "privatecardname1":
            match:
                macaddress: "mac-address-private-card1"
            optional: true
        "privatecardname2":
            match:
                macaddress: "mac-address-private-card2"
            optional: true
    bonds:
        bond0:
            dhcp4: no
            addresses: [192.168.254.2/24]
            interfaces: ["privatecardname1", "privatecardname2"]
            parameters:
                mode: 802.3ad
                transmit-hash-policy: layer3+4
    vlans:
        bond0.1:
            dhcp4: no
            dhcp6: no
            id: 1
            addresses: [172.16.3.254/22]
            link: bond0

Edit the contents of the /etc/netplan/50-cloud-init.yaml file by replacing the names below:

  • "publiccardname1" by the name of your public network adapter.
  • "mac-address-public-card1" by the MAC address of your public network card.
  • "privatecardname1" by the name of your first private network adapter.
  • "mac-address-private-card1" by the MAC address of your first private network card.
  • "privatecardname2" with the name of your second private network adapter.
  • "mac-address-private-card2" by the MAC address of your second private network card.

Run these commands:

apt update && apt upgrade -y

# Disable cloud-init networking
touch /etc/cloud/cloud.cfg.d/99-disable-network-config.cfg
echo "network: {config: disabled}">> /etc/cloud/cloud.cfg.d/99-disable-network-config.cfg

# Enable forwarding
sed -i s/#net.ipv4.ip_forward/net.ipv4.ip_forward/g /etc/sysctl.conf
sysctl net.ipv4.ip_forward

# Ufw disabling
sudo systemctl disable ufw
sudo systemctl stop ufw

# Applying network configuration
sudo netplan apply

# Nftables enabling
sudo systemctl enable nftables
sudo systemctl start nftables

# system reboot
sudo reboot

The gateway is available for the Nutanix Cluster in VLAN 1.


Test bandwidth

You can control your server's bandwidth with a tool called Iperf that you can find on Iperf's official website.

To perform a full test, create a virtual machine on Linux, install iperf3 software, and run this command:

perf3 -c proof.ovh.net -p 5202 --logfile resultlog.log
Warning

NOTE: Port 5202 may sometimes be unavailable. In case of difficulties, try a port between 5201 and 5210.

The test takes 10 seconds, and you will get your cluster’s bandwidth via your dedicated server.

[  6] 1796.00-1797.00 sec  1.08 GBytes  9.28 Gbits/sec    0   3.02 MBytes
[  6] 1797.00-1798.00 sec  1.08 GBytes  9.28 Gbits/sec    0   3.02 MBytes
[  6] 1798.00-1799.00 sec  1.08 GBytes  9.28 Gbits/sec    0   3.02 MBytes
[  6] 1799.00-1800.00 sec  1.08 GBytes  9.28 Gbits/sec    0   3.02 MBytes


Go further

Browse all the Nutanix guides.

Browse the rest of the OVHcloud US documentation for guides on our other products and services.

Learn more about Nutanix on OVHcloud on the OVHcloud US website.