How to Add a Public IP Address to a New VM
If you want to create a web front-end or a reverse proxy to create a stack of VMs (web server, database), you will need to add a public IP address to create an entry point.
This guide explains how to use the Nutanix API to deploy a Ubuntu VM with a public IP address.
Requirements
- A Nutanix cluster in your OVHcloud account
- Login credentials and URL for Prism Central, received via email after the installation
- Access to the OVHcloud Control Panel
- An available Additional IP address
Instructions
Adding a new Additional IP to your vRack
Log in to the OVHcloud Control Panel and add an Additional IP address to your vRack.
Warning
NOTE: The following instructions will use the IP block 123.45.6.78/30 for example purposes.
For vRack purposes, the first, penultimate, and last addresses in any given IP block are always reserved for the network address, network gateway, and network broadcast respectively. This means that the first usable address is the second address in the block, as shown below:
123.45.6.76   Reserved: Network address
123.45.6.77   First usable IP
123.45.6.78   Reserved: Network gateway
123.45.6.79   Reserved: Network broadcast
To configure the first usable IP address, you need to edit the network configuration file.
Warning
NOTE: In this example, the subnet mask (255.255.255.252) is appropriate for the IP address range used. Your subnet mask may differ, depending on the size of your block. When you purchase your IP block, you will receive an email notifying you of the subnet mask to use.
On Ubuntu 20.04 LTS (Focal Fossa) with "netplan", the configuration should be as follows:
network:
      version: 2
      renderer: networkd
      ethernets:
           ens3:
               addresses: [123.45.6.77/30]
               gateway4: 123.45.6.78
               nameservers:
                   addresses: [213.186.33.99]
Deploying a Ubuntu VM via Nutanix API
Step 1: Upload the OS image
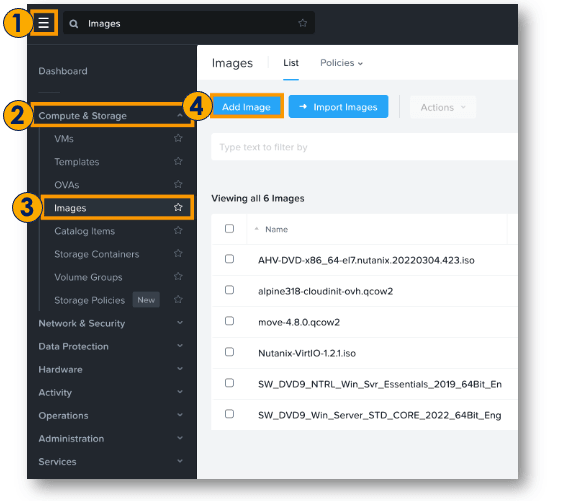
Once you connect to Prism Central:
- Select the main menu icon in the upper-left corner.
- Click
Compute & Storage.
- Select
Images.
- Click on the
Add Image button.
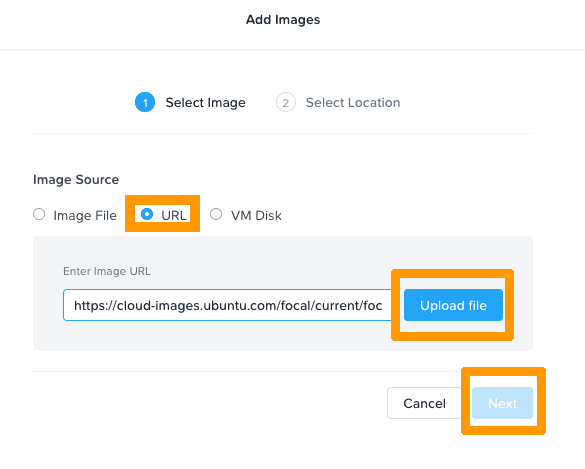
Select URL as the image source.
Paste the URL of a compatible cloud image. For example:
https://cloud-images.ubuntu.com/focal/current/focal-server-cloudimg-amd64.img
Click on Upload file, then Next.
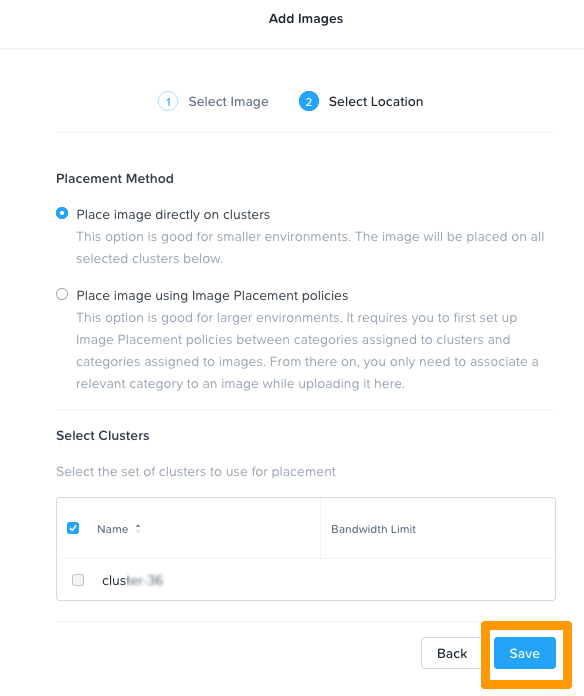
Select Place image directly on clusters, then select your cluster and Save.
To deploy the VM, you need the UUID of the "image" and the network.
Open a terminal and execute the following command:
curl -k -H Accept:application/json -H Content-Type:application/json -u "admin:PRISMADMINPASSWORD" -X POST https://fqdn-cluster:9440/api/nutanix/v3/images/list -d{} | jq .
Warning
NOTE: Remember to enter your actual password and FQDN as parameters.NOTE: The "jq ." command will provide a readable json.
{
  "api_version": "3.1",
  "metadata": {
    "total_matches": 2,
    "kind": "image",
    "length": 2,
    "offset": 0
  },
  "entities": [
    {
      "status": {
        "state": "COMPLETE",
        "execution_context": {
          "task_uuids": [
            "4a7d3ce8-8127-4556-b30e-cf7013e74c81"
          ]
        },
        "name": "ubuntu-focal",
        "resources": {
          "retrieval_uri_list": [
            "https://127.0.0.1:9440/api/nutanix/v3/images/3cd498a2-99da-49a2-bbdf-14c349036019/file"
          ],
          "current_cluster_reference_list": [
            {
              "kind": "cluster",
              "uuid": "0005cfe0-d7b6-81c8-6173-0c42a12333ee"
            }
          ],
          "architecture": "X86_64",
          "size_bytes": 2361393152,
          "image_type": "DISK_IMAGE",
          "source_uri": "https://cloud-images.ubuntu.com/focal/current/focal-server-cloudimg-amd64.img"
        }
      },
      "spec": {
        "name": "ubuntu-focal",
        "resources": {
          "image_type": "DISK_IMAGE",
          "source_uri": "https://cloud-images.ubuntu.com/focal/current/focal-server-cloudimg-amd64.img",
          "architecture": "X86_64"
        }
      },
      "metadata": {
        "last_update_time": "2021-11-08T15:12:31Z",
        "kind": "image",
        "uuid": "3cd498a2-99da-49a2-bbdf-14c349036019",
        "spec_version": 0,
        "creation_time": "2021-11-08T15:12:06Z",
        "categories_mapping": {},
        "owner_reference": {
          "kind": "user",
          "uuid": "00000000-0000-0000-0000-000000000000",
          "name": "admin"
        },
        "categories": {}
      }
    }
In the metadata, you can find the UUID, in this case: 3cd498a2-99da-49a2-bbdf-14c349036019.
Next, you need to find the correct subnet UUID. Execute the command below:
curl -k -H Accept:application/json -H Content-Type:application/json -u "admin:PRISMADMINPASSWORD" -X POST https://fqdn-cluster:9440/api/nutanix/v3/subnets/list -d{} | jq .
Warning
NOTE: Remember to use your actual password and FQDN as parameters.
{
  "api_version": "3.1",
  "metadata": {
    "total_matches": 2,
    "kind": "subnet",
    "length": 2,
    "offset": 0
  },
  "entities": [
    {
      "status": {
        "state": "COMPLETE",
        "name": "base",
        "resources": {
          "vswitch_name": "br0",
          "subnet_type": "VLAN",
          "virtual_switch_uuid": "4a18b6dd-be0a-4c05-bd81-59229e67ac46",
          "vlan_id": 0
        },
        "cluster_reference": {
          "kind": "cluster",
          "name": "cluster-36",
          "uuid": "0005cfe0-d7b6-81c8-6173-0c42a12333ee"
        }
      },
      "spec": {
        "name": "base",
        "resources": {
          "vswitch_name": "br0",
          "subnet_type": "VLAN",
          "virtual_switch_uuid": "4a18b6dd-be0a-4c05-bd81-59229e67ac46",
          "vlan_id": 0
        },
        "cluster_reference": {
          "kind": "cluster",
          "name": "cluster-36",
          "uuid": "0005cfe0-d7b6-81c8-6173-0c42a12333ee"
        }
      },
      "metadata": {
        "last_update_time": "2021-11-04T08:25:18Z",
        "kind": "subnet",
        "uuid": "ed156bb0-a838-4596-b427-4bbed1968864",
        "spec_version": 0,
        "creation_time": "2021-11-04T08:25:18Z",
        "categories_mapping": {},
        "categories": {}
      }
    }
In the metadata you can find the UUID, in this case: ed156bb0-a838-4596-b427-4bbed1968864.
Step 3: Create the necessary files
To deploy the VM you need two files: vm.json, describing the VM and the cloud-init.yaml configuration file which contains the user data such as password, network, etc.
Create the vm.json file:
{
  "spec": {
    "name": "YOURVMNAME",
    "resources": {
      "power_state": "ON",
      "num_vcpus_per_socket": 4,
      "num_sockets": 1,
      "memory_size_mib": 4096,
      "disk_list": [
        {
          "disk_size_mib": 41264,
          "device_properties": {
            "device_type": "DISK",
            "disk_address": {
              "device_index": 0,
              "adapter_type": "SATA"
            }
          },
          "data_source_reference": {
            "kind": "image",
            "uuid": "3cd498a2-99da-49a2-bbdf-14c349036019"
          }
        }
      ],
      "nic_list": [
        {
          "nic_type": "NORMAL_NIC",
          "ip_endpoint_list": [
            {
              "ip_type": "DHCP"
            }
          ],
          "subnet_reference": {
            "kind": "subnet",
            "name": "base",
            "uuid": "d1117d0b-015b-4007-a84b-37f196f1af4d"
          },
          "is_connected": true
        },
        {
          "nic_type": "NORMAL_NIC",
          "ip_endpoint_list": [
            {
              "ip_type": "DHCP"
            }
          ],
          "subnet_reference": {
            "kind": "subnet",
            "name": "base",
            "uuid": "ed156bb0-a838-4596-b427-4bbed1968864"
          },
          "is_connected": true
        }
      ],
      "guest_customization": {
        "cloud_init": {
          "user_data": "USERDATA"
        },
        "is_overridable": false
      }
    }
  },
  "api_version": "3.1.0",
  "metadata": {
    "kind": "vm"
  }
}
Warning
NOTE: You can adjust the settings with your values as needed: VM name, number of VCPUs, RAM size, disk size, etc.
Check data_source_reference to ensure the UUID is the actual UUID of your OS image:
"data_source_reference": {
            "kind": "image",
            "uuid": "3cd498a2-99da-49a2-bbdf-14c349036019"
                         }
Verify as well for your subnet UUID:
          "subnet_reference": {
            "kind": "subnet",
            "name": "base",
            "uuid": "ed156bb0-a838-4596-b427-4bbed1968864"
                              }
Now you have to create the cloud-init.yaml file. This file contains the "user data". When the system boots, these parameters such as users, package, files, etc. will be applied to the VM.
Below, find a template that you can amend with your values to create your individual VM.
Warning
NOTE:
- Change "hostname", "fqdn", "name", "passwd", "ssh-autorized-keys", and IP addresses with the desired values.
- This file will create the file for netplan, apply the configuration, and initiate a reboot.
- The password must be a hash value. You can generate it with the command below.
mkpasswd --method=SHA-512 --rounds=4096
#cloud-config
hostname: <yourhostname>
fqdn: <yourhostname.ovh.cloud>
users:
  - name: <yourusername>
    sudo: ['ALL=(ALL) NOPASSWD:ALL']
    groups: sudo
    shell: /bin/bash
    lock_passwd: false
    passwd: <yourhashpass>
    ssh-authorized-keys: <your public ssh key>
write_files:
   - path: /etc/netplan/50-cloud-init.yaml
     content: |
        network:
           version: 2
           renderer: networkd
           ethernets:
              ens3:
                addresses: [123.45.6.77/30]
                gateway4: 123.45.6.78
                nameservers:
                  addresses: [213.186.33.99]


runcmd:
   - netplan generate
   - netplan apply
# Optional: if you want to use access via password instead of SSH key, uncomment the next line
#  - sed -i s/PasswordAuthentication/#PasswordAuthentication/g /etc/ssh/sshd_config
   - reboot
Step 4: Create the VM
Transform the cloud-init.yaml into "base64" and put it into a variable:
USERDATA=$(base64 -w 0 cloud-init.yaml)
Then replace the chain "USERDATA" in vm.json with the value of the USERDATA variable in the vm.json file:
sed -i s/USERDATA/${USERDATA}/g vm.json
Finally, use a cURL request to register and power on the VM:
curl -k -H Accept:application/json -H Content-Type:application/json -u "admin:PRISMADMINPASSWORD" -X POST https://fqdn:9440/api/nutanix/v3/vms -d @vm.json | jq .
Warning
NOTE: You can now connect to your VM with SSH through the public IP address.
Go further
Browse all the Nutanix guides.
Browse the rest of the OVHcloud US documentation for guides on our other products and services.
Learn more about Nutanix on OVHcloud on the OVHcloud US website.
