
First steps with pre-installed applications
Learn the first steps for each pre-installed application image on our Public Cloud platform.
OVHcloud offers Public Cloud customers pre-installed application images for quick and easy deployment of applications with just a few clicks.
Requirements
- A Public Cloud instance in your OVHcloud account
Instructions
Common steps
Install your chosen pre-installed application
Install your chosen application on your Public Cloud instance using the OVHcloud Control Panel / API or the OpenStack Horizon / API.
In the OVHcloud Control Panel, during the Select an image step of creating an instance, use the Operating systems + Apps tab to choose an application.
Application login details
Once the instance has been installed with your chosen pre-installed application, you can retrieve your login details only via the OVHcloud API.
- Log in to the API console here.
- Then use this API call:
Parameters
- serviceName: This is your cloud project ID
- instanceId: This is the UUID of your instance
Let's Encrypt SSL
This section only applies to WordPress, Drupal, Joomla!, and PrestaShop installations. It will not work for other installations.
-
You must create or edit two
Arecords in the OVHcloud Control Panel which point to the IP address of your server. For example, if your domain name is "personaldomain.ovh" then you need to createArecords for:personaldomain.ovh
www.personaldomain.ovhContact the company with whom your domain is registered for assistance to set up your
Arecords.
- You may need to wait 24 hours before the two records propagate fully. You can always check it with mxtoolbox. If the IP for your domain is showing on mxtoolbox the same as your server's IP address then you can proceed to the next step.
-
SSH into your server with the CentOS user and execute the following commands to install Certbot.
WarningNOTE: Replace personaldomain.ovh in the commands with your own domain name.
-
Generate your SSL using Certbot (follow the on-screen instructions)
When asked about "Input the webroot," you need to enter something like "/var/www/wordpress". If you are installing Joomla!, you need to replace "wordpress" with "joomla".
Now you need to get Certbot to also place it into the ssl.conf file. To trigger this, enter:
When prompted, answer the first prompt with "1" and the second prompt with "1".
You should get the following output if your SSL has been generated:
cPanel
This section will explain the first steps specifically for the cPanel pre-installed image. Steps marked with * have a FAQ at the end of the steps.
-
Get your one-time login URL following these steps.
-
Click on the URL that is returned by the API.
InfoIf the link has expired already, please SSH into the instance using the CentOS user and execute the "whmlogin" command to generate a new one or just reinstall the instance.
- Read and accept the terms of cPanel.
- Provide your email and nameservers you wish to set on the server *.
- Set your root password which you will use the next time you log in to WHM *.
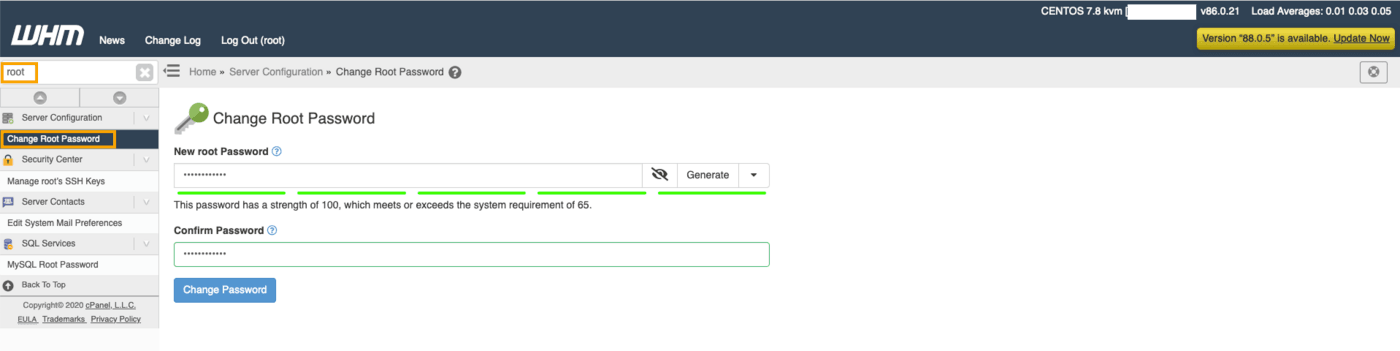
No further steps are necessary to complete the first configuration of this application.
Why set a root password?
WHM by default uses the root user for authentication and the one-time link allows access to complete the first setup and change the root password. Next time you log in to WHM you must use the root user and the password you have set.
Where is my license for cPanel?
OVHcloud currently does not provide any licensing for Public Cloud servers other than Windows licensing. Customers must purchase a license from a third-party vendor for cPanel. For this, we recommend cPanel directly.
Plesk
This section will explain the first steps specifically for the Plesk pre-installed image. Steps marked with * have a FAQ at the end of the steps.
- Get your application access URL by following these steps.
- Click on the URL that is returned by the API.
- Log in using the username and password returned by the API.
- Once logged in, Plesk will ask you to provide:
a) Your contact information
b) A new password for the "admin" user which you will use for login on the Plesk panel
c) License information*
d) Read and accept their end-user license agreement
No further steps are necessary to complete the first configuration of this application.
Where is my license for Plesk?
OVHcloud at the moment does not provide any licensing for Public Cloud servers other than Windows licensing. Customers must purchase a license from a third-party vendor for Plesk. For this, we recommend Plesk directly.
Docker
This section will explain the first steps specifically for the Docker pre-installed image.
- SSH into the server using the CentOS user.
- Check that Docker is working using the "docker run hello-world" command.
No further steps are necessary to complete the first configuration of this application.
Go further
Browse all the Compute guides.
Browse the rest of the OVHcloud US documentation for guides on our other products and services.
Learn more about Public Cloud Compute on the OVHcloud US website.
If you need training or technical assistance to implement our solutions, contact your sales representative or click on this link to get a quote and ask our Professional Services experts for a custom analysis of your project.